DataOps Docker Runner Upgrade
Overview
The following is an overview of the upgrade process:
- Stage 1 Install the new runner with
new
agent_tag - Stage 2 Create a feature branch and change your configuration to use this new agent tag and run pipeline tests
- Stage 3 Merge this feature branch to dev and run pipeline tests. Continue until you are happy with all testing and then merge to main
- Stage 4 Once you are fully happy, docker rm the old agent and you are done
We are using main as our production branch, yours may be named master.
You will need permission to run Docker commands and modify root-owned files using sudo.
Installing the new runner with new agent_tag
Step 1 - Export settings for upgrade
These steps are similar to installing a runner with some upgrade-specific tweaks.
To make running commands consistent, copy and modify the following environment variables and export them to your command line environment.
Copy and run in your terminal:
export IMAGE_TAG='latest'  # DockerHub image tag and the version of the runner
export IMAGE=dataopslive/dataops-runner:$IMAGE_TAG  # DockerHub repo path and tag
export AGENT_TAG=<YOUR_RUNNER_AGENT_TAG>  # DataOps runner tag
export AGENT_NAME=$AGENT_TAG-$IMAGE_TAG  # Runner full name
export DATAOPS_URL=https://app.dataops.live/  # Data product platform
export REGISTRATION_TOKEN=<YOUR_REGISTRATION_TOKEN>  # Token from Settings → CI/CD → Runners
You can use the
IMAGE_TAGvaluelatest-nextto enable additional features not yet inlatest. See Platform release notes for more info.
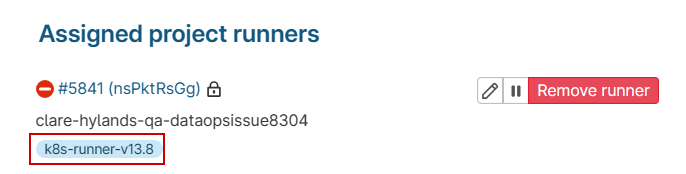
AGENT_TAGTo upgrade without impacting other branches/environments, use a different
AGENT_TAG to the existing .agent_tag's.
You can see agent tags in Settings → CI/CD → Runners and look like blue pills.
Step 2 - Register new runner
Register the new runner using the new runner image:
docker run --rm -v /srv/dataops-runner-$AGENT_NAME/config:/etc/gitlab-runner $IMAGE register --non-interactive --executor "docker" --docker-image dataopslive/dataops-utils-orchestrator:5-stable --url "$DATAOPS_URL" --registration-token "$REGISTRATION_TOKEN" --description "$AGENT_NAME" --tag-list "$AGENT_TAG" --run-untagged="false" --locked="true"
This new runner is now visible in Settings → CI/CD → Runners.
Step 3 - Update new runner configuration
Update the new runner configuration file generated as a result of the registration step:
sudo sed -i 's/concurrent = .*/concurrent = 8/' /srv/dataops-runner-$AGENT_NAME/config/config.toml
sudo sed -i 's/check_interval = .*/check_interval = 10/' /srv/dataops-runner-$AGENT_NAME/config/config.toml
sudo sed -i  's/    volumes =.*$/    volumes = ["\/app:\/local_config:rw","\/agent_cache:\/agent_cache:rw", "\/secrets:\/secrets:ro"]/' /srv/dataops-runner-$AGENT_NAME/config/config.toml
If you added any custom config for the old runner, you will have to manually update the new runner config to include it.
If you are unsure, check /srv/dataops-runner-<old_agent_name>/config/config.toml, then update
/srv/dataops-runner-$AGENT_NAME/config/config.toml as necessary.
Step 4 - Start new runner
Start the new runner alongside the old runner:
docker run -d --name $AGENT_NAME --restart always -v /srv/dataops-runner-$AGENT_NAME/config:/etc/gitlab-runner -v /var/run/docker.sock:/var/run/docker.sock $IMAGE
Success! The new runner is deployed and can pick up jobs with AGENT_TAG tag.
Note that this is in parallel with the existing runner.
Updating the agent_tag on feature branch
Step 1 - Create a new feature branch
-
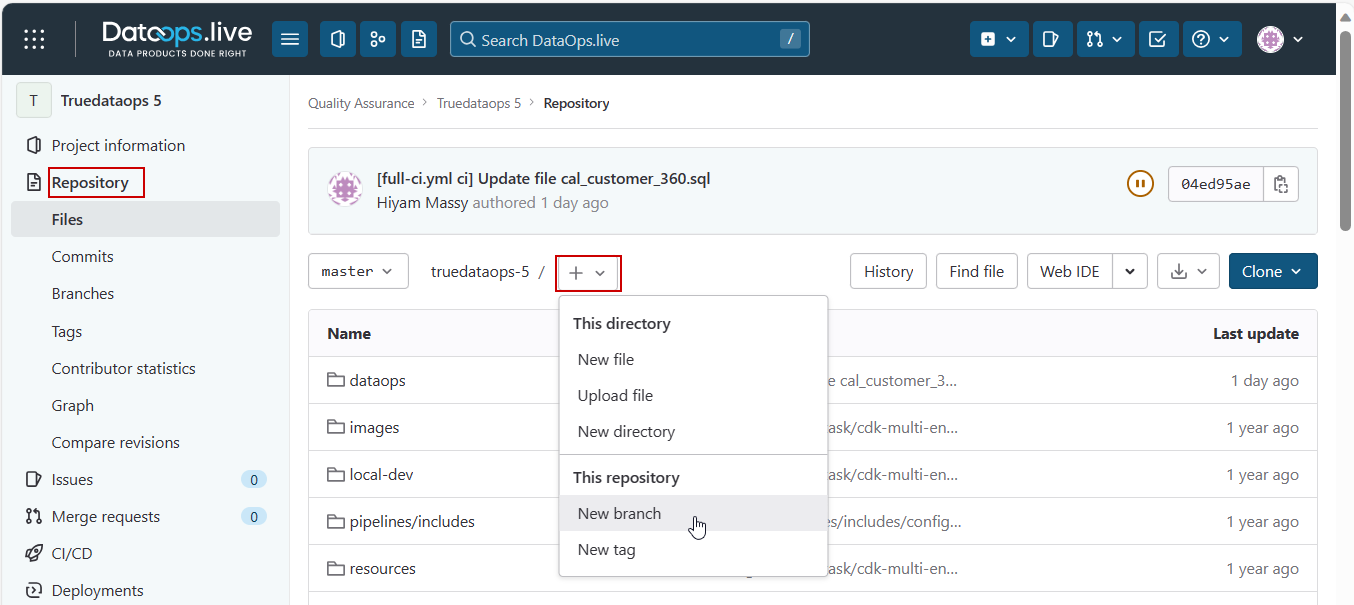
From the Project → Repository view, click the plus (+) dropdown button and select New branch.
-
In the New Branch view, enter a new branch name and ensure you are branching from your dev branch.
There are several ways to create a new branch.
Step 2 - Update agent tag
-
Ensure you are on your new branch.
-
Navigate to the
.ymlfile where you manage agent tags. In a standard DataOps project, this is usually located atpipelines/includes/config/agent_tag.yml -
From the drop-down list on to right of the file, select Edit.
-
Update the tag to the
AGENT_TAGused during the new runner install.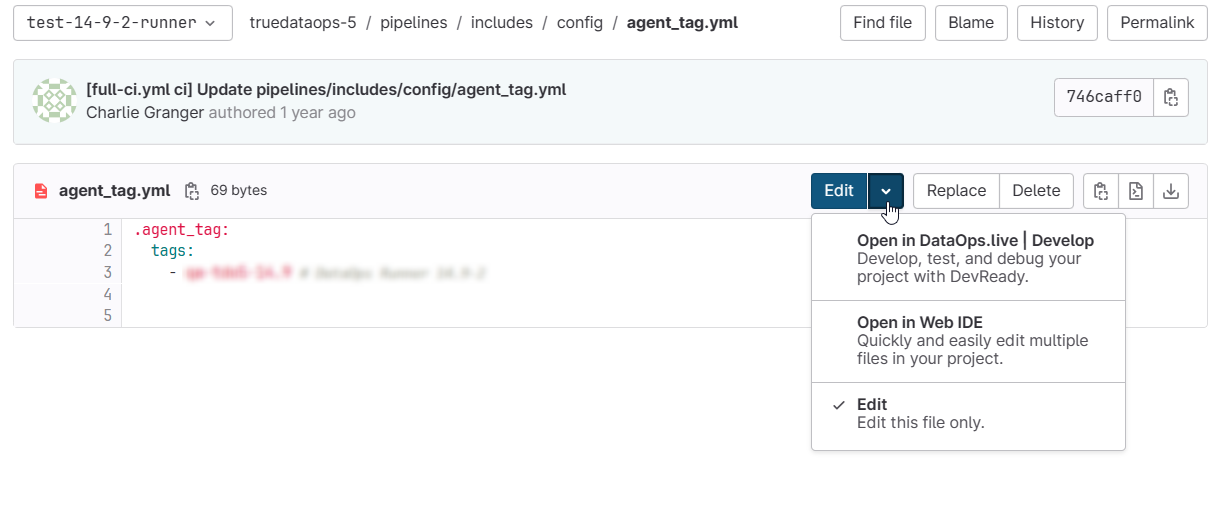
-
Click Commit changes to update your feature branch.
Step 3 - Monitor testing
When you commit the agent tag change, you will need to trigger your pipeline and all jobs will use the new runner.
-
Go to your Project → CI/CD → Pipelines.

-
Select your feature branch to run.
-
Select the pipeline type that will run tests.
-
Use the Run pipeline button.
This will start a pipeline and you can monitor the progress of the new runner.
To confirm that the new runner is being used:
-
Select any job from the pipeline just triggered.
-
View its details and logs.
-
At the head of the logs, you will find your
AGENT_TAG.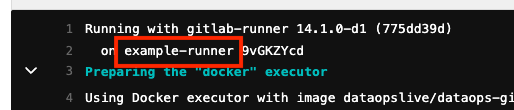
When you are happy that jobs are performing well e.g. tests are passing and transformations are happening successfully, then continue to the next step.
Merging and testing
Step 1 - Merge the feature branch into dev branch
Once your checks are complete on the feature branch, it is time to merge the agent tag changes into the dev branch.
-
Create a merge request from Project → Merge requests → New merge request.
noteRecent changes to a branch may also create a notification and helper Create merge request button, which you can also use.

-
Set the source and target branches and click Compare branches and continue.
-
In the New merge request view, enter a description, assignee, reviewer, etc.
-
Click the Create merge request button.
-
Review and approve the merge request.
-
Merge the request into dev.
Now trigger a dev pipeline run to test the runner in dev. Go to your Project → CI/CD → Pipelines and use the Run pipeline button. Full instructions are on Step 3 - Monitor testing instructions to trigger the pipeline.
When you are happy that jobs are performing well e.g. tests are passing and transformations are happening successfully, then continue to the next step.
Step 2 - Merge the dev branch into main
Once your checks are complete on the dev branch, it is time to merge the agent tag change into the main branch.
Follow the instructions in Step 1 - Merge feature branch into dev branch, changing the source branch to dev and target branch to main.
At this point the old runner is no longer running jobs, however, don't remove it just yet because it's your fail back if anything goes wrong in main, revert the agent tag change and it should continue on the old version.
Cleaning up
Step 1 - Stop and remove the old runner
Export the helper variables:
export OLD_AGENT_NAME=<YOUR_OLD_RUNNER_AGENT_NAME>
Stop and remove the old runner:
docker stop $OLD_AGENT_NAME
docker rm $OLD_AGENT_NAME
Step 2 - Remove image
Clean up old images using docker rmi IMAGE:TAG, where IMAGE:TAG is the old
runner image stopped and removed in Step 3.
docker rmi dataopslive/dataops-runner:v13.8.0
Installing a runner without an IMAGE_TAG will result in Docker using the
latest tag instead. In that case, you will need to take care in identifying
the correct image to remove.
Updating an old DataOps Runner to the latest version
To update an outdated DataOps Runner to the latest version, you need to follow a few steps for a smooth transition. Use the below script to do this efficiently.
Just make sure to fill in some variables in the script, similar to what is explained in step 1 about how to export settings for upgrade:
export IMAGE_TAG='latest'  # DockerHub image tag and the version of the runner
export AGENT_TAG=<YOUR_RUNNER_AGENT_TAG>  # DataOps runner tag
docker stop $AGENT_TAG-$IMAGE_TAG
docker rm $AGENT_TAG-$IMAGE_TAG
docker pull dataopslive/dataops-runner:$IMAGE_TAG
export IMAGE=dataopslive/dataops-runner:$IMAGE_TAG  # DockerHub repo path and tag
export AGENT_NAME=$AGENT_TAG-$IMAGE_TAG  # Runner full name
export DATAOPS_URL=https://app.dataops.live/  # Data product platform
export REGISTRATION_TOKEN=<YOUR_REGISTRATION_TOKEN>  # Token from Settings → CI/CD → Runners
docker run --rm -v /srv/dataops-runner-$AGENT_NAME/config:/etc/gitlab-runner $IMAGE register --non-interactive --executor "docker" --docker-image dataopslive/dataops-utils-orchestrator:5-stable --url "$DATAOPS_URL" --registration-token "$REGISTRATION_TOKEN" --description "$AGENT_NAME" --tag-list "$AGENT_TAG" --run-untagged="false" --locked="true"
docker run -d --name $AGENT_NAME --restart always -v /srv/dataops-runner-$AGENT_NAME/config:/etc/gitlab-runner -v /var/run/docker.sock:/var/run/docker.sock $IMAGE
By following these steps, you'll update your DataOps Runner to the latest version, ensuring it's ready to perform tasks on our data product platform.
This process also protects your runner's critical configurations, including secrets, volumes, and the config.toml file, preserving the integrity of your existing setup.