DataOps Kubernetes Runner Installation
Step 1 - Secrets and volumes
You will need Kubernetes secrets and persistent volume claims created before installing the runner Helm chart.
Secrets
Docker registry
As of Helm chart version 1.1.7, the Docker registry secret is automatically created by the Helm chart. You no longer need to manually create this secret.
The DataOps runner requires access to pull images from the DataOps Docker registry. The Helm chart will automatically create the necessary
image pull secret with the name <release-name>-docker-creds.
These examples install the runner in the default Kubernetes namespace.
DataOps runner registration token
You will need a secret to hold the runner registration token.
The registration token is generated automatically in DataOps.live and is used to link together the runner you are about to create with your specific DataOps Project or Group.
The scope of registration tokens is to the project or group you obtained them from.
Follow these steps to obtain your registration token:
-
Connect to the data product platform.
-
Open the group (preferred) or project you want to create the runner for.
-
At the group level, follow the below steps:
-
Click CI/CD → Runners. Choosing the group makes the runner available to all projects in that group.
-
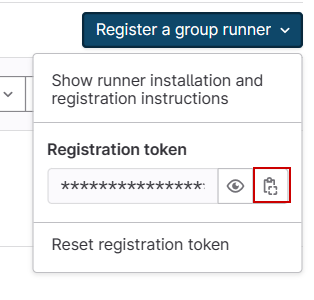
Expand Register a group runner on the top right and copy the registration token.
-
-
At the project level, follow the below steps:
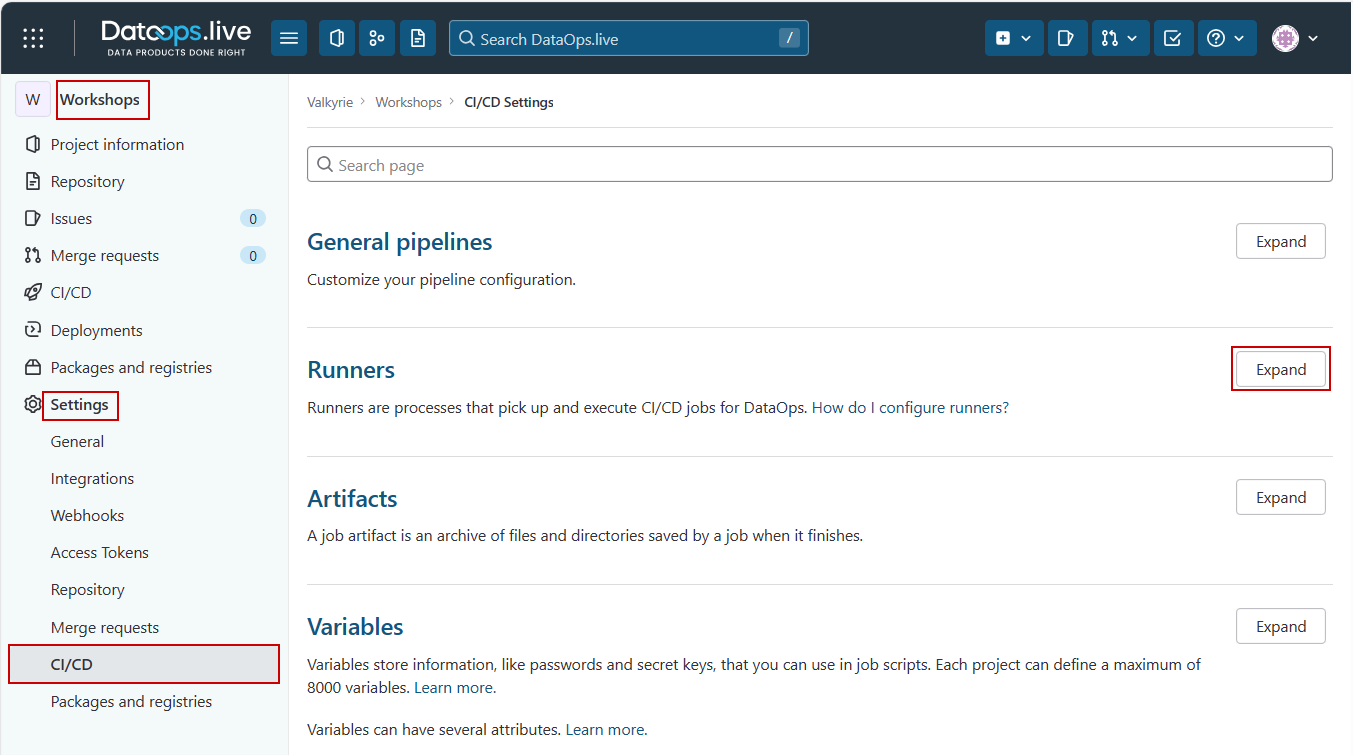
- Click Settings → CI/CD.
- Find the Runners section and click Expand.
- Copy the registration token from inside the Project runners section under Set up a project runner for a project.

- Create the secret in your cluster and replace
REGISTRY_TOKENwith the copied token:
kubectl create secret generic reg-token \
  --from-literal=runner-registration-token=REGISTRY_TOKEN \
  --from-literal=runner-token=""
runner-token="" must remain on the command line as an empty string. The actual value is automatically populated
during registration.
Volumes
We recommend using storage classes to create your persistent volume dynamically. In this configuration, you will need a persistent volume claim (PVC) that is then used to mount a path for the runner.
Avoid special characters like . in PVC names for best compatibility.
- Azure Kubernetes Service
- AWS Elastic Kubernetes Service
Storage class for Azure File Storage:
kind: StorageClass
apiVersion: storage.k8s.io/v1
metadata:
  name: afs-sc
provisioner: file.csi.azure.com # replace with "kubernetes.io/azure-file" if aks version is less than 1.21
allowVolumeExpansion: true
mountOptions:
  - dir_mode=0777
  - file_mode=0777
  - uid=0
  - gid=0
  - mfsymlinks
  - cache=strict
  - actimeo=30
parameters:
  skuName: Premium_LRS
For example, a Persistent Volume Claim using the previous Azure StorageClass:
apiVersion: v1
kind: PersistentVolumeClaim
metadata:
  name: pipeline-cache-dataops-live
spec:
  accessModes:
    - ReadWriteOnce
  storageClassName: afs-sc
  resources:
    requests:
      storage: 5Gi
Learn more about Azure Dynamic Storage related to Kubernetes in the Microsoft docs.
Storage class for EFS:
kind: StorageClass
apiVersion: storage.k8s.io/v1
metadata:
  name: efs-sc
provisioner: efs.csi.aws.com
parameters:
  provisioningMode: efs-ap
  fileSystemId: <efs_filesystem_id> # Replace with the id of your elastic file system
  directoryPerms: "700"
  gidRangeStart: "1000" # optional
  gidRangeEnd: "2000" # optional
  basePath: "/dynamic_provisioning" # optional
For example, a Persistent Volume Claim using the previous AWS StorageClass:
apiVersion: v1
kind: PersistentVolumeClaim
metadata:
  name: pipeline-cache-dataops-live
spec:
  accessModes:
    - ReadWriteOnce
  storageClassName: efs-sc
  resources:
    requests:
      storage: 5Gi
Learn more about AWS storage related to Kubernetes in the AWS user guide.
Alternative: Automatic PVC creation
As of Helm chart version 1.1.7, after creating a Storage Class you can skip the manual PVC creation and let the Helm chart handle it using the setupStorage configuration block within the dataops-values.yml file (see Step 3):
setupStorage:
  claimName: "pipeline-cache-dataops-live"
  accessModes:
    - ReadWriteOnce
  storageClass: "efs-sc"  # The name of the StorageClass previously created
  size: "5Gi"  # Optional, defaults to 5Gi
This configuration will automatically create a PVC with proper labels and metadata, eliminating the need to manually create and manage PVCs.
Step 2 - Add DataOps Helm chart repository
To install the DataOps Runner, you will need access to the Helm chart. Helm charts package templated Kubernetes manifests so they can be configured to fit customer environments.
Install the repo:
helm repo add dataops https://charts.dataops.live
Test the runner chart is available for installation:
helm search repo dataops
Update your local repository index with the latest versions of the chart:
helm repo update
Step 3 - Configure and install the runner
Create a new file named dataops-values.yml that will configure the DataOps runner
Helm chart for your environment:
image:
  # DataOps Runner version to use.
  tag: latest

# Main runner configuration
imagePullPolicy: Always
runners:
  # Equivalent to runner config.toml file contents.
  # https://docs.gitlab.com/runner/configuration/advanced-configuration.html
  config: |
    [[runners]]
      [runners.kubernetes]
        pull_policy = "always"
        namespace = "default"
        [[runners.kubernetes.volumes.pvc]]
          name = "pipeline-cache-dataops-live"
          mount_path = "/agent_cache"
  # Name of runner, used to identify in the cluster.
  name: <AGENT_NAME>
  # Tag used in jobs to specify this runner.
  tags: <AGENT_TAG>
  # Registration token secret name created earlier.
  secret: reg-token

# Optional: Automatic PVC creation
setupStorage:
  claimName: "pipeline-cache-dataops-live"
  accessModes:
    - ReadWriteOnce
  storageClass: "efs-sc"  # The name of the StorageClass previously created
  size: "5Gi"  # Optional, defaults to 5Gi
You can choose between two approaches for storage:
- Manual PVC creation (traditional approach): Create PVCs manually as shown in Step 1, then reference them in the
runners.configsection - Automatic PVC creation (new in v1.1.7): Use the
setupStorageconfiguration block to let the Helm chart create the PVC automatically
Configure runner name and agent tag
First, review the config block and ensure you update the following settings in dataops-values.yml:
- The
<AGENT_TAG>- modify this value to reflect your runner's tag. - The
<AGENT_NAME>- modify this value to reflect your runner's full name.
Adjust pull policies
Pull policies control how an image is fetched and updated by the runner. By default, the runner and orchestrators have an image pull policy of IfNotPresent and if-not-present, respectively, which may cause some undesirable behavior when new versions are released.
- Set
imagePullPolicytoAlwaysfor an up-to-date runner. - Set
pull_policytoalwaysfor up-to-date orchestrators.
Doing so will force a pull where the runner always looks for and downloads the latest images. Read more about image pull policy and default image pull policy in the Kubernetes documentation.
Set namespace and persistent volumes
Finally, in your dataops-values.yml adjust the following:
- The
namespaceto set the namespace to run Kubernetes jobs in. - The
[[runners.kubernetes.volumes.pvc]]to identify the PVC configuration for orchestrators.
Note that a PVC is required, with a mount path /agent_cache.
Discover the specific configuration syntax for specifying your chosen volume storage from the
Kubernetes executor volume types documentation.
As of Helm chart version 1.1.7, you can also configure persistent volumes directly in the Helm chart using the setupStorage configuration block, which provides more flexibility for storage configuration.
Install the Kubernetes runner
Install the runner using your chart values:
helm upgrade --install runner dataops/dataops-runner -f dataops-values.yml
Or, if you are installing in a specific namespace, use:
helm upgrade --install runner dataops/dataops-runner -f dataops-values.yml --namespace <namespace>
DataOps runner chart installed! 🎉
Checking the runner's health
You can check if your runner is still contacting the data product platform from your group or object CI/CD page. To do this:
-
Navigate to your group or project CI/CD settings and expand the Runners section.
Depending on how you have registered your runner, it will show under one or more of the available runners lists.
-
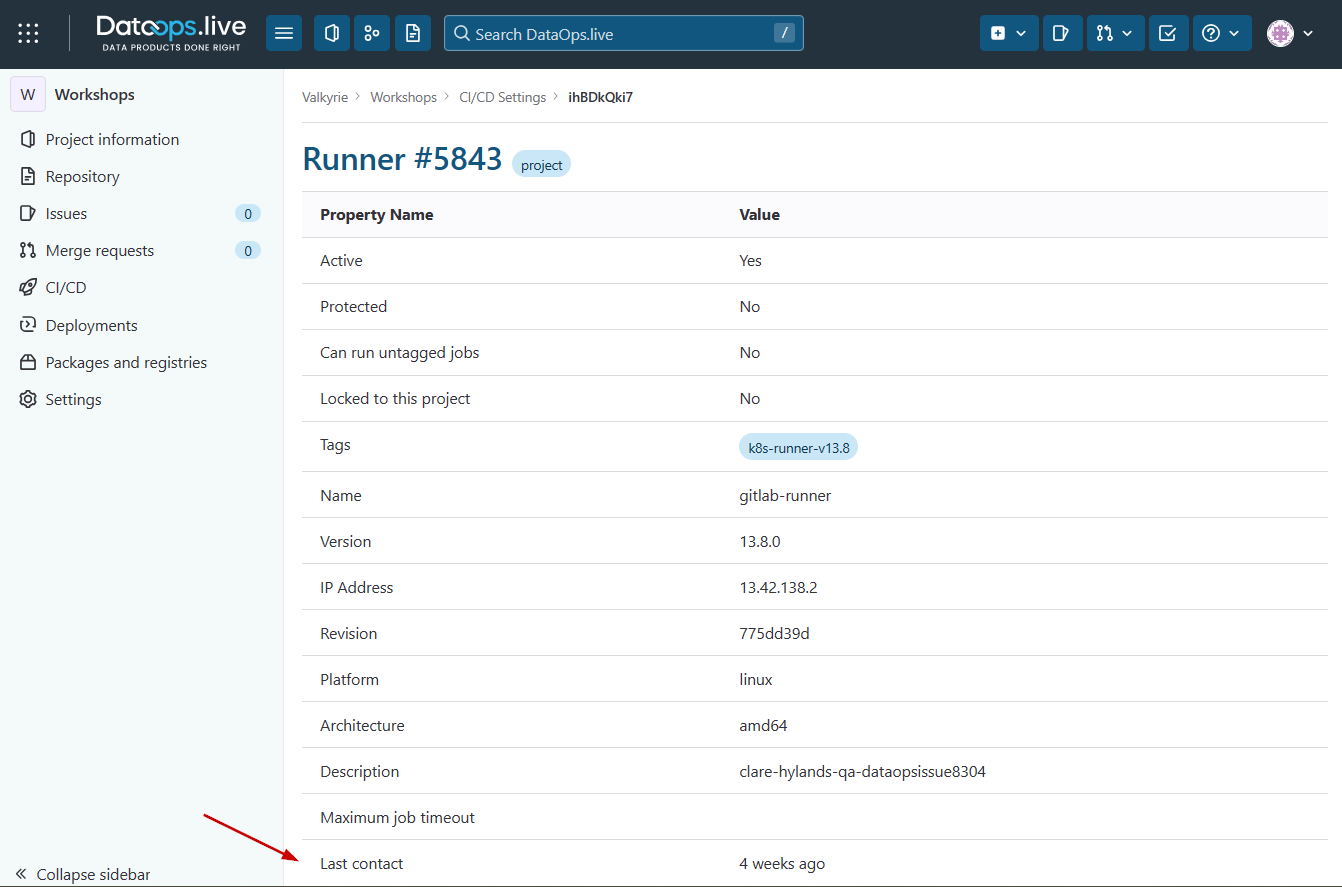
Find your runner on this page and click the runner ID.

This opens a detailed page where you can see more information about your runner. The Last contact field shows whether your runner is healthy.