Analytical Data Product Quickstart
DataOps.live Create simplifies the creation process of data products through an intuitive user interface (UI). It eases model building and testing through the powerful DataOps development environment (DataOps.live Develop). The creator helps you create valuable insights and actionable information from your Snowflake data.
Data products created by the data product creator are the output of DataOps pipelines generated automatically at the end of the process. Building a data product involves data quality, data governance, reproducibility, scalability, and maintainability. DataOps.live achieves this by using robust engineering practices, version control, testing, automation, and collaboration methodologies, all enhanced by the powerful SOLE and MATE engines and the orchestration capabilities.
Running DataOps pipelines results in building data products, updating them, and refreshing their data to create different versions of the data products once there are any changes. The DataOps.live data product platform offers a data product registry and metadata objects managed within the platform infrastructure at a group or project level to manage data products.
Follow the below steps to build data products and share them with other teams so that they enrich and add their values before republishing. This helps consumers understand data, uncover patterns, and make smart decisions.
Creating the data product
In this example, let's focus on collecting customer order information, with the aim of monitoring and analyzing these orders to ensure timely processing. Using an AI personal assistant, you will:
- Automatically generate tests to verify that each order corresponds to a customer.
- Investigate and resolve any issue with the help of the assistant.
- Keep refining the product and generating new models till you achieve the final version.
This product's final version will provide insights into order delivery performance, including on-time delivery rate and average delivery delay.
1. Access the data product creator
To initiate the process:
-
Make sure you have completed the prerequisites.
-
(Only for existing customers) If you already have runners installed on your premises or private cloud and want to use DataOps.Live Create with them, just add the tag
dataops-runnerto the registered runner you want to use.For more information about editing tags, see How to Update Tags on Existing Runners.
-
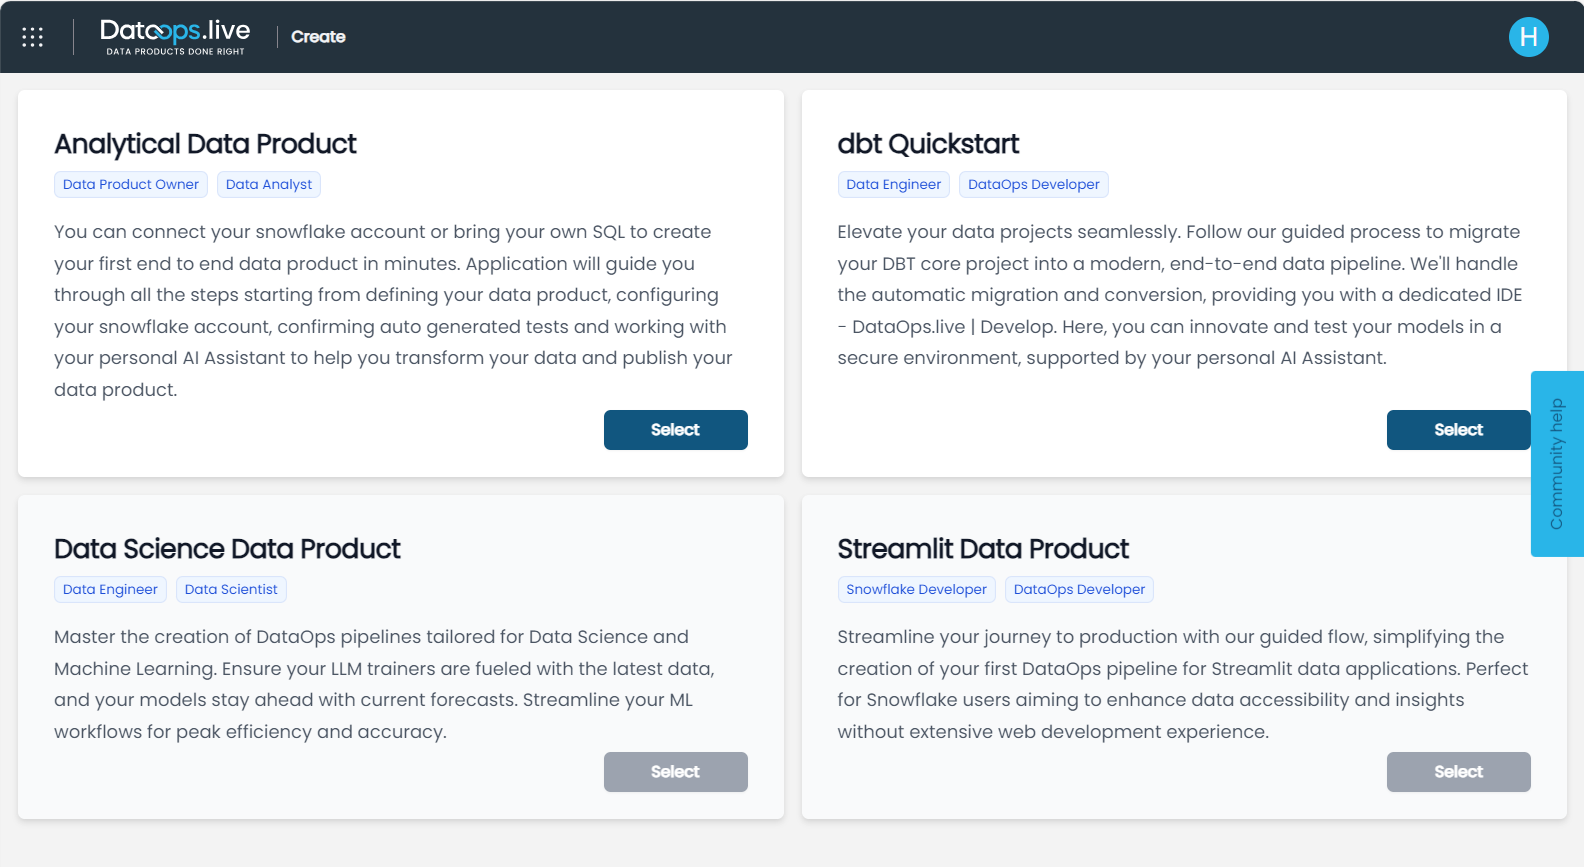
Once authenticated, select Analytical Data product and follow the steps in the stepper to create your data product.
2. Define data product properties
Begin by defining the purpose and objectives of your data product. Consider what insights or solutions you aim to derive from the data and how it will benefit your organization.
-
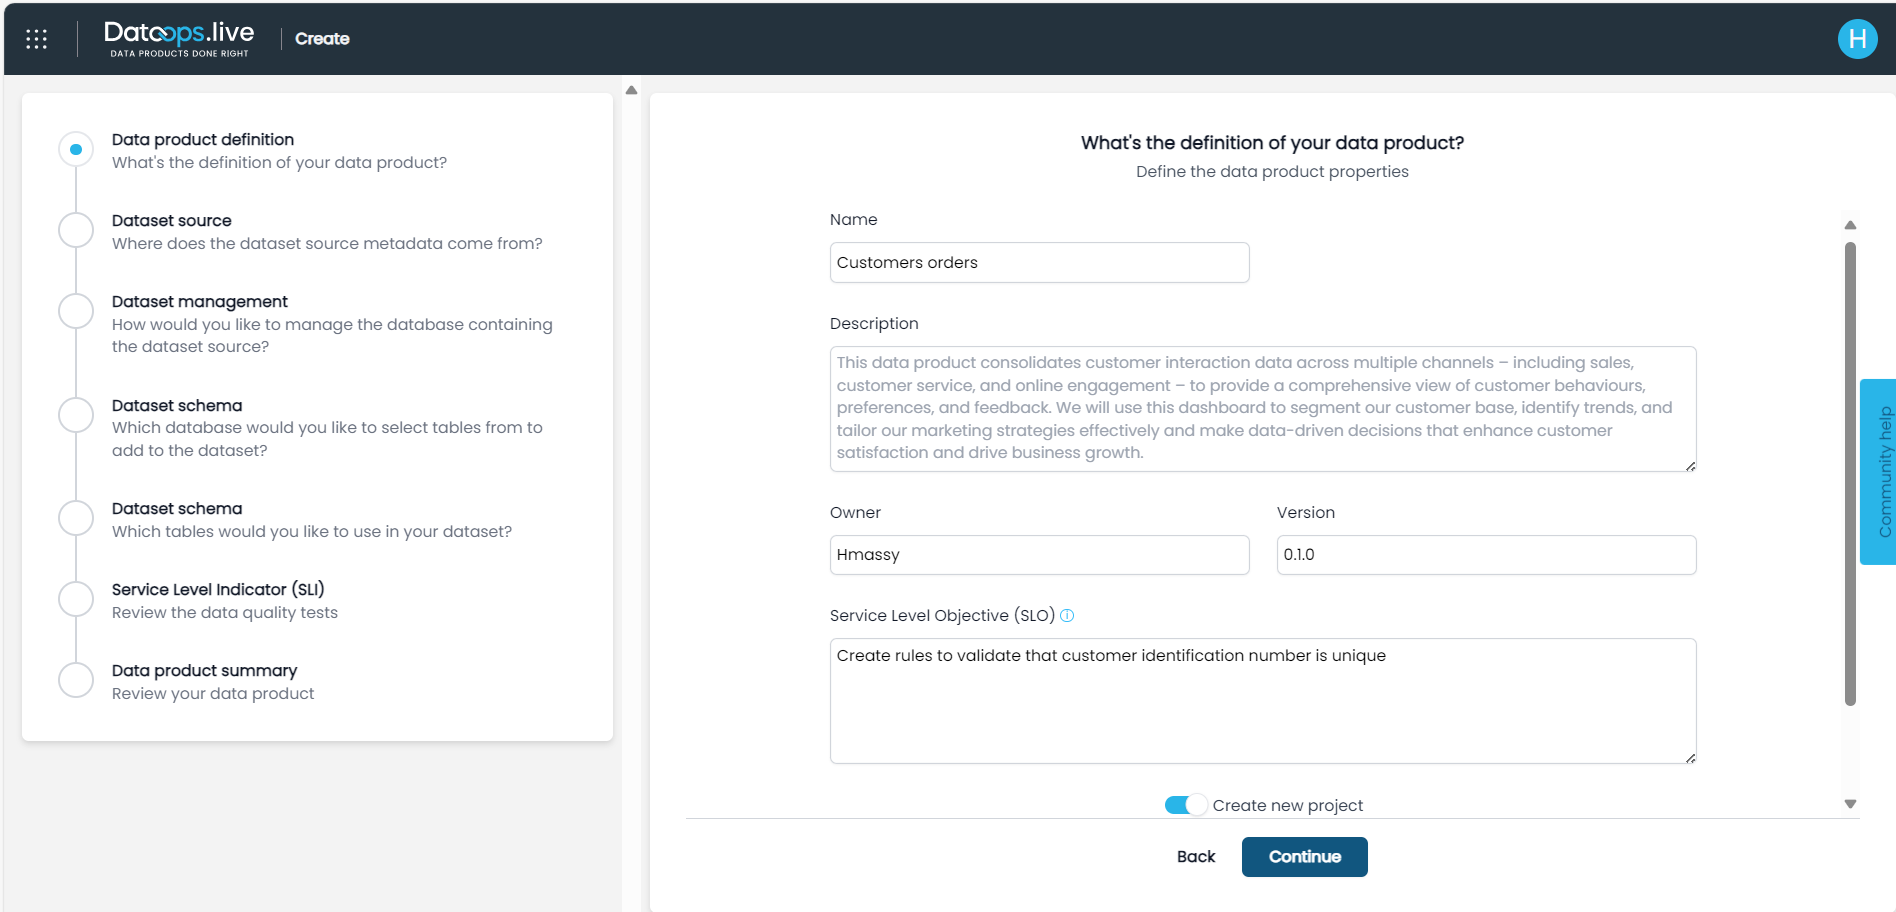
Enter the data product properties in the corresponding fields.
-
Name: Avoid using spaces and special characters.
-
Description: Provide a detailed description of the data product, including its purpose, scope, objectives, target audience, data sources, transformation processes, output formats, and intended outcomes. The description should cover all aspects necessary to understand and effectively use the data product for its intended purposes. Also, the business problem you describe here will help the AI-powered copilot to suggest transformational models to solve the problem. See Building Models.
-
Owner: Define the team member who owns the complete lifecycle of a data product, from requirements to monitoring.
-
Version: Versions help track changes over time, allowing users to manage and revert to previous versions if needed.
-
Service Level Objectives (SLO): This includes extra quality tests you can add to check specific aspects of the data product's performance and reliability to meet users's expectations and needs. Generative AI will then generate meaningful tests based on this SLO description, provided it is precise and includes clear details. Default tests are also generated based on the constraints defined on the database columns you select in the subsequent step.
-
Create new project: Enabled by default. Toggle on or off to decide whether to create the data product in a new project or an existing one on the DataOps.live platform.
It is recommended to start with a new project as the app functions optimally with a project structure similar to the template project. Alternatively, you can filter existing groups and projects. If opting for an existing project, make sure it was created using Create to ensure compatibility with the data product template.
-
DataOps group: Enter a group name or start typing the name of an existing Dataops group to display a list you can choose from. The group is contained within a customer account and it has projects and subgroups.
-
New project name: It is automatically filled with the product name. You can enter a new name if needed, following the naming conventions.
-
-
Click Continue.
3. Define dataset source
You can import the metadata of the dataset that forms the basis of your data product from an existing Snowflake account or by using a Data Definition Language (DDL) file.
Choose the data product dataset source
-
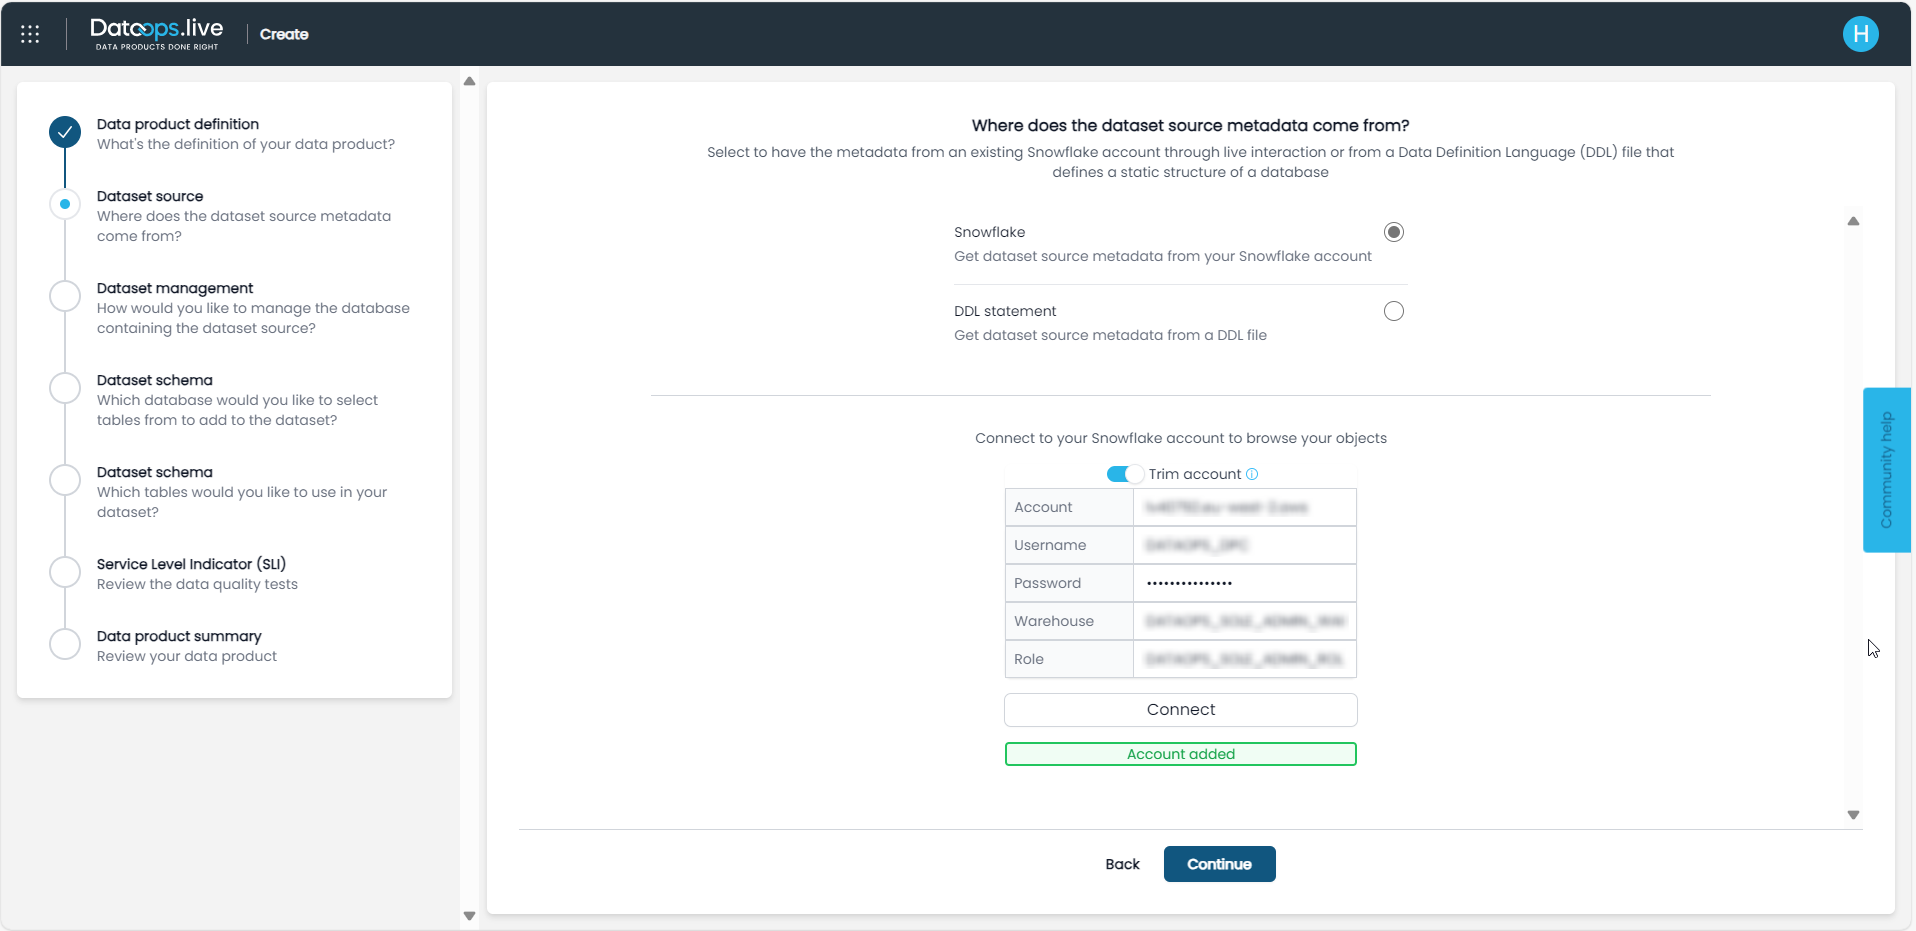
Select the source from which you'll gather dataset metadata.
You can create data products using existing data in a Snowflake database or generate source models based on a DDL file and create a schema in Snowflake.
-
Depending on your dataset source:
-
Enter your Snowflake login information and click Connect.
You must have a role with enough permissions on the Snowflake database. Otherwise, the pipeline will fail.
-
Upload your DDL file or enter the DDL statements separated by semicolons before you connect to your target Snowflake account.
-
-
Click Continue.
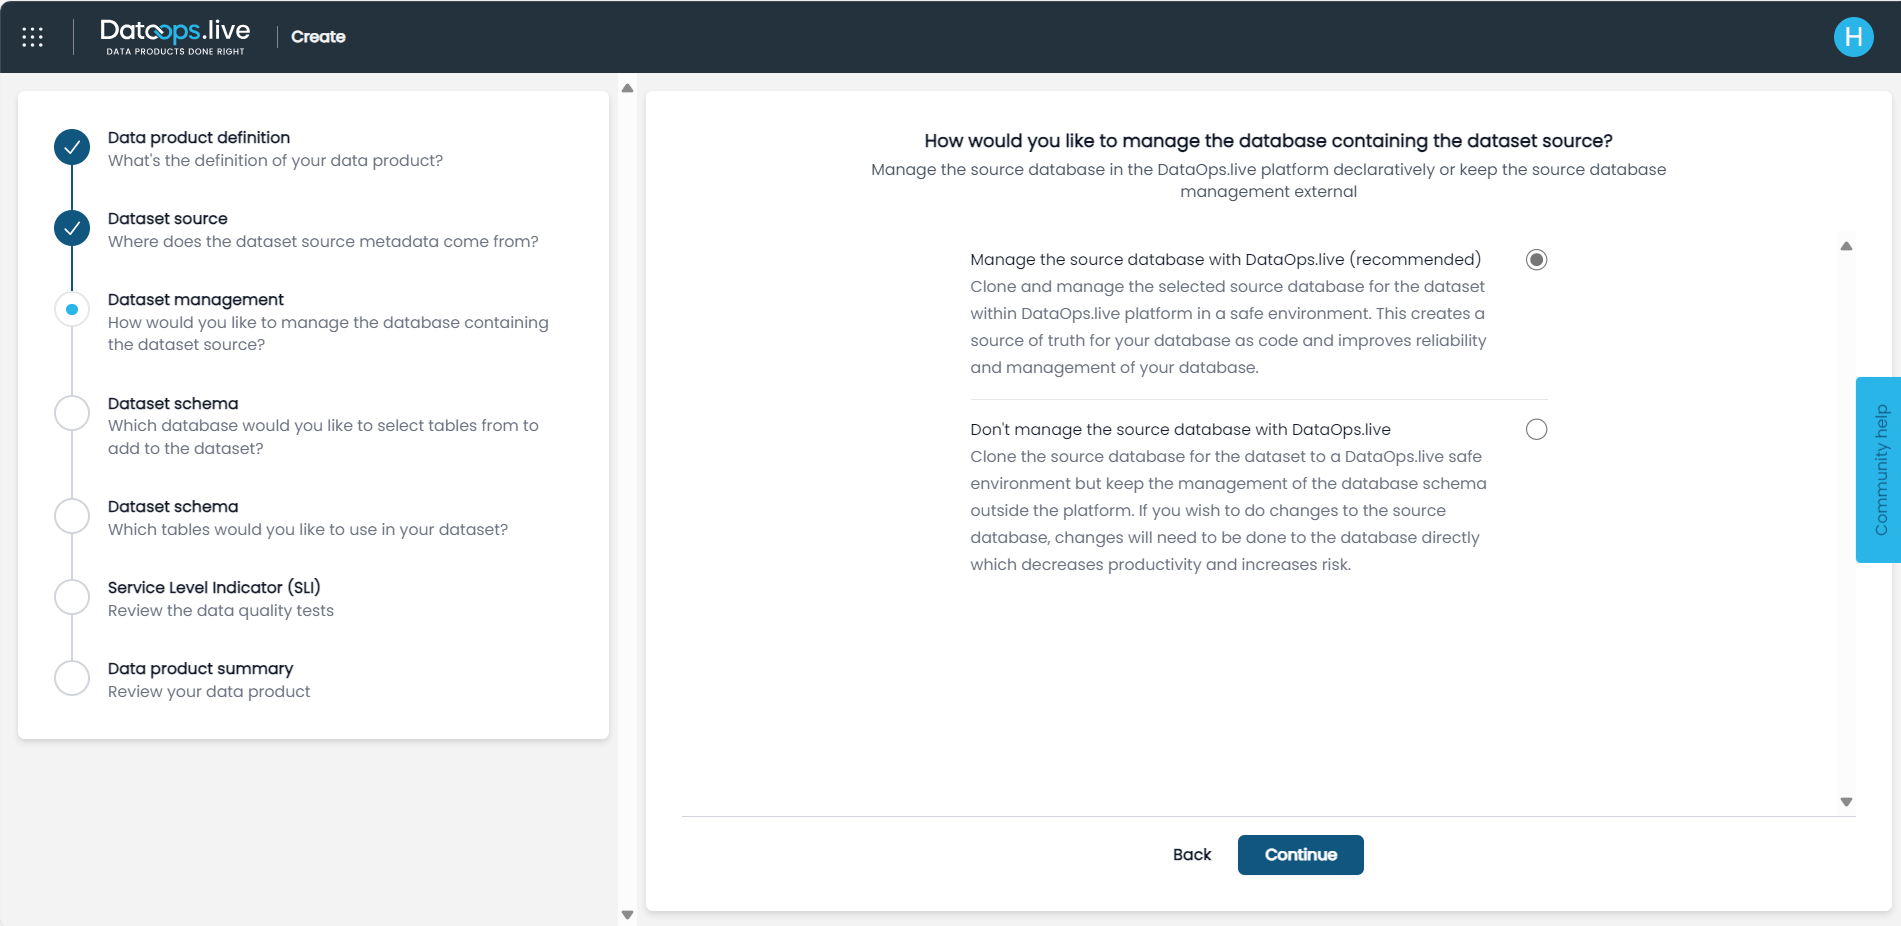
Choose the dataset management approach
Decide how you want to handle the database containing the data product dataset source. Specify if you want to manage the database and its source within the DataOps.live platform or manage the source outside the platform.
Managing the database containing the dataset source within the DataOps.live platform brings significant benefits. You can easily generate all necessary configuration files and perform development in a safe environment.
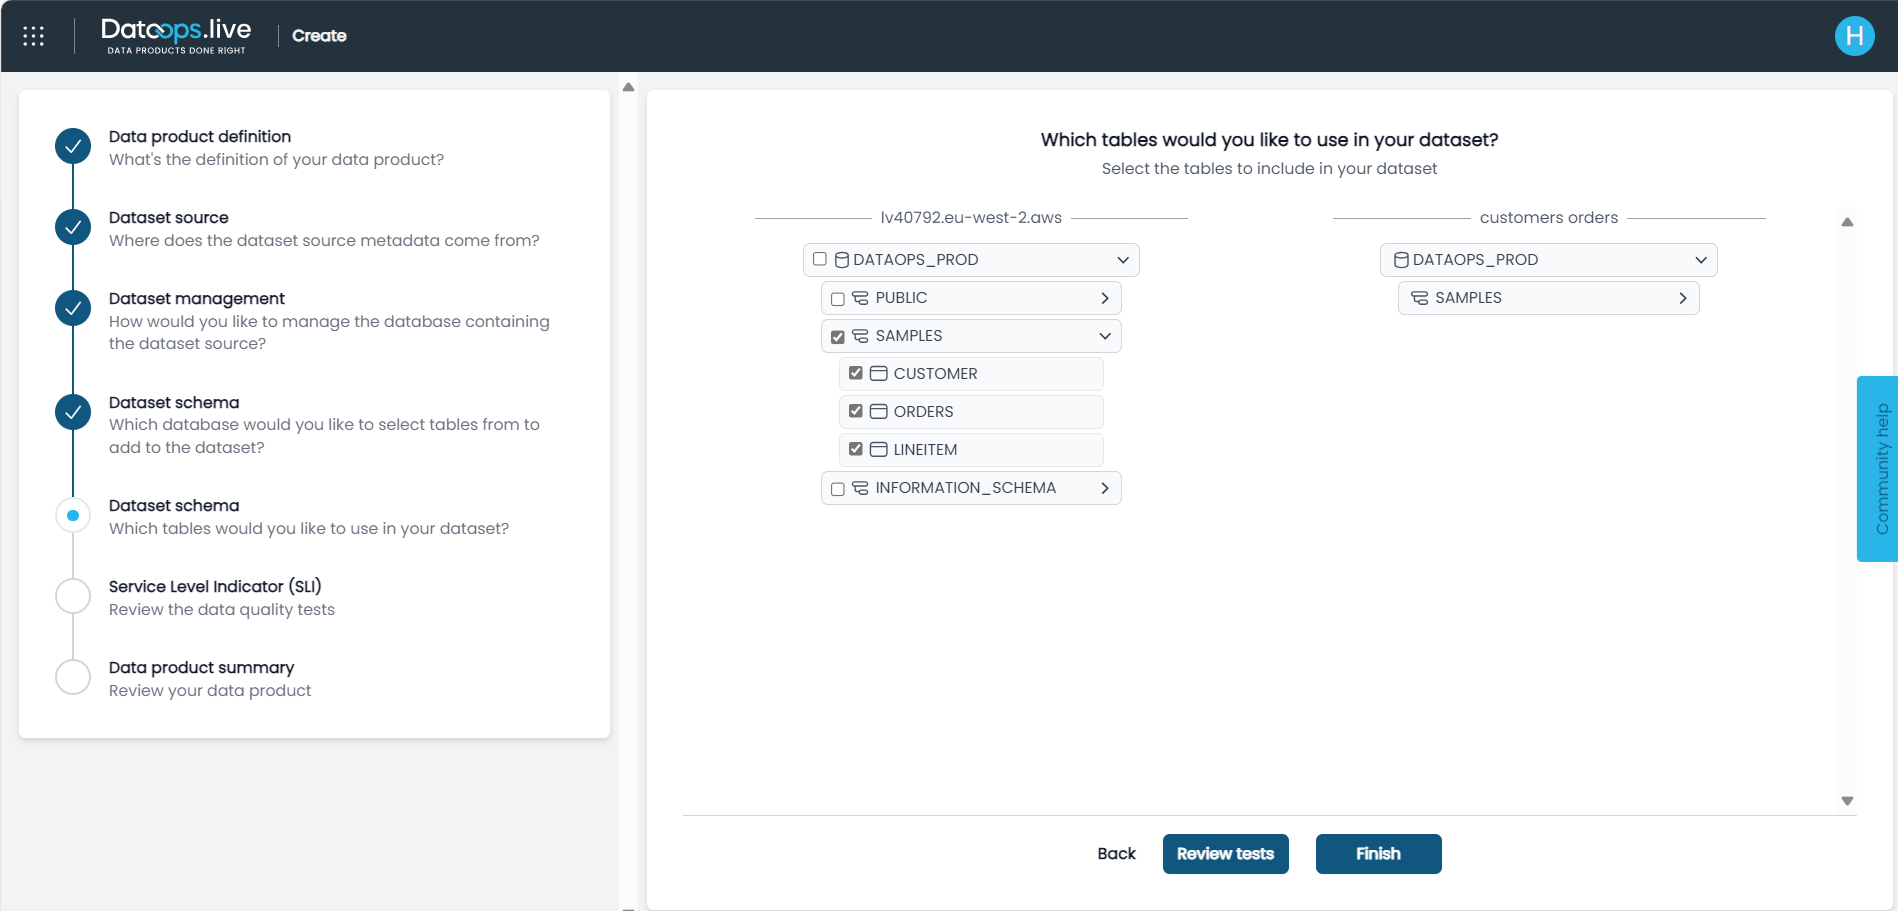
4. Choose dataset schema
Once you've identified the data product dataset source and management approach:
-
Select the database containing the tables to include in your dataset and click Continue.
-
Select the tables to use in the dataset.
Define the schema and structure of your dataset to align with your data product objectives and analysis requirements.
-
Either:
- Click Finish to create the data product and switch directly to the design phase in the DataOps development environment.
- Otherwise, continue with the two optional steps to review the quality tests and the generated data products before start updating the data product, as described in the following topics.
5. Review schema quality tests
Review the data quality tests that will be applied to your data product dataset. These tests help ensure that your data meets predefined quality standards and SLIs. Review the test criteria, thresholds, and frequency to verify that they align with your data product goals.
-
(Optional) Click Review tests to move to the next step and open a summary of the data quality tests.
Default tests are automatically generated based on the constraints defined on the database columns to ensure data integrity and validity. In this example, the constraints specify that the columns cannot contain null values.

-
(Optional) Toggle on Generate automatic tests based on SLO if you want Gen AI to generate extra tests based on the SLO description you used in the first step.
Make sure your SLO description is precise and has clear details if you want AI to generate meaningful tests.
-
(Optional) Click Review summary to move to the next step and open a summary of the data product.
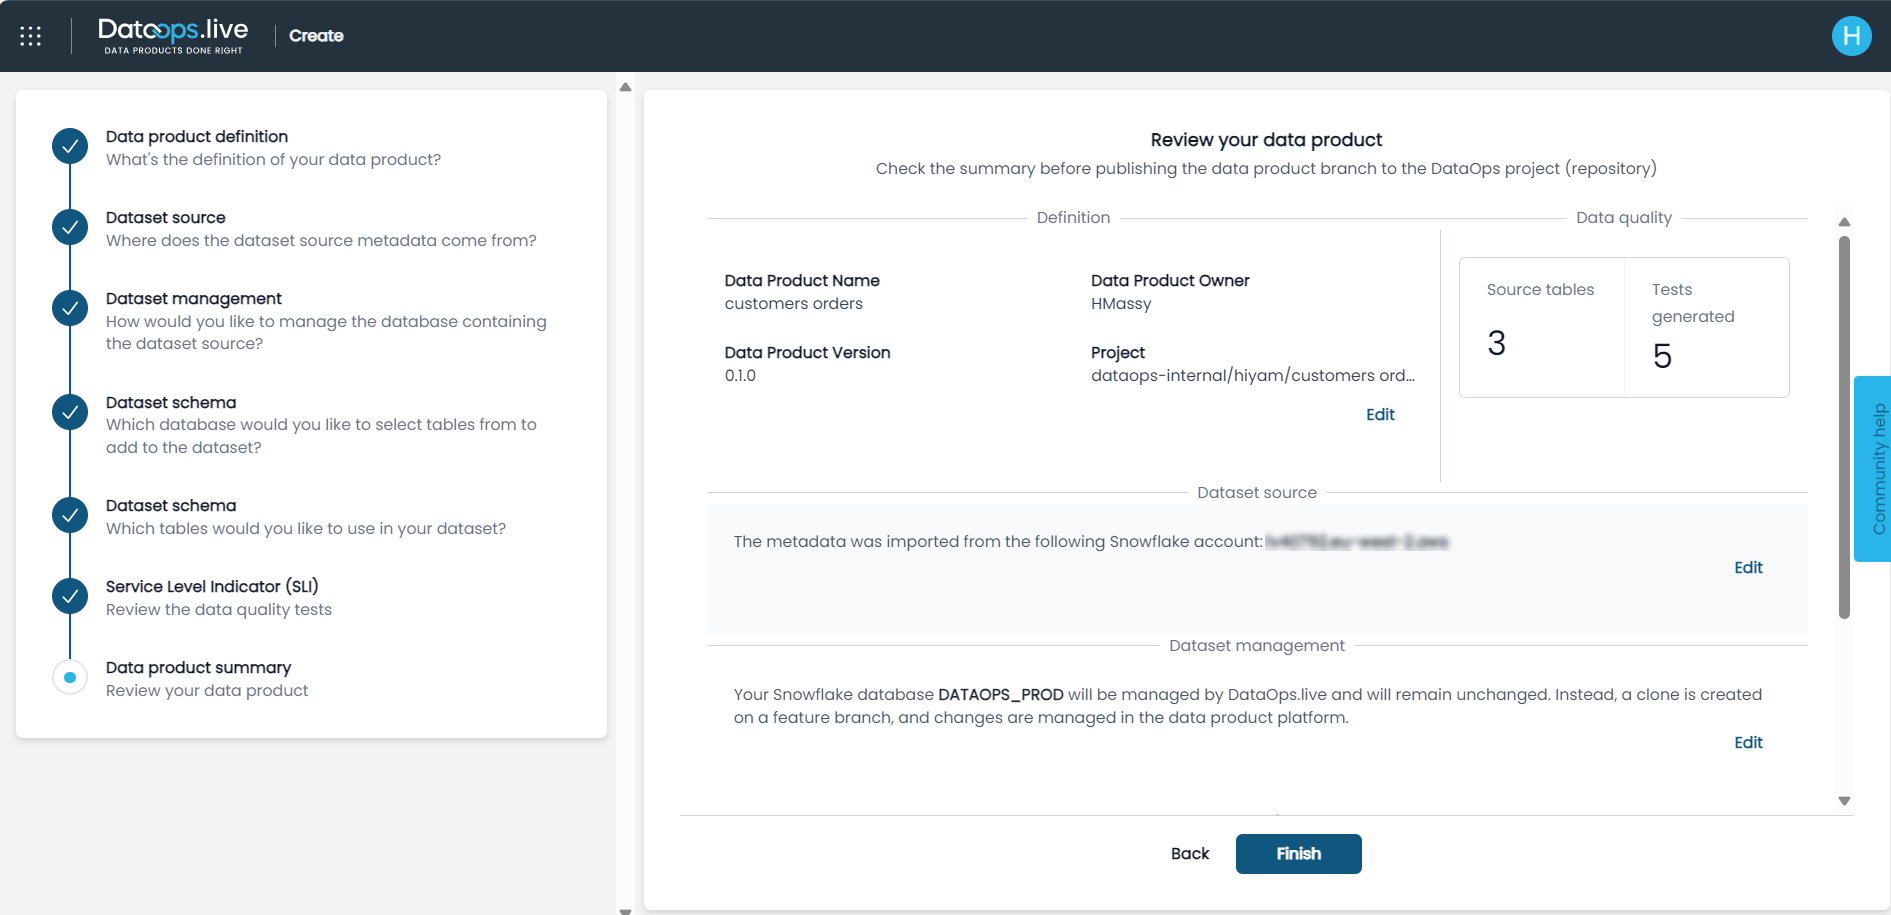
6. Review and create the data product
Before finalizing the first version of your data product, take a look at the data product summary and:
-
Make sure that it accurately reflects your defined objectives, dataset sources, schema specifications, and data quality tests.
The data product summary marks the beginning of the data product contract.
-
Go back to the previous steps and make any necessary adjustments or refinements to ensure your data product is well-aligned with your organization's needs and objectives.
-
Click Finish to display a confirmation window.
The data product is created under the selected group on the DataOps.live platform and a DataOps pipeline is generated to deploy your data product to Snowflake.
-
From the confirmation window, do one of the following:
-
Click Open designer to launch DataOps.live Develop, our browser-based development environment, and start updating your data product.
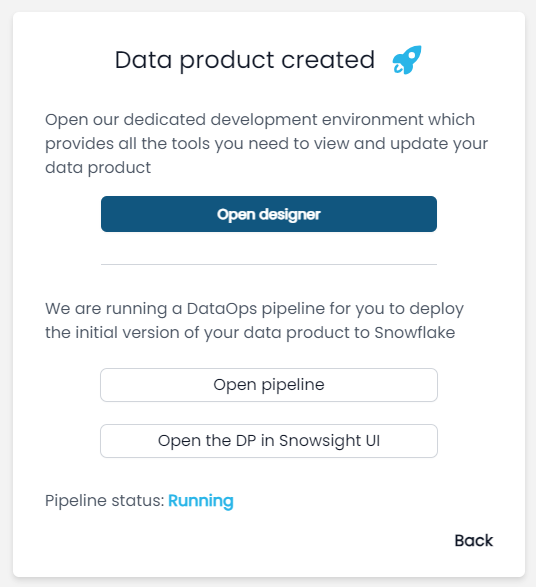
-
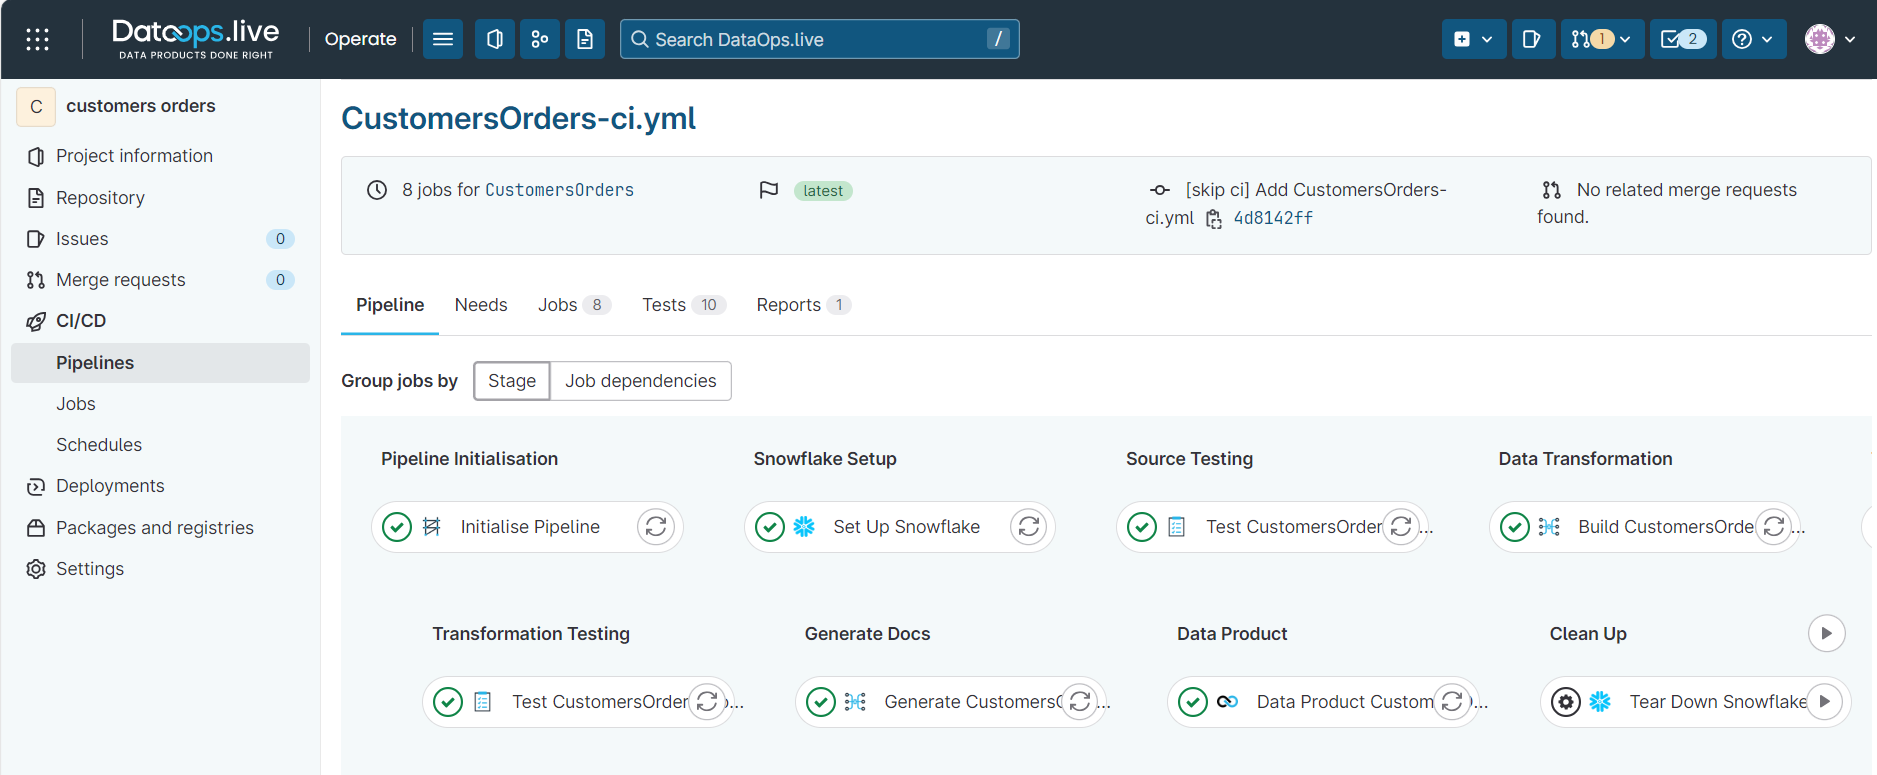
Click Open pipeline to open the generated pipeline on the DataOps.live platform.
-
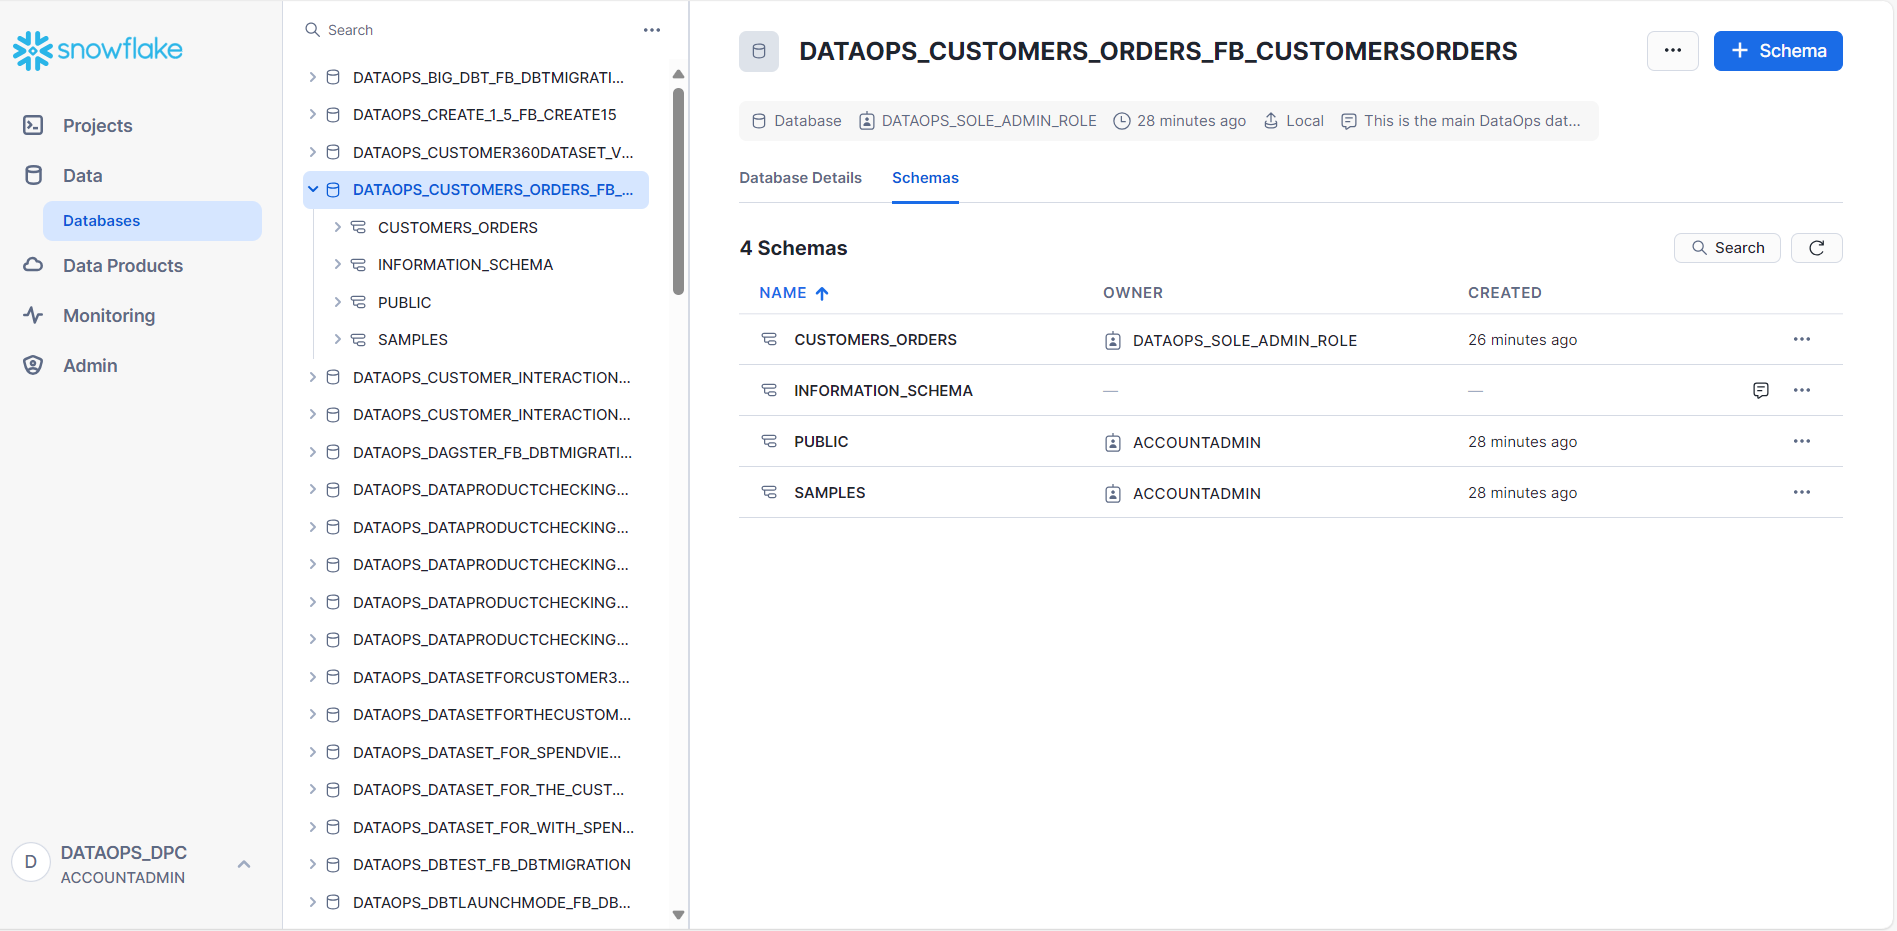
Click Open the DP in Snowsight UI to open the generated data product in Snowflake and perform data analysis and engineering tasks.
-
Iterating on the data product with Gen AI
Data product development often involves a series of iterations and refinements to achieve optimal outcomes. With the support of DataOps.live Assist, this process becomes more efficient and insightful.
Sharing the data product from the data product creator with the Assist Chat in the development environment offers crucial context, leading to more accurate responses. The Assist Chat offers instant answers to developers' and analysts' questions as they iterate on the data product.
By using AI-driven suggestions and guidance, developers and analysts can continuously test and create new models, refining their data products as they go. This iterative approach speeds up development and enhances the quality and impact of the final data product.
1. Open the data product in the development environment
Once you finalize creating the data product in the data product creator:
-
Open the data product in the browser-based development environment by doing one of the following:
- Click Open designer from the confirmation window that shows at the end of the creation steps in the data product creator.
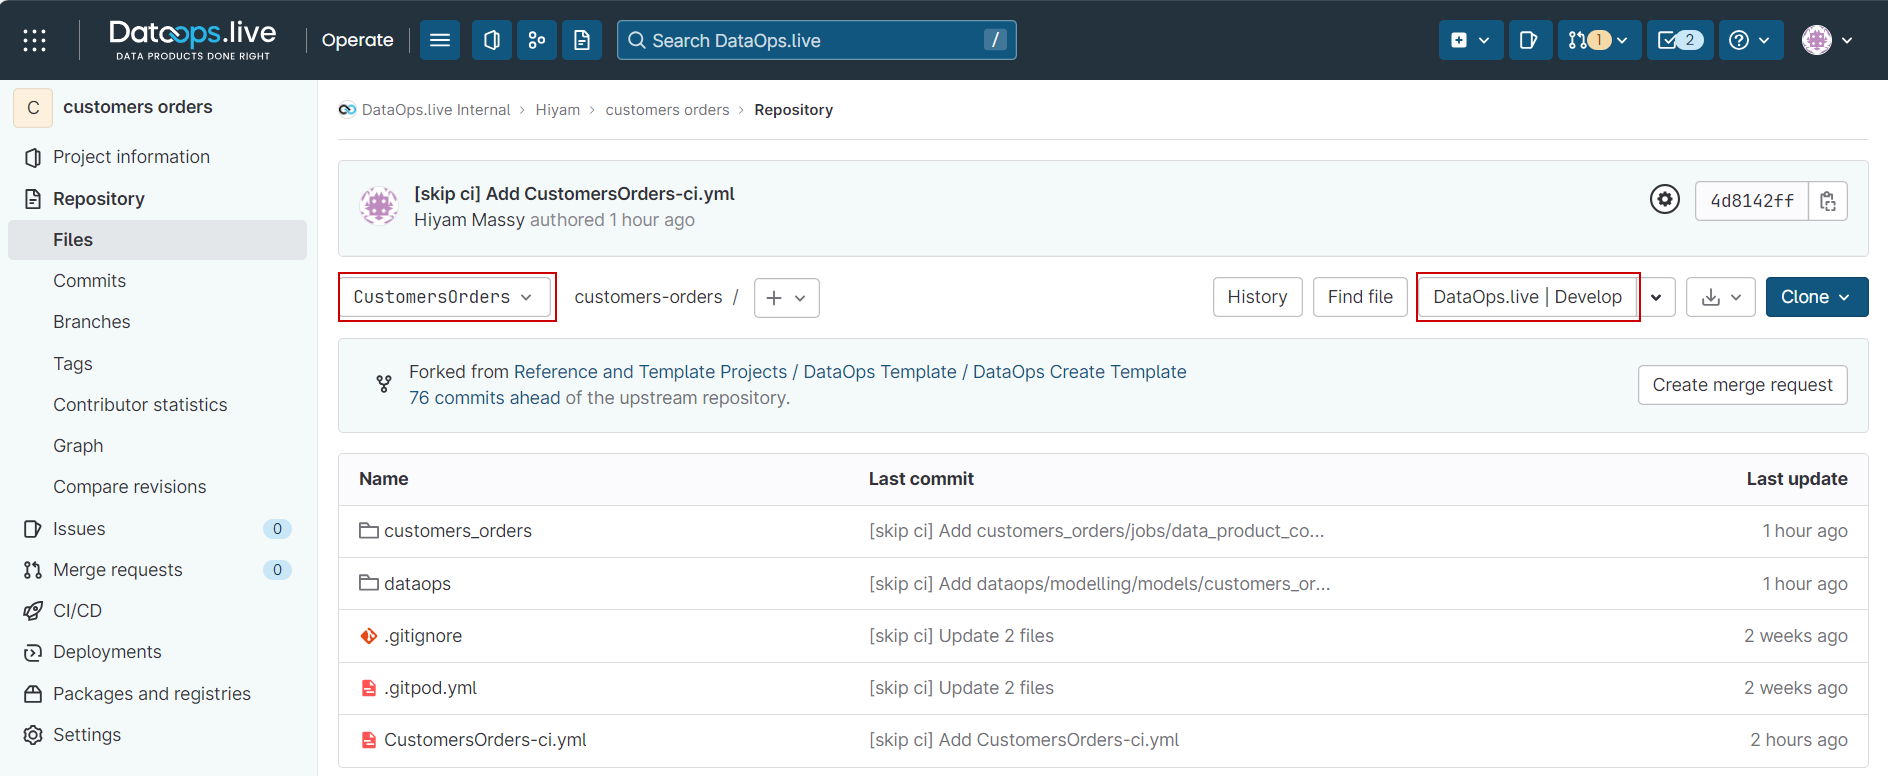
- Navigate to the data product project on the DataOps.live platform. From the branches drop-down list, select the data product branch and click DataOps.live | Develop.
-
When prompted, allow the DataOps.live extension and accept the opening of the website.
noteThis step is temporary and only for the private preview. It will be removed later.
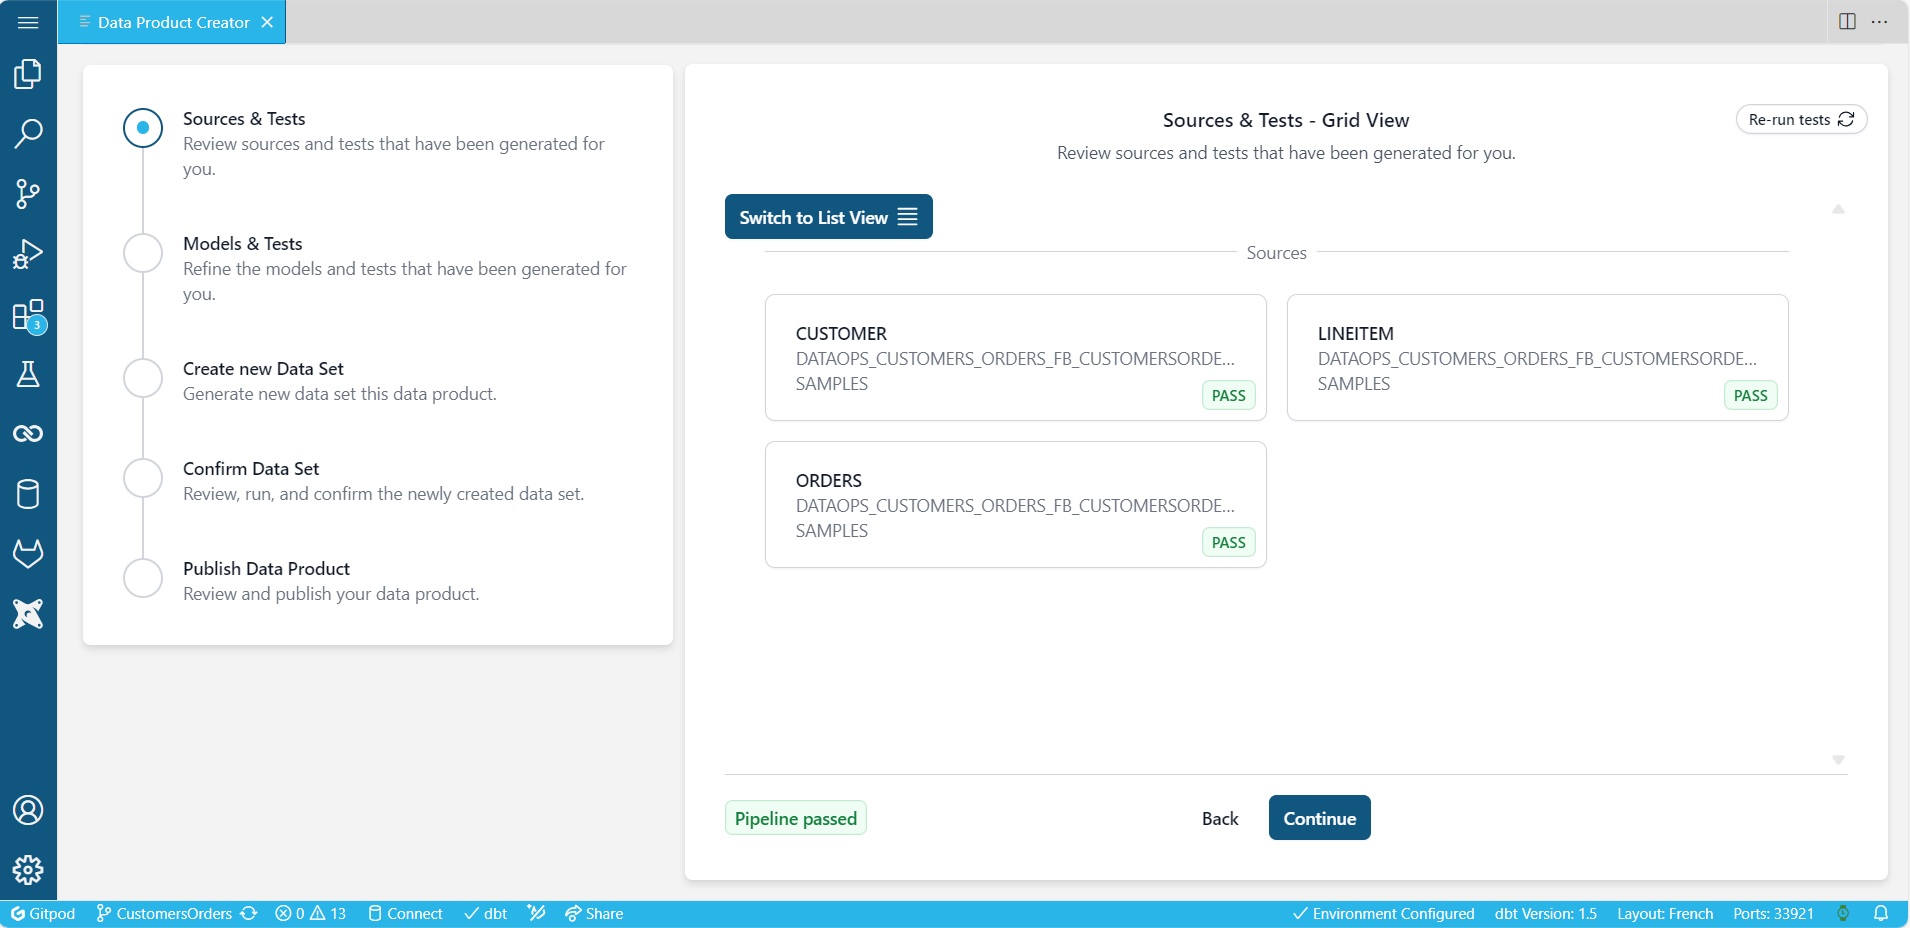
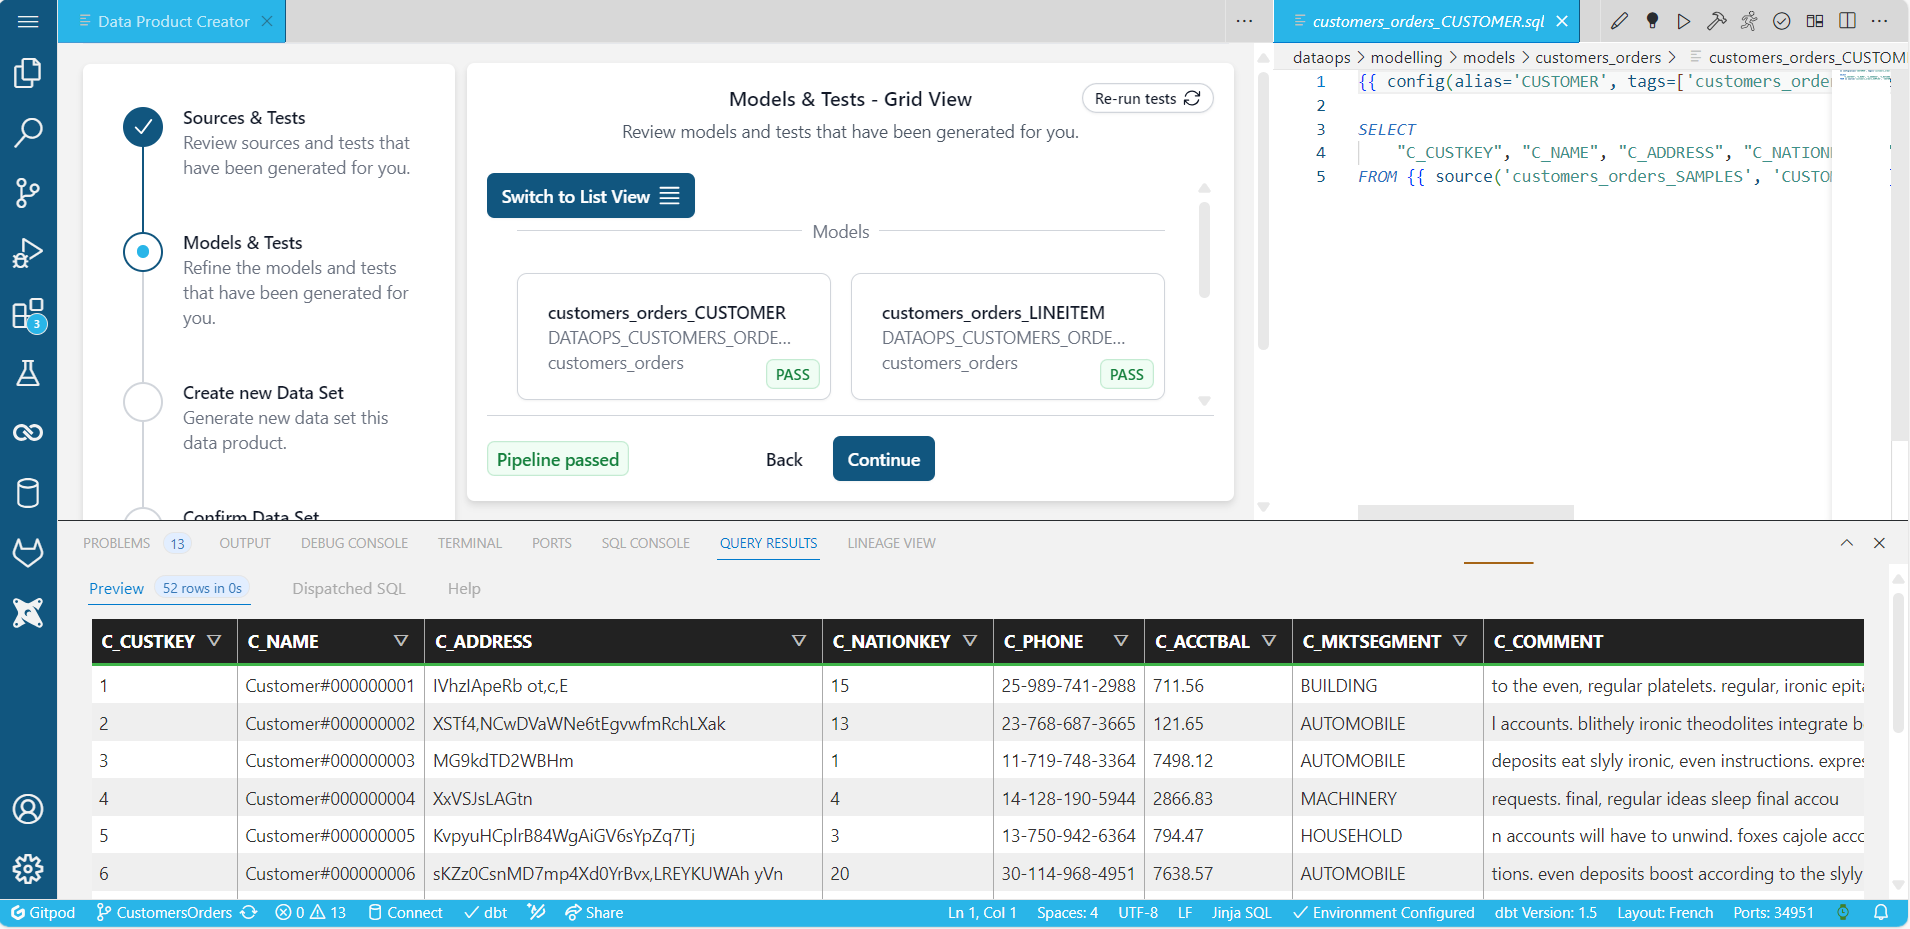
The data product opens in the development environment, showing whether the pipeline and tests have passed.
Switch between a list and table views to show the dataset sources and generated tests.
2. Review sources and generated models
-
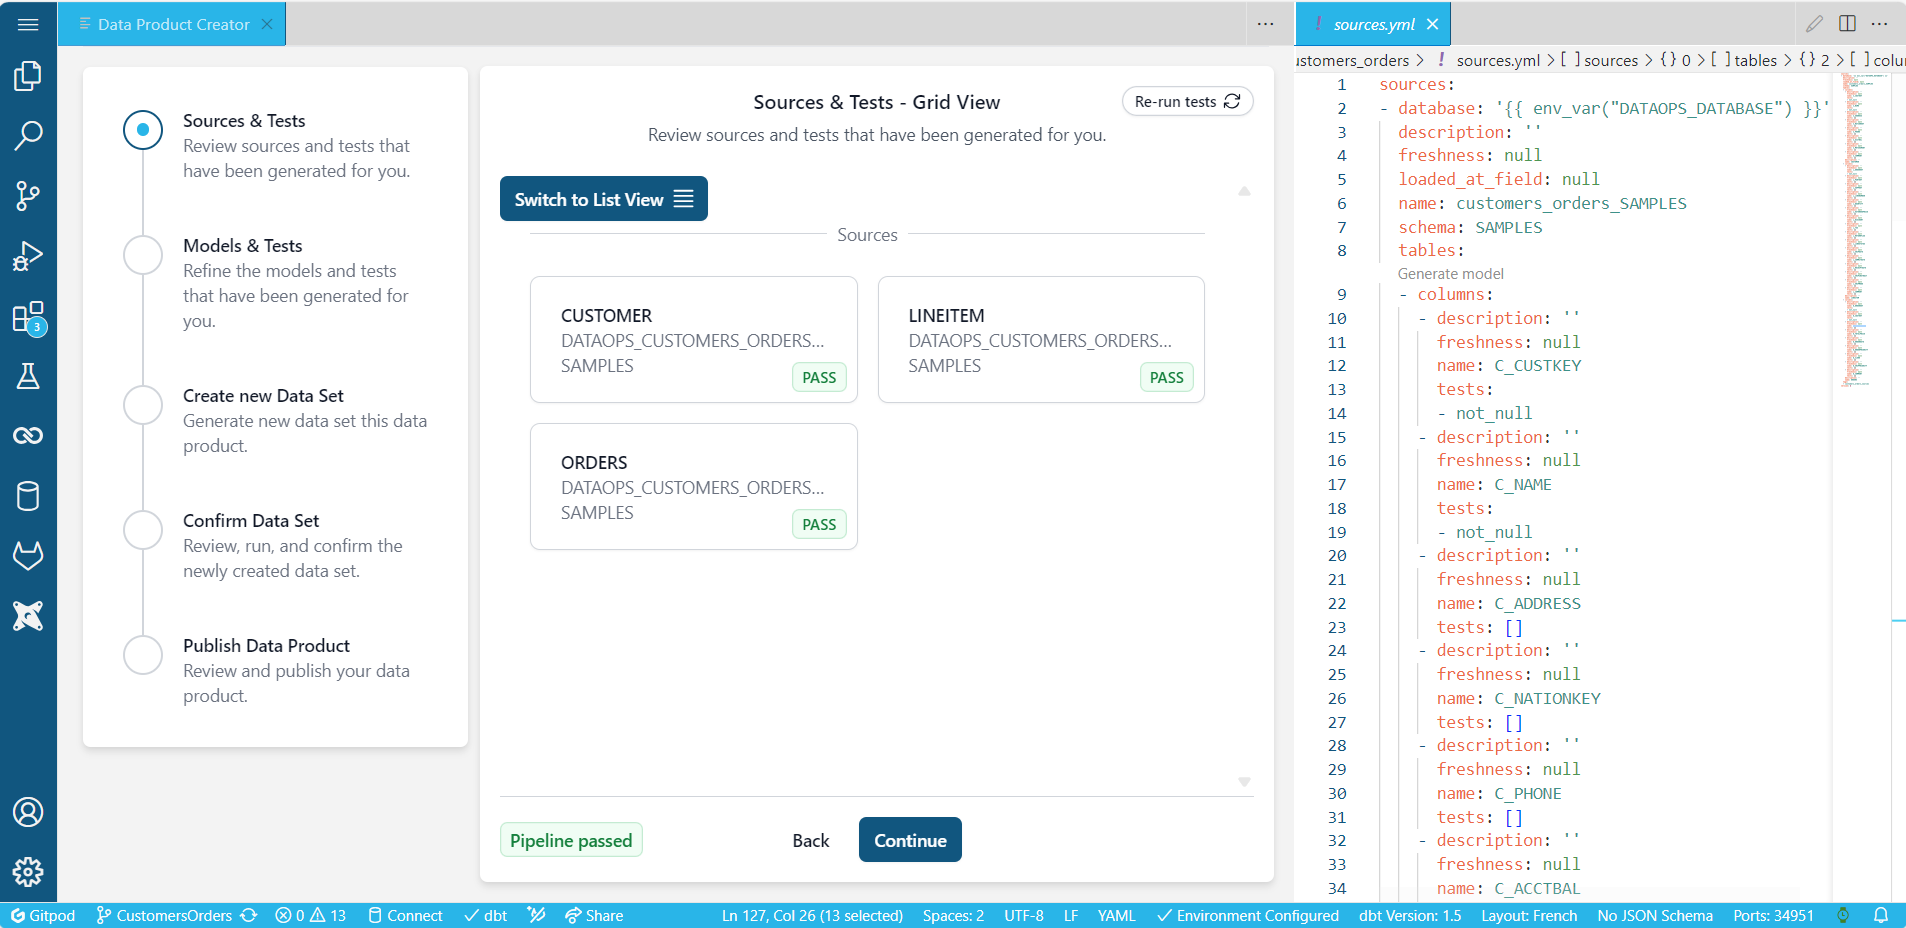
Click the table name to open a tab with a data preview (YAML file) of the tests generated in the data product creator.
-
Check your data and the automatically generated tests to make sure this is what you need for your data product.
-
Click Continue to generate the SQL code necessary to build the model from the source.
-
Click the table name to open a tab with a preview of the SQL file generated automatically to build the model.
Jinja templating is used to insert dynamic content into the model.
-
On the top right, click the Execute dbt SQL icon to run the script and create the model.
-
Run the SQL for the other tables in the data product similarly to create all the models you need.
-
Click Continue.
The following topics describe how to interact with the Assist Chat and get instant answers to your questions while iterating on and refining your data product.
3. Create a new data product dataset
Building models
Here is where the Assist Chat comes into play. After the initial setup of the data product through the data product creator, the Assist Chat takes the business problem description and the initial schemas as a starting point and provides a new dbt model to satisfy the description.
Click Start Assist Chat.
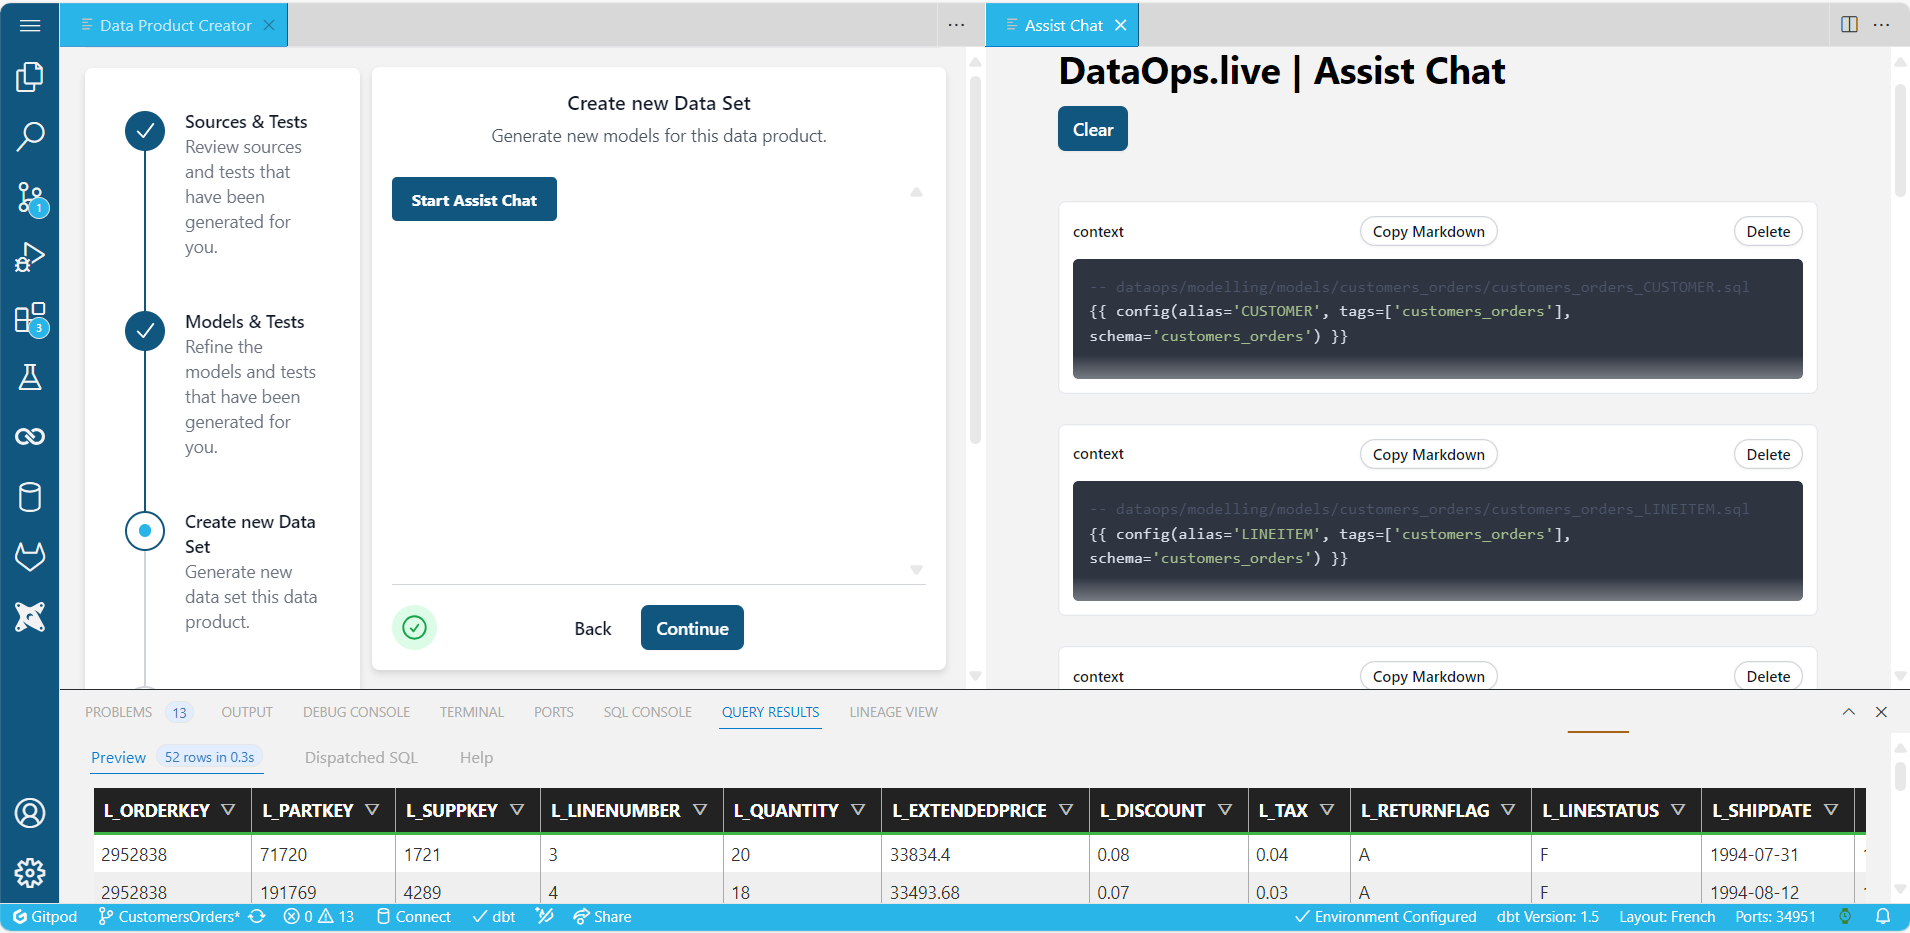
The assistant automatically generates a new model based on the ones you selected in the previous steps, which are passed to Assist as context. In this example, the data product is aimed at monitoring and analyzing customer orders, ensuring they are processed promptly and efficiently.
- The prompt box holds the data product business description given while creating the data product in step 2.
- The assistant box holds the complete SQL script defining the model/data product,
customer_order_analysis_modelin this example.
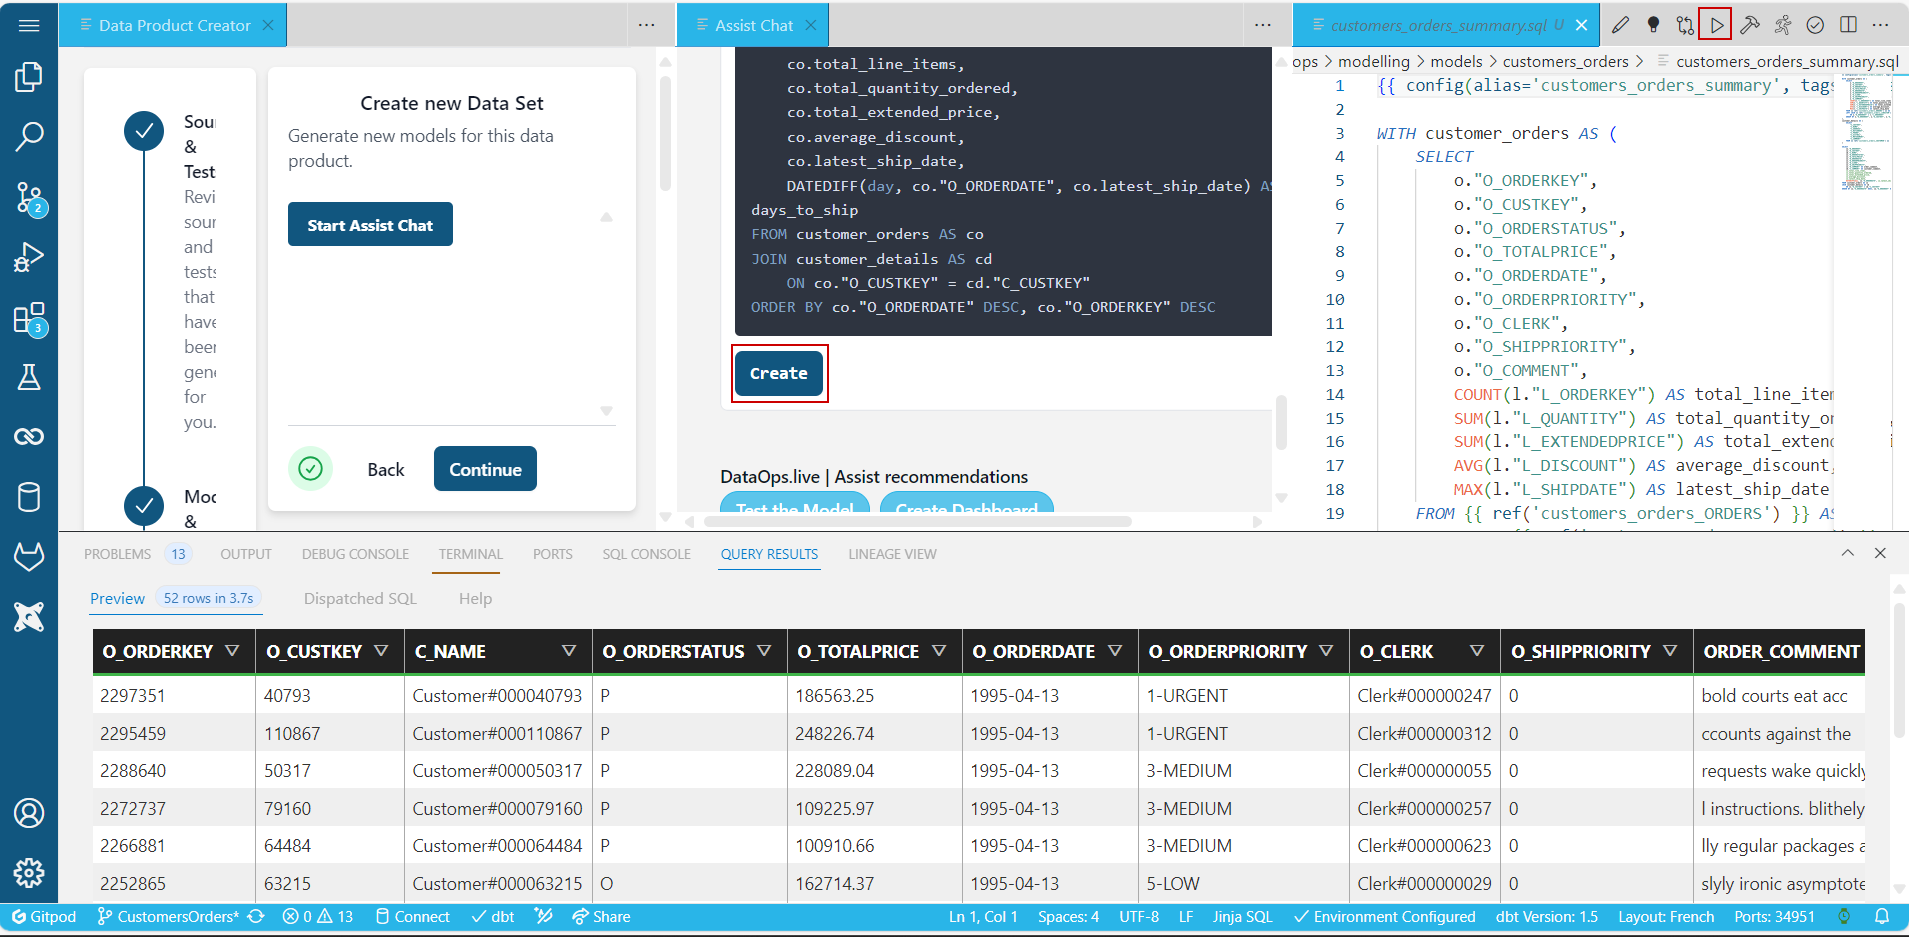
If satisfied with this first version of the data product:
-
Click Create under the assistant box to generate the SQL code necessary to build the model.
-
On the top right, click the Execute dbt SQL icon to run the script and create the data product.
-
From the Assist Chat recommendations below the new model, select to test the model or ask the chat directly to test and validate the data for you.
-
Click Submit.
In this example, the test checks the
customer_orders_summarymodel to ensure that every order has a corresponding customer in thecustomer_orders_CUSTOMERmodel. If there are any orders without a matching customer, the test will return those order keys, indicating a data integrity issue that needs to be investigated and resolved. Then, the assistant creates a new version of the model.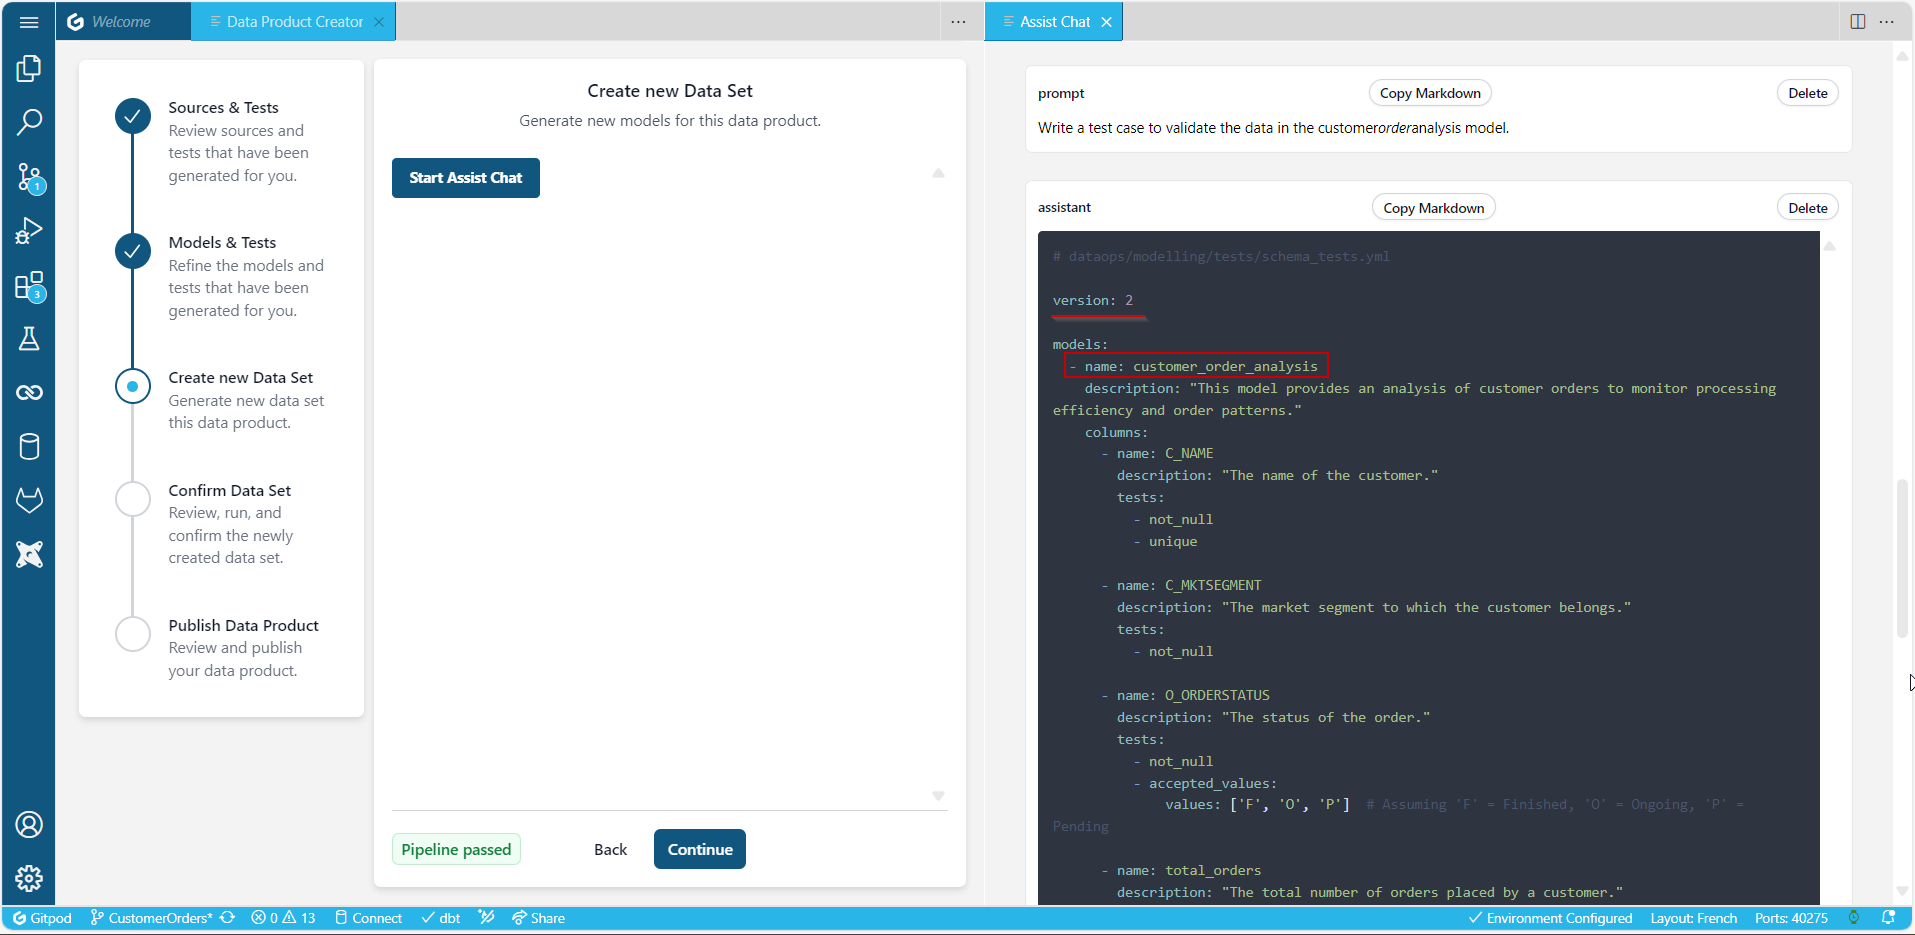
-
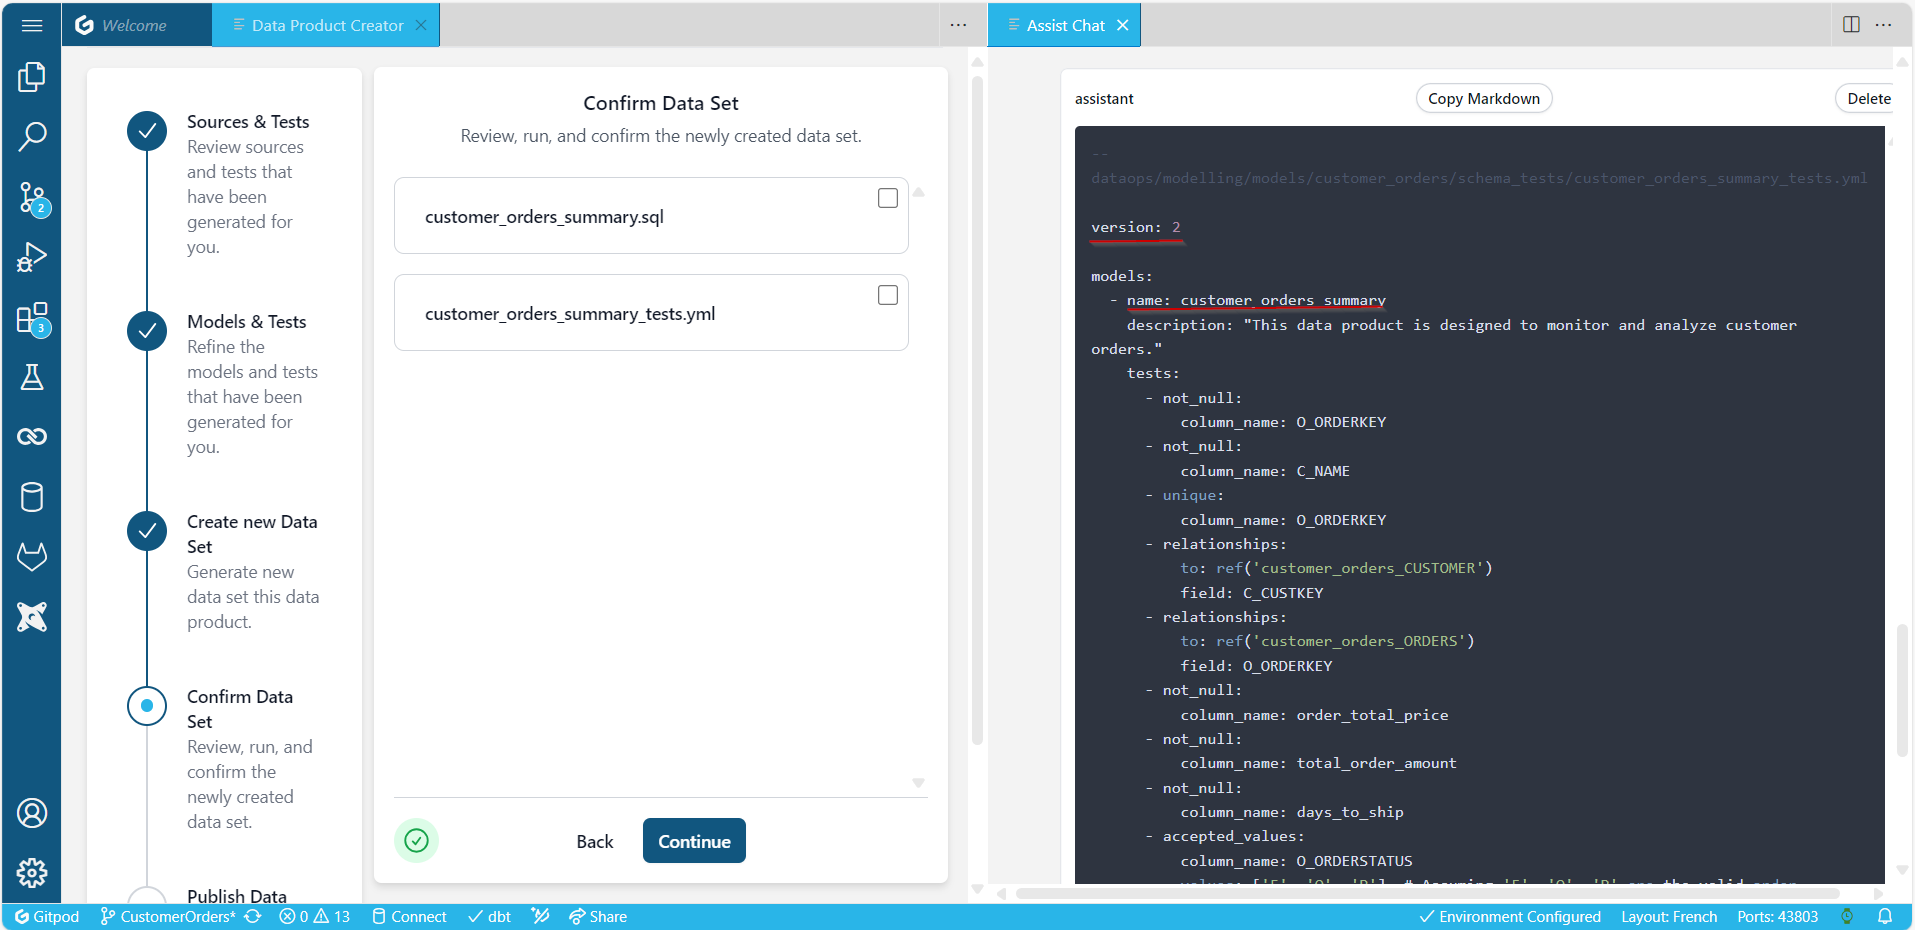
Click Create under the assistant box to generate the test YAML file.
-
Click Continue to review and confirm the newly created dataset.
Continue to refine the data model further as needed.
Create a new dataset: iterating and testing
Continue asking Assist for any modifications or requests to refine the data model. It answers in human readable language and generates the new SQL files as per the request. It may also propose new versions for the model created where it finds fit.
Let's assume you need to refine the created data product to help calculate the average delivery delay for each customer between the order date and the latest ship date. You want to enable businesses to optimize their operations, enhance customer satisfaction, and drive overall performance.
-
Scroll down and do one of the following:
- Check the assistant recommendations as per the initial data product you set up and select those that make sense to you.
- Ask the assistant directly for any modifications to refine the data model.
-
Click Submit.
For example, you may need a dbt model that reports on order delivery performance, including on-time delivery rate and average delivery delay, within the
customer_ordersschema. The Assistant generates a new model following your request. Take a moment to review the SQL code it has created for our MATE models. -
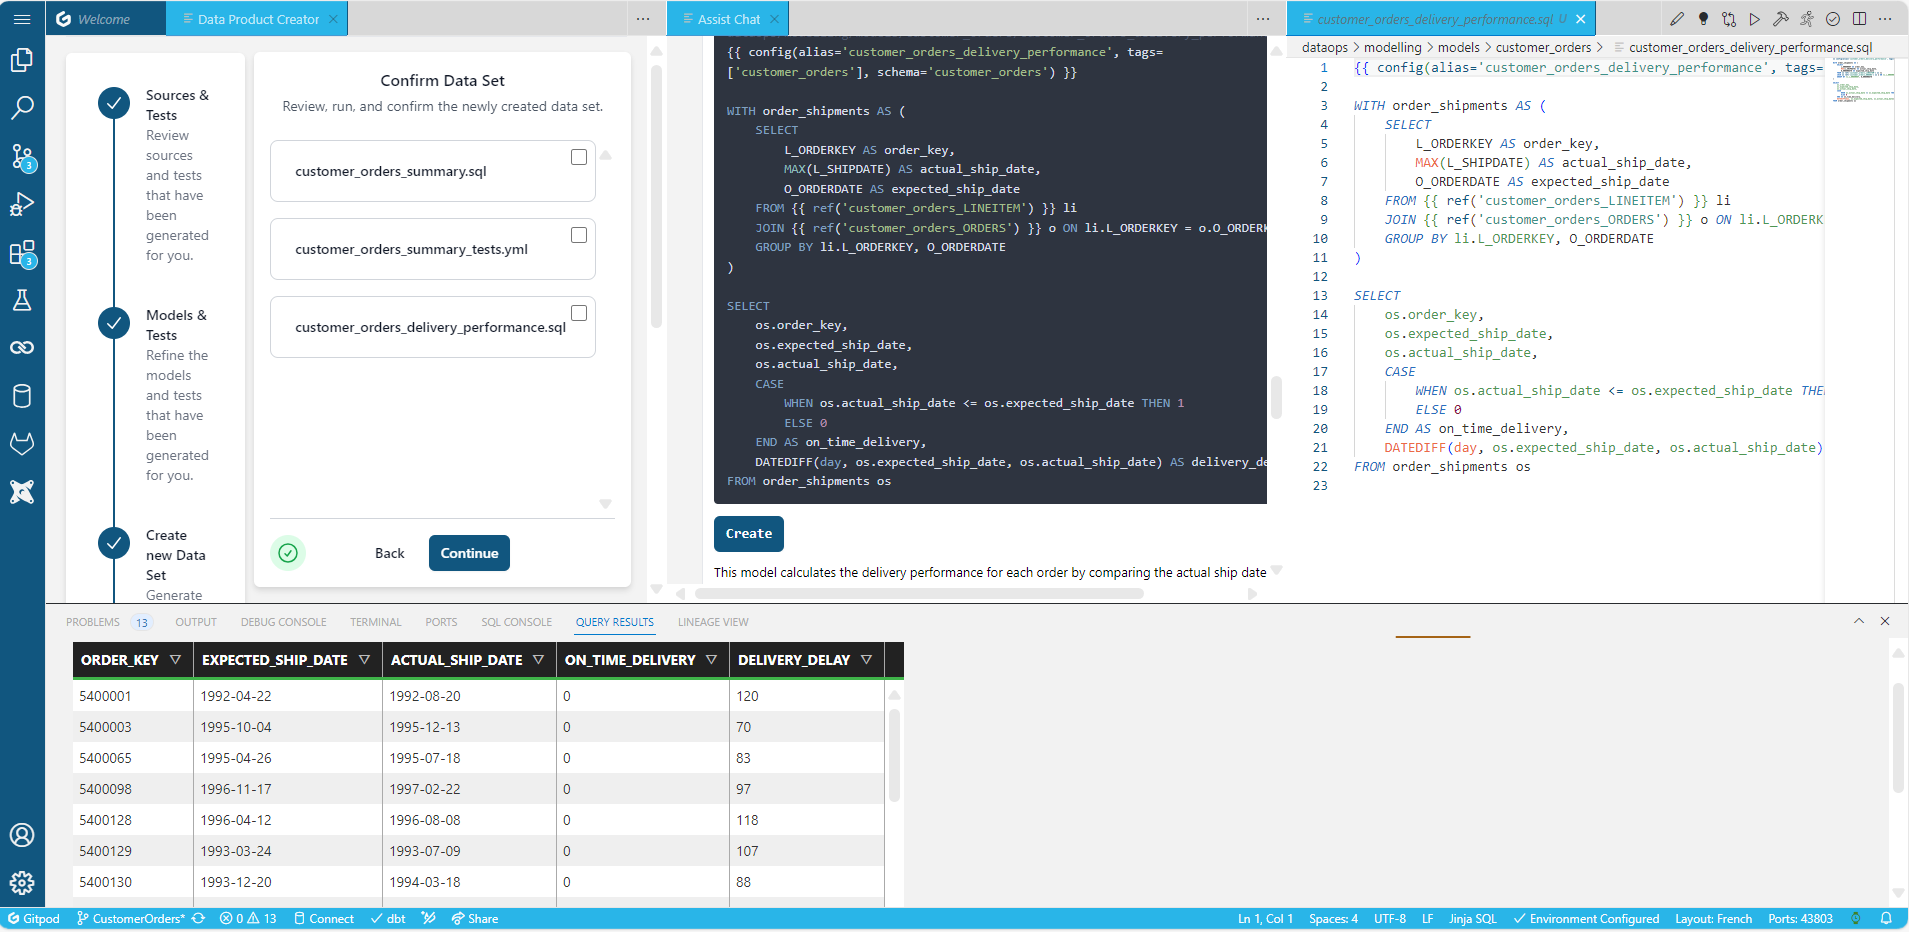
Click Create under the assistant box to generate the new SQL.
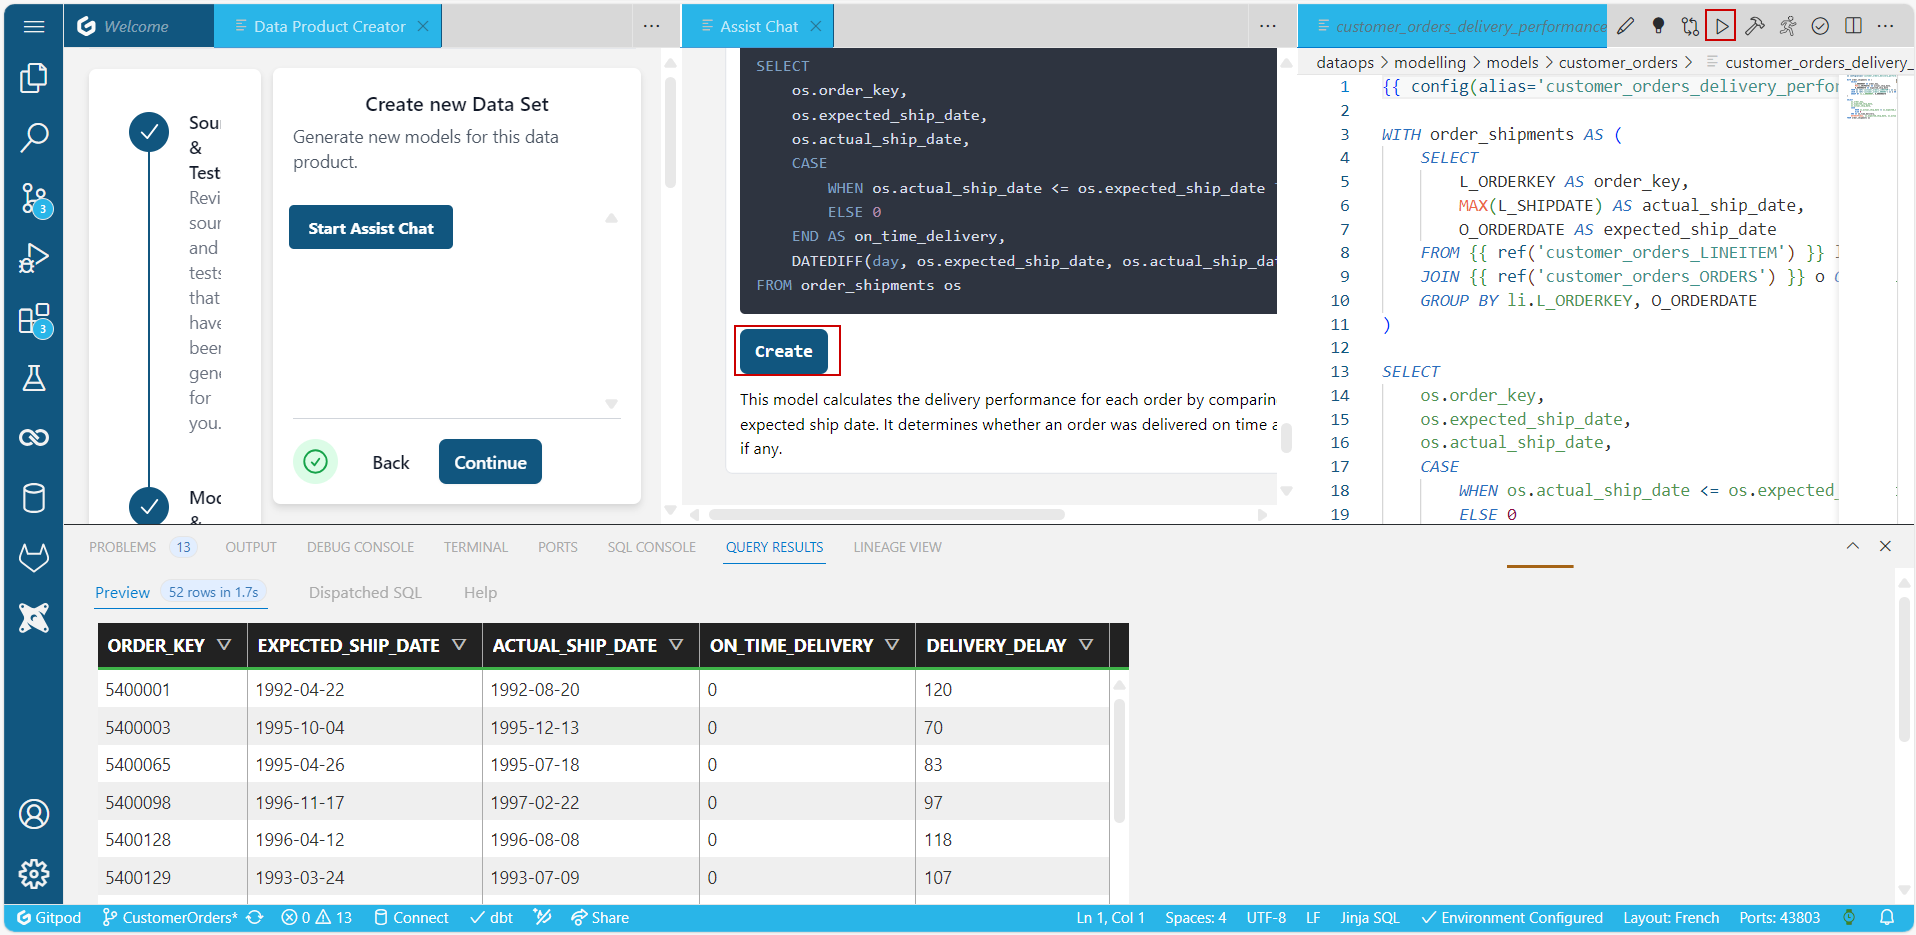 Running the dataset, you now validate the output data shown in the table. It's all about ensuring accuracy.
If you get an error running SQL, you can copy this error to the assistant and ask it to fix your model.
Running the dataset, you now validate the output data shown in the table. It's all about ensuring accuracy.
If you get an error running SQL, you can copy this error to the assistant and ask it to fix your model.Back to the chat window, you can ask the assistant for suggestions on how to test your dataset best. It outlines the types of tests tailored to your data, creates a YAML file with applicable tests, and even recommends specific columns to test, ensuring data integrity. After reviewing the YAML, one click on the create button is all it takes to set up the tests for your dataset automatically. As easy as that, you've employed the power of AI to streamline your data modeling and testing process.
-
Click Continue to confirm the dataset and start building your data product.
-
Ask the assistant for any other need. For example,
create a Mermaid diagram code snippet to represent customer orders and delivery performance. Click Submit.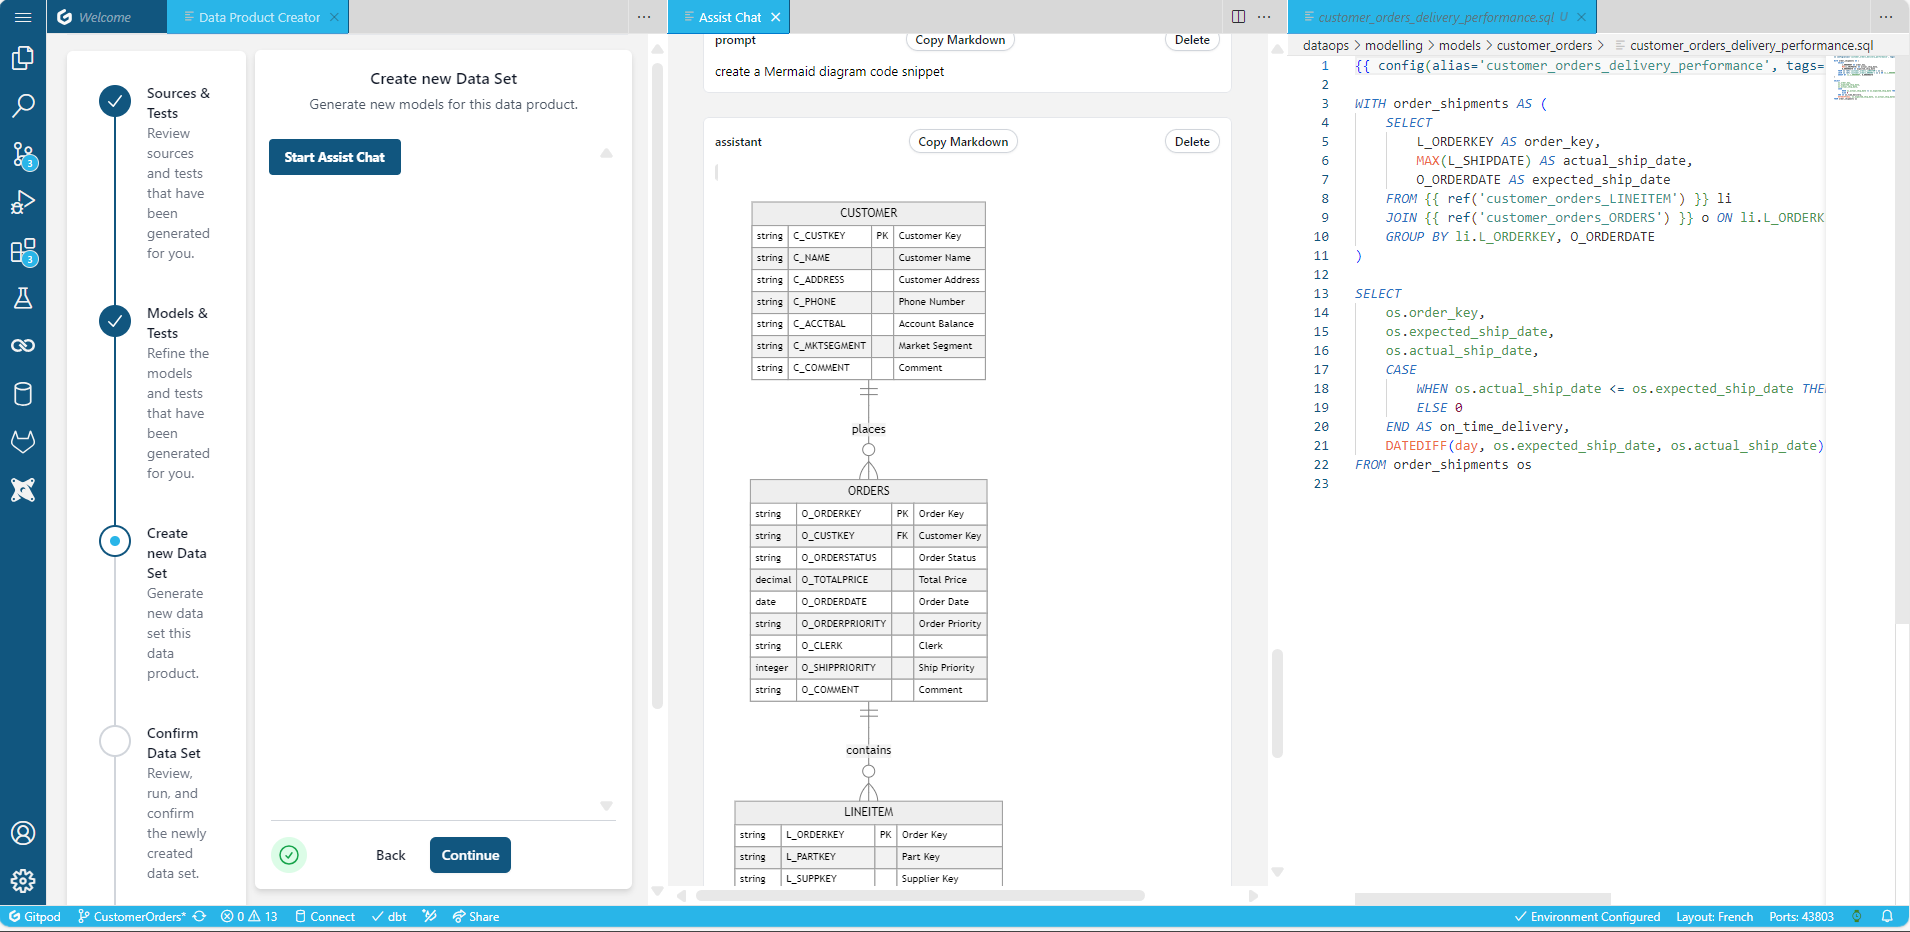
5. Publish the data product
-
Review the data product definition and Service Level Objectives and click Build.
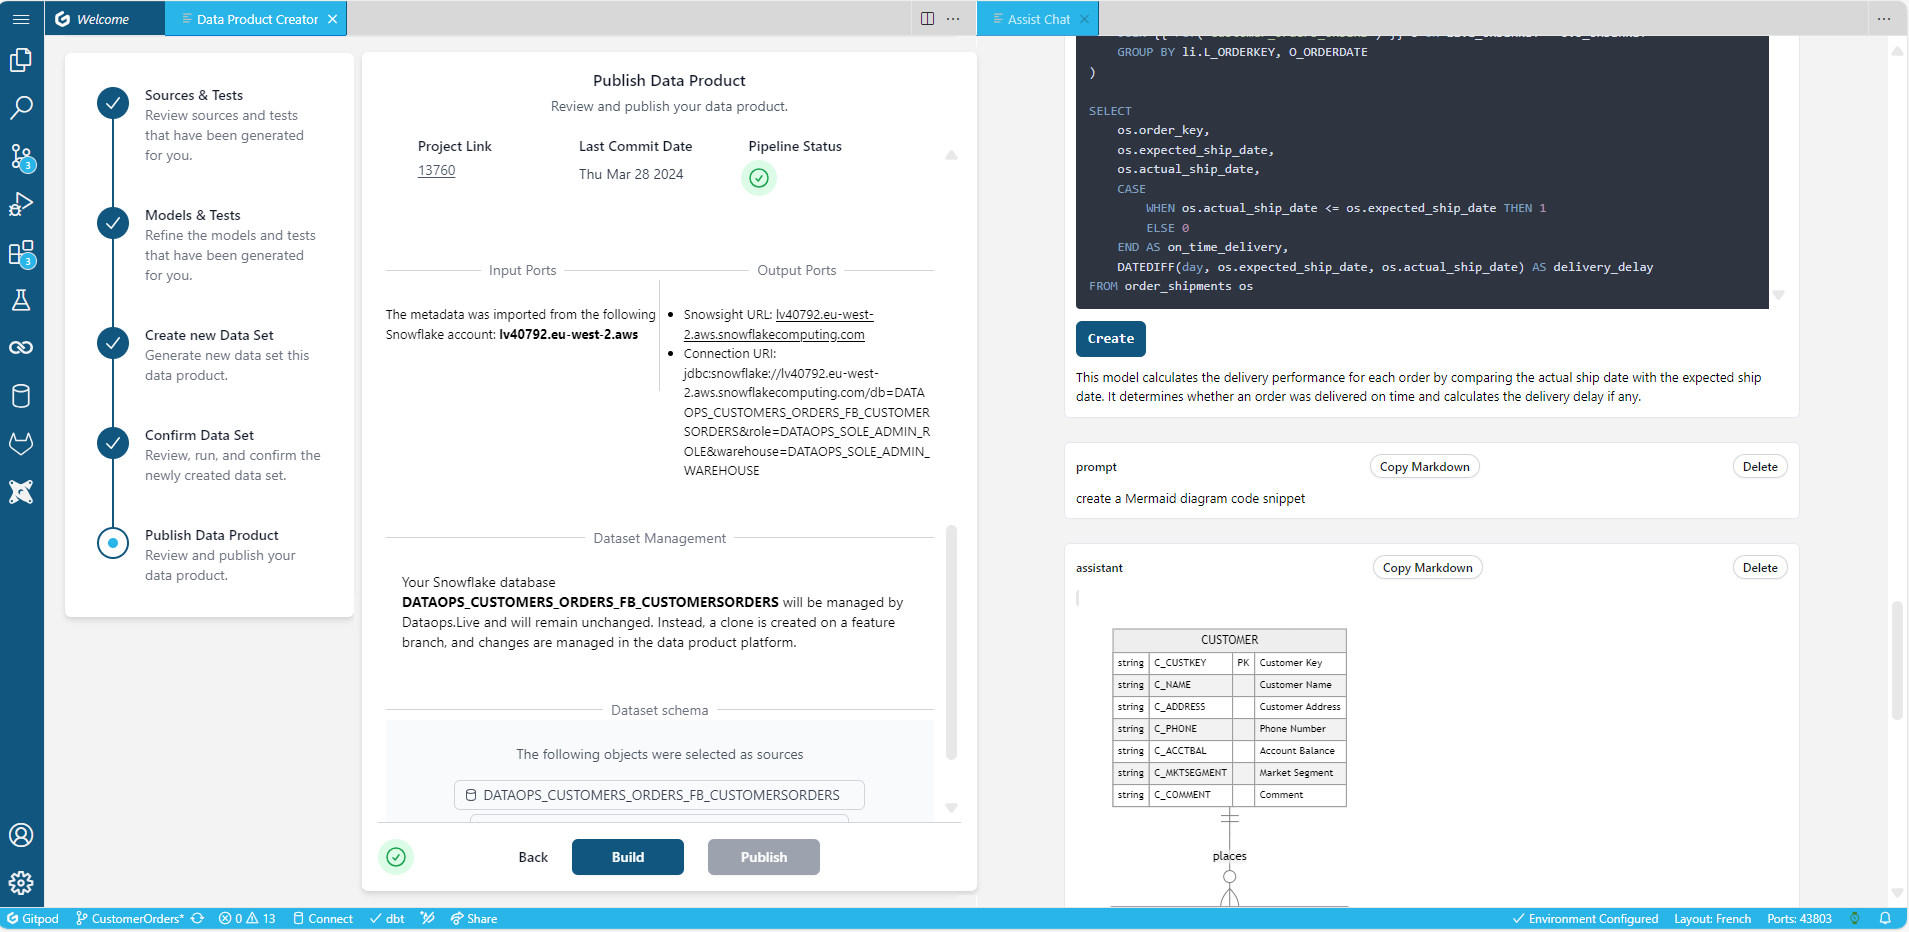
-
Click Publish to open the New merge request page on your project on the data product platform.
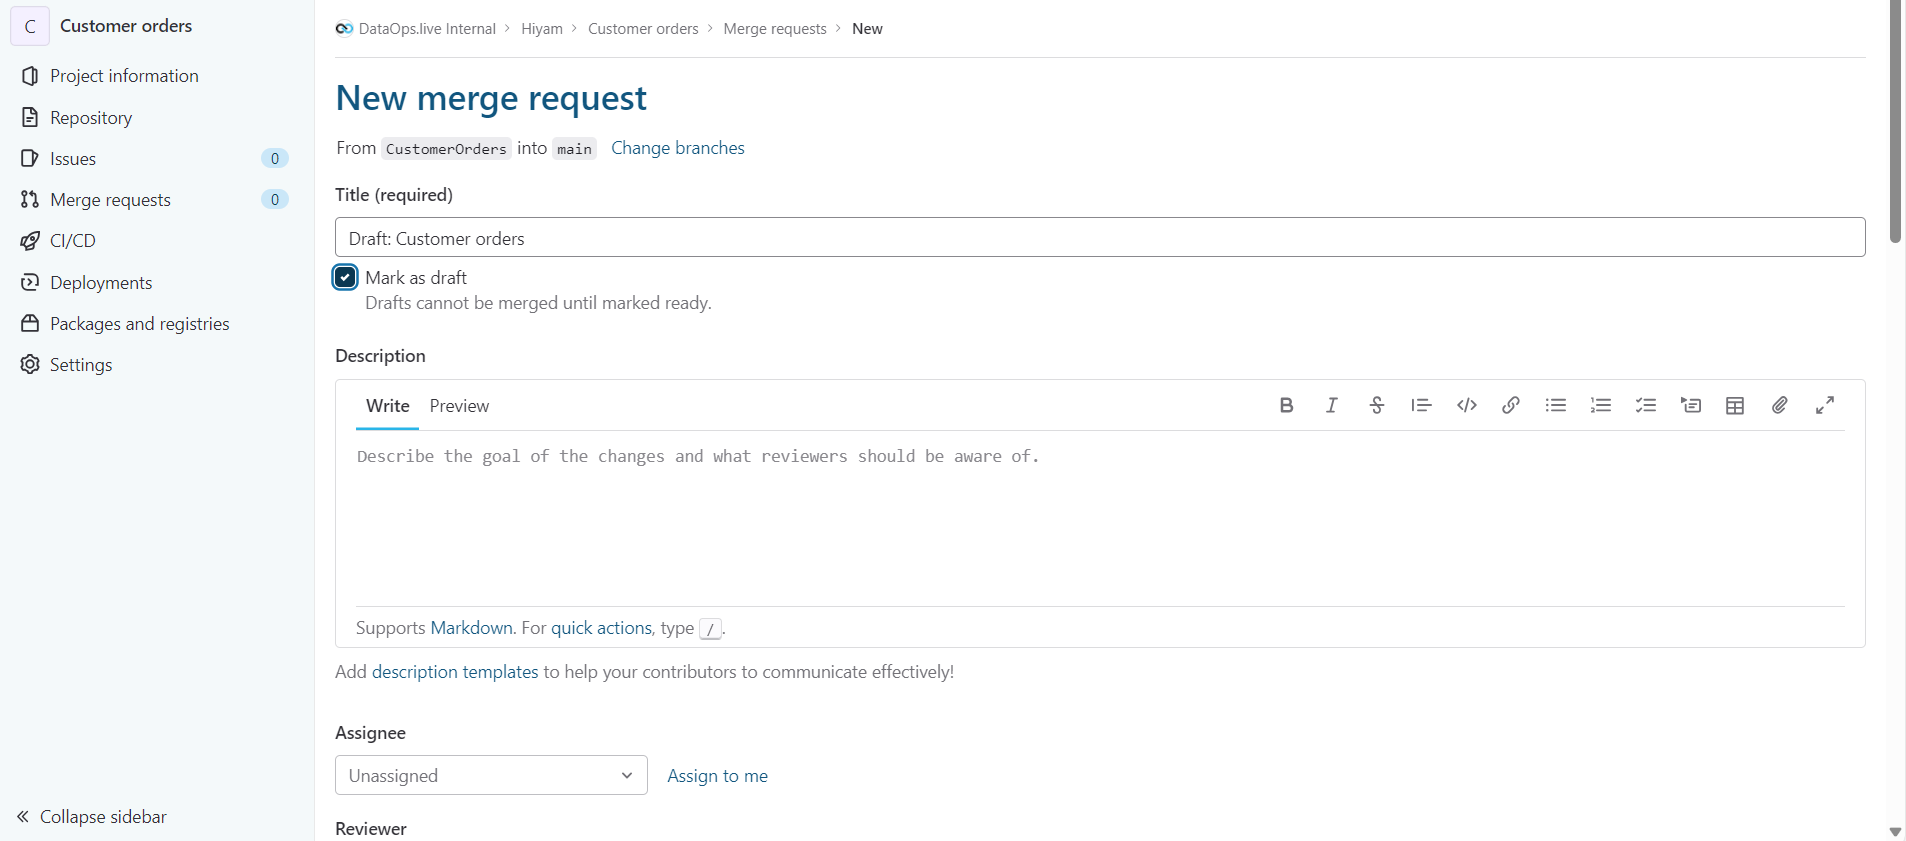
-
Describe the merge request and select the assignee, reviewers, and milestones.
-
Click Create merge request.
DataOps.live Assist, our AI-powered copilot, automatically summarizes and describes the merge request, helping data product owners quickly understand and approve it.
For more information, see the DataOps.live Assist documentation.