DevPod Setup and Configuration
 Deprecated
What is DevPod — DataOps development environment?
If your organization prefers to avoid allowing the DevReady workspace container to connect to Snowflake, you can deploy the workspace container to your organization's environment.
DataOps.live enables you with two different options:
- Run both the VS Code frontend and the workspace container on your developer machine
- Run the VS Code frontend on your developer machine, yet the workspace container on a shared Docker environment
Looking at the first option with everything on your developer machine:

With just your computer, you can accelerate development using the DevPod and keep your development credentials on your local machine. Please note the known issues for MAC Users.
The only additional prerequisite is to install Docker on your machine. However, if installing Docker locally is not an option, consider running the actual execution environment on a remote server (usually Linux):
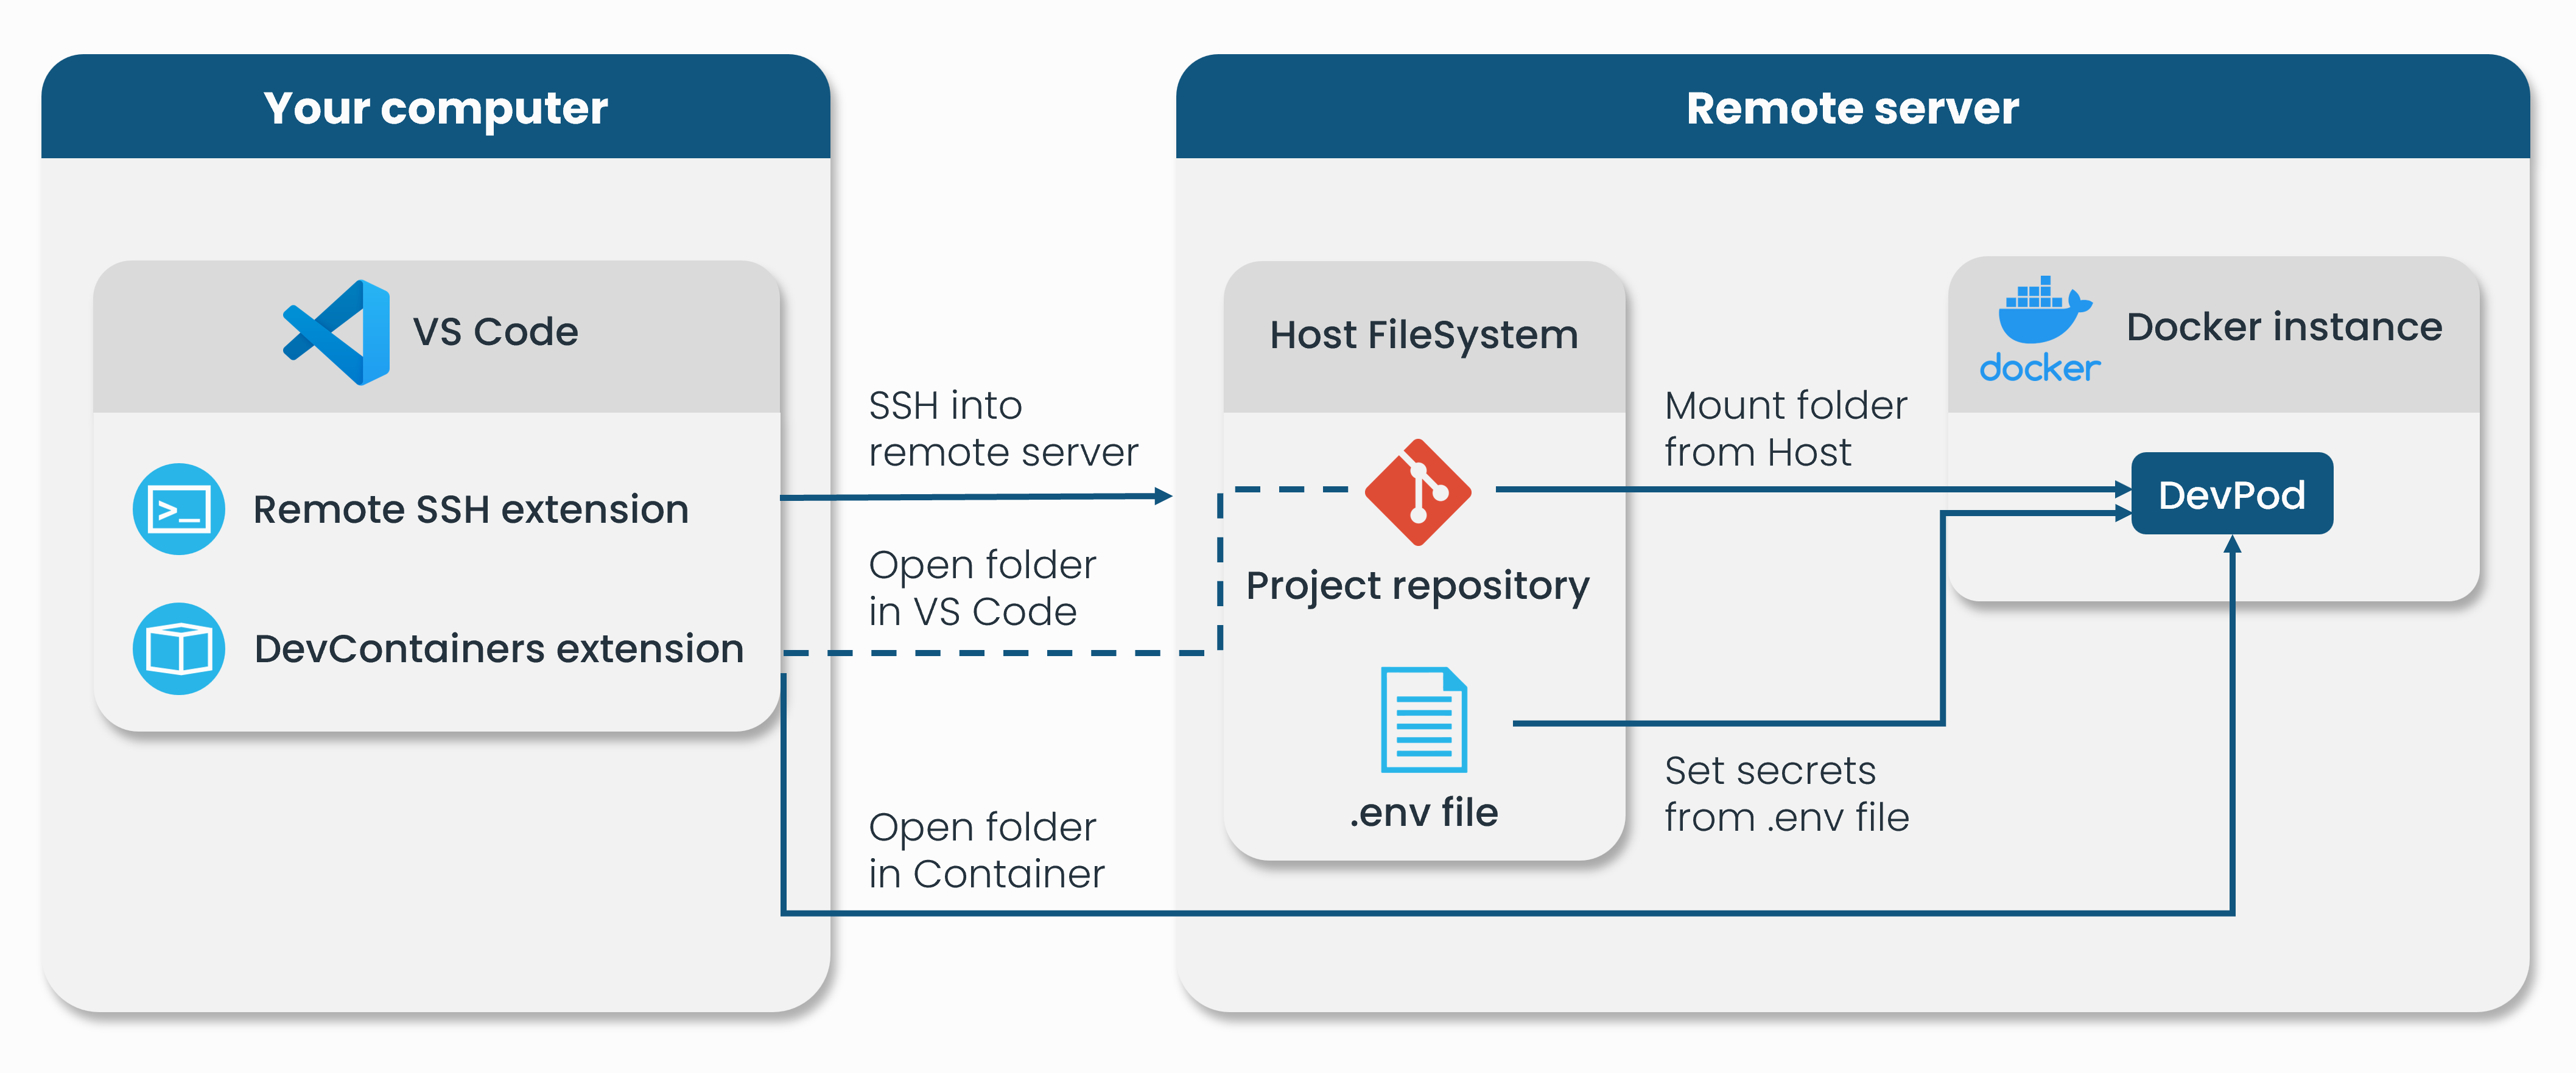
The simplest way to do this is to use the
Remote SSH
extension in VS Code to connect to the remote computer and clone your repo that
contains your devcontainer.json file or create a new one as described in
setting up and configuration.
DevPod setup
General prerequisites
On your local machine, you must:
- Install Visual Studio Code.
- Install the VS Code Dev Containers extension.
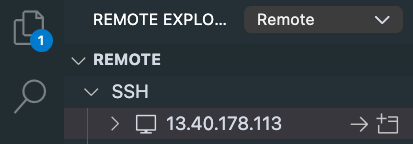
SSH automatically from your local to your remote machine
- Install the VS Code Remote SSH extension.
-
Configure your SSH client. Find more help on using the SSH config file.
~/.ssh/configHost <dev_container_remote>
HostName <remote_ip_address>
User <user>
IdentityFile <path_to_ssh_key_file> -
Confirm that you can connect to the remote machine from your local machine through VS Code.
Prerequisites for the machine running the workspace container
-
Install Docker.
-
Authenticate to Docker Hub for DataOps images:
On your command line, run the following command:
docker login --username dataopsread --password dckr_pat_82FQ4O6N4yb6fXJc15kIvX4Qrtg -
Confirm that you can successfully run:
docker run -it dataopslive/dataops-development-workspace:5-stable bash -c "date"And see a result like:
  ubuntu@ip-172-31-7-62:~$ docker run -it dataopslive/dataops-development-workspace:5-stable bash -c "date"
  Mon 20 Feb 2023 12:26:48 PM UTC
Setting up and configuration
-
Open or clone your desired repository.
-
Create a folder called
.devcontainer/in your repository rootThis change is inside the repository, so if another user uses the development environment, you may already see this folder.
-
Create a file called
devcontainer.jsoninside the.devcontainer/folder.This change is inside the repository, so if another user uses the development environment, you may already see this file. Here is a minimal example:
.devcontainer/devcontainer.json{
"name": "DevPod",
"image": "dataopslive/dataops-development-workspace:5-stable"
}
This enables VS Code to open your project as a devcontainer.
For more information on developing using dev containers and developing on a remote host, see here: https://code.visualstudio.com/remote/advancedcontainers/develop-remote-host
Giving DevPod access to Snowflake
The DataOps.live extension provides a step-by-step guide to help you set up the Snowflake connection for DevPod, simplifying your experience in the development environment.
When you open the development environment for the first time without setting any credentials beforehand, a notification message prompts you to open the setup walkthrough. Once open, a one-step setup displays on the VS Code. Following the on-screen guidance lets you choose the Snowflake authentication method and then set your Snowflake credentials.
Snowflake connection
-
Click Setup Snowflake Connection → Run Setup Wizard.
-
Choose from Username & Password or Single Sign On.
Username & Password
-
On top of the VS Code, choose a storage method for your Snowflake credentials.
- Visual Studio Code secret storage: Stores credentials within the workspace but only lasts for the lifetime of that workspace. You'll need to reenter them for a new workspace.
For a more permanent solution without using your DataOps.live account, consider using DevReady through your local VS Code client. You can set this up in your account preferences by selecting VS Code as your preferred editor.
-
Enter your Snowflake credentials following the on-screen instructions.
These credentials are for tools like dbt in the DataOps development environment to connect with your Snowflake. Once you enter them, the DataOps development environment setup will configure your environment. You only need to do this once for each workspace.
Single Sign On
You'll be guided through a few steps with prompts as follows:
-
If your DevReady SSO setup has been configured to allow multiple warehouses, choose a warehouse from the dropdown menu at the top of the window.
-
If your DevReady SSO Setup has been configured to allow multiple roles, choose a role from the dropdown menu at the top of the window.
-
Confirm you wish to sign in with SSO.
The built-in VS Code trusted URL mechanism will prompt you to open a browser window to complete the SSO process.
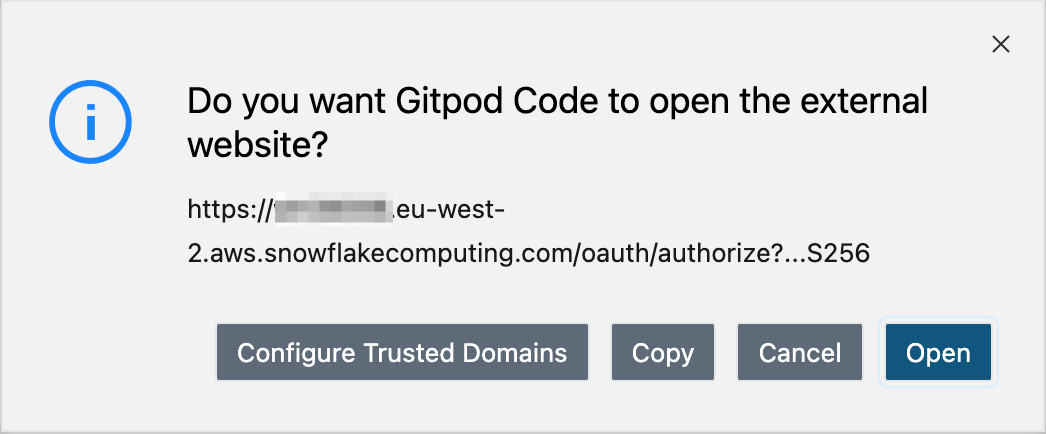
Once you click Open, you will be redirected to your Snowflake account where you can choose to log in with your SSO provider.
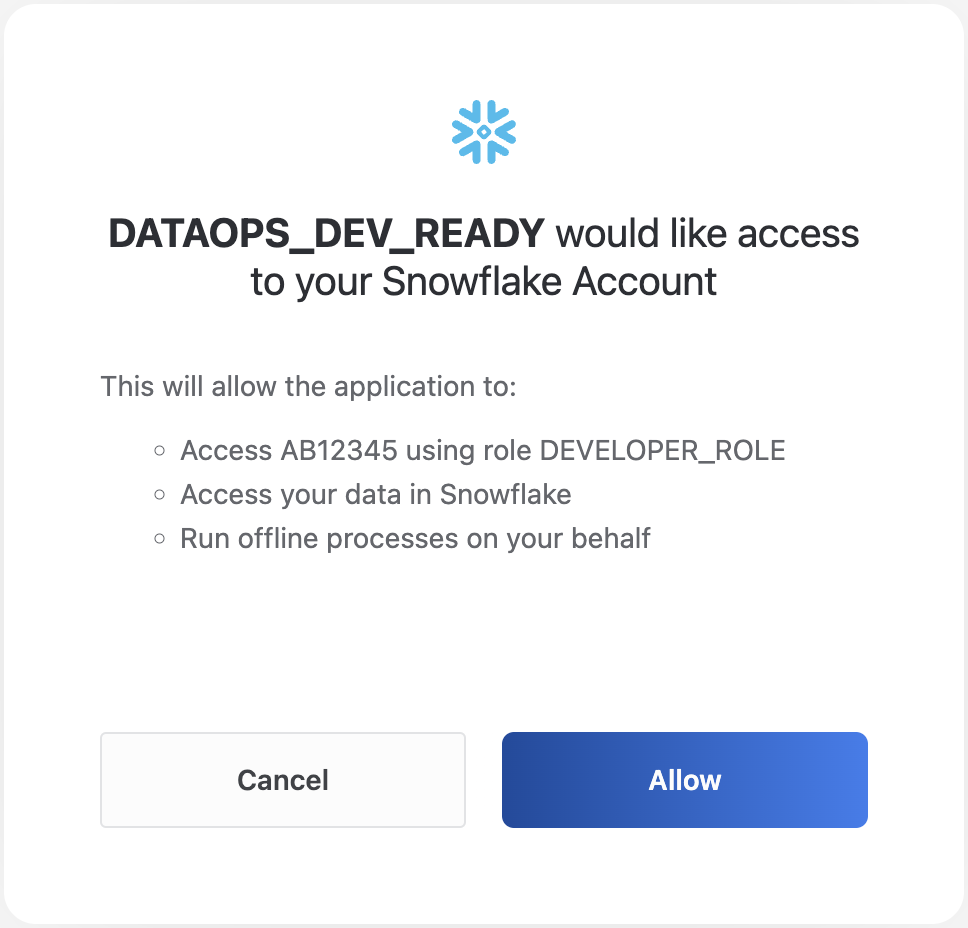
-
Click Allow to confirm the Snowflake account and role you are granting DevReady permission to use.
-
Close the browser window and return to VS Code.
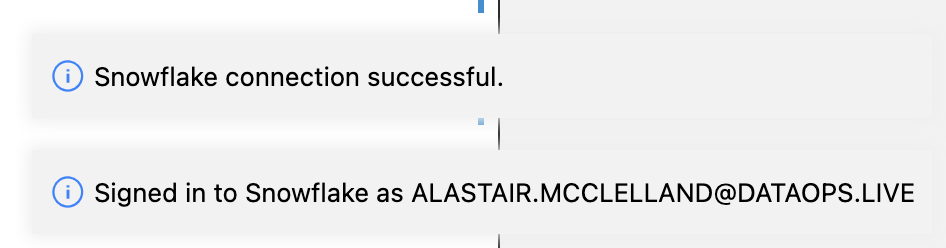
You should be back on your DevReady window where DevReady is setting up your workspace. There should be a popup in the bottom right corner of VS Code confirming you are now connected to Snowflake.
dbt version
The dbt version set in the variables.yml file in the main folder of your DataOps project is the source version for DevReady and MATE Orchestrator.
Once you have signed in to Snowflake as described in the previous steps, DevReady automatically gets the default dbt version used in MATE.
If you're satisfied with this version for your workspace, no action is needed.
However, if you prefer to use a different dbt version, you can modify it in the YAML file as described below:
-
Navigate to the
variables.ymlfile atpipelines/includes/config/variables.yml. -
Change the version value for the variable
DATAOPS_FEATURE_MATE_DBT_VERSION.Available versions correspond to those in the MATE orchestrator used in pipelines. You can also enter a custom dbt version bundled with MATE. For more information, see MATE Orchestrator.
-
Save and commit your changes.
In DevPod, you can only store credentials in VS Code secrets. This means your credentials are only stored on your local machine and will not be stored in your DataOps.live account.
Configuring Git credentials
When trying to do your first commit, VS Code might prompt you to set your Git
username and email. The commands it suggests need to be modified to remove the
--global flag, as the change will not persist if the container is recreated.
Instead, your commands should look like this:
git config user.email "you@example.com"
git config user.name "Your Name"
Your Git config is set locally on the files mounted from the host computer and will persist.
Advanced configuration
You can extend your container environment to your needs, but you will always
benefit from building on top of the built-in tooling provided by the DataOps
development environment. Read the
devcontainer.json reference
for what you can configure through the file.