Segregating Production and Non-Production Environments
A critical capability of the data product platform is providing data engineers with a safe yet separate environment for all their development tasks. This environment needs to perform identically for most things to production. The critical difference is the credentials the DataOps service account uses to run pipelines and access a data warehouse environment. At the high level, it requires production and non-production segregation of such environments. The non-production environments tend to be split further into qa, dev, and feature branches. The focus of this section is on top-level segregation.
Overview
We assume you are familiar with protected runners and protected branches to get started. You will use protected runners and branches to represent a production or production-like environment. Read the dedicated sections before moving on.
Further, we assume that you want to run the same pipeline for any environment with the end goal that it uses the correct per-environment credentials to access Snowflake.
To achieve that, we will take you through the following:
- How to dynamically select the DataOps runner via the agent tag based on the protected/unprotected environment context.
- How a given DataOps runner instructs the Secrets Manager orchestrator to select the correct secrets.
- How to only access a given secret based on an AWS example.
- How to set up the AWS IAM roles for the secret.
- How IAM roles get attached to a service account based on a Kubernetes example.
Environment segregation video
Watch the end-to-end demo (4:40 minutes) for all the steps, or move to the individual steps to customize them for your environment.
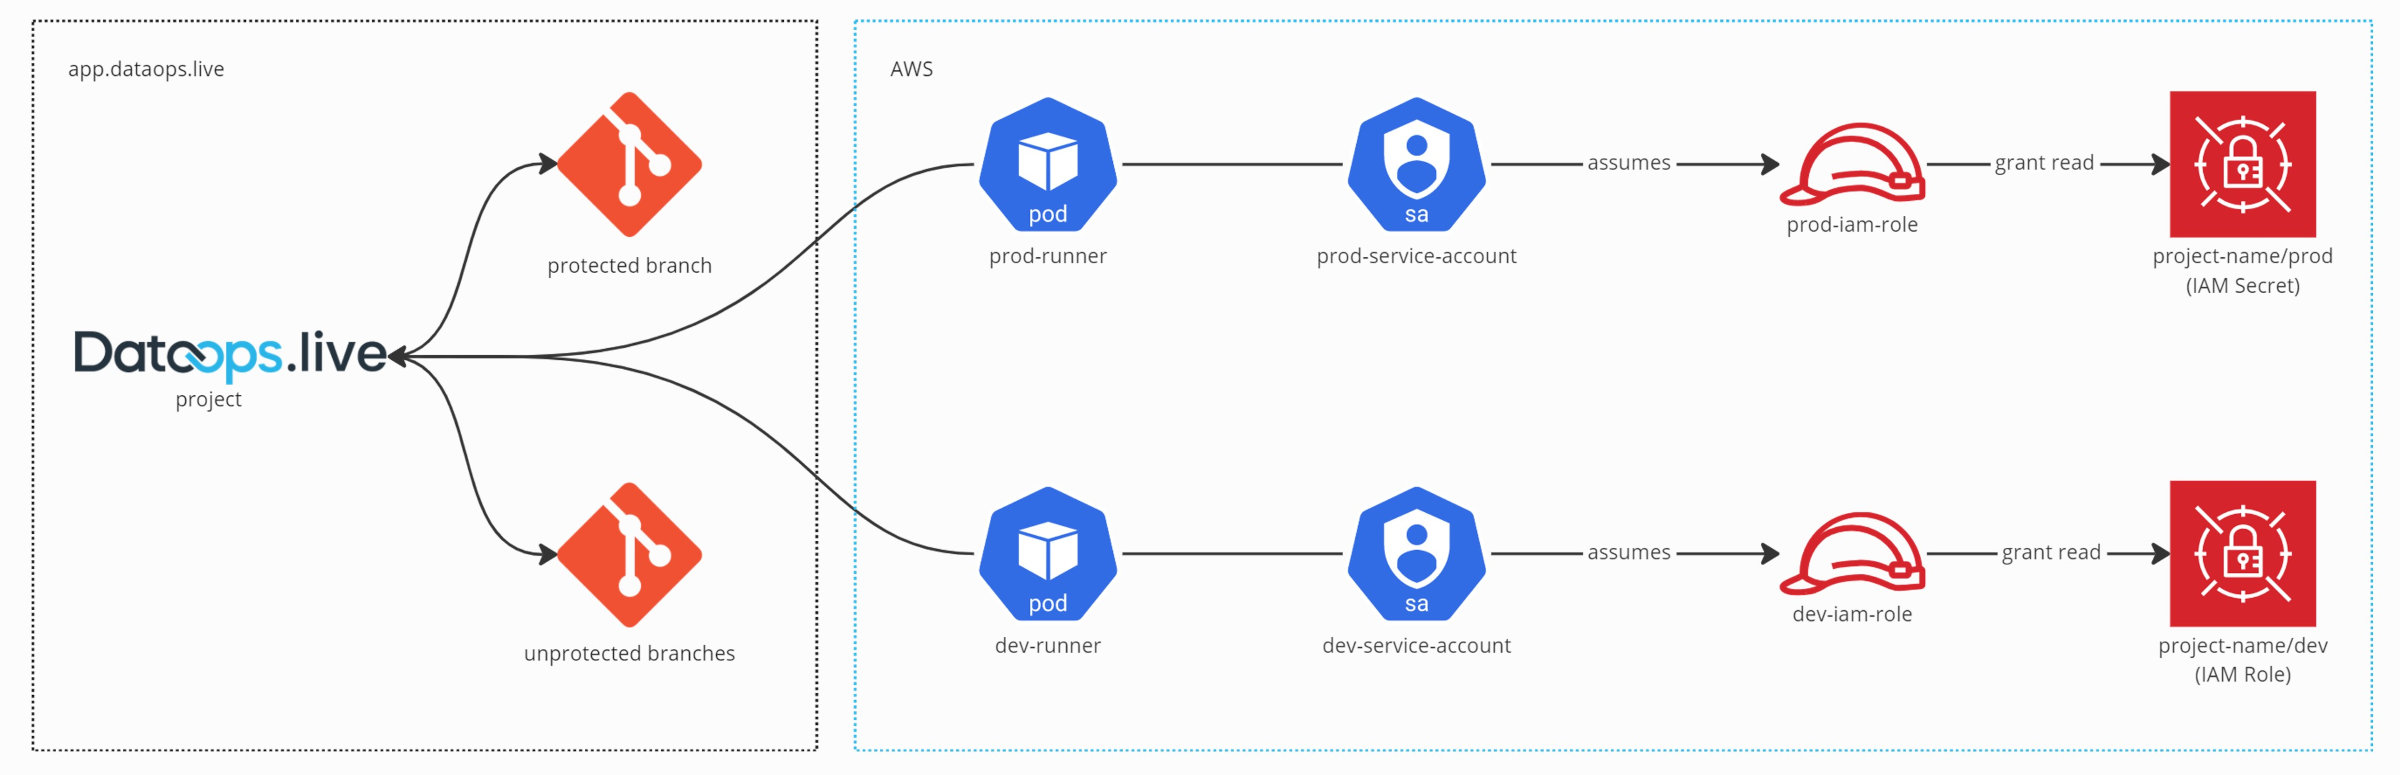
Selecting the runner by environment
Suppose you want to use the same pipeline definition no matter the environment. At the same time, the pipeline instance should dynamically select the correct runner for the given environment context. You achieve this by setting the DataOps runner tag (also called agent_tag) based on the protected/unprotected context. The tag, in turn, then selects the correct runner or cluster of runners matching the tag.
Consider the following example:
.agent_tag:
  tags:
    # set the name of the name as a string
    - protected=$CI_COMMIT_REF_PROTECTED
The name of the runner tag to use is either protected-true or protected-false.
The string value is generated as the concatenation of protected- and the evaluated value of $CI_COMMIT_REF_PROTECTED. CI_COMMIT_REF_PROTECTED evaluates to true if the job is running for a protected reference. In more detail, the behavior of CI_COMMIT_REF_PROTECTED is the following:
trueif the pipeline runs for a branch and that branch is protected,trueif the pipeline runs for a tag and that tag is protected,falseotherwise.
You are free to choose any naming conventions for your runner tags. For example, you could also use:
my-domain-prod[$CI_COMMIT_REF_PROTECTED]dataops-runner-is-protected: $CI_COMMIT_REF_PROTECTED- or you dynamically compute the runner name based on the actual environment name using
$DATAOPS_ENV
The rest of the discussion assumes that the tag name is either protected-true or protected-false.
Setting up the Kubernetes runner
You will have to set up two DataOps runners with the chosen tags protected-true and protected-false. Follow the Kubernetes runner instructions and ensure that you set the tag names to protected-true and protected-false respectively.
Create your dataops-values.yml as per instructions, yet before the runner installation, ensure you select the correct secret and service account. For the production runner this requires two additional configurations:
...
runners:
  serviceAccountName: prod-service-account
  config: |
    [[runners]]
      environment = ["SECRETS_SELECTION=project-name/prod"]
      [runners.kubernetes]
        pull_policy = "always"
...
Read on. We will first discuss the environment keyword and then the serviceAccountName keyword.
Selecting secrets by environment
We will use the environment keyword in the runner's config section to override the SECRETS_SELECTION parameter of the Secrets Manager Orchestrator. Secrets selection allows us to retrieve only a single secret (AWS) for the given runner. Using the runner's config will enable us to override any user-defined pipeline settings.
environment- append or override environment variables for the service container. Values are specified as name-value pairs as follows:environment = ["ENV1=value1", "ENV2=value2"].
For environment segregation, you need to modify the Kubernetes runner config section in dataops-values.yml for both runners:
...
runners:
  config: |
    [[runners]]
      environment = ["SECRETS_SELECTION=project-name/prod"]
      [runners.kubernetes]
        pull_policy = "always"
...
Choose the value of SECRETS_SELECTION as per your actual naming conventions in your Secrets Manager backend. The example above uses project-name/prod as the selector. For your nonproduction environment, adjust it to project-name/dev.
Finally, install the runner. If you have installed the runner before, you will need to restart it to leverage the configuration changes.
Protecting your secrets in AWS
Protecting secrets in AWS is preferably done using AWS IAM roles. The roles are set up specific to your project and your environment. In our example, you must protect the secret project-name/prod and project-name/dev as specified in the SECRETS_SELECTION parameter for the given runner.
The AWS IAM role must grant access to the secret project-name/prod or project-name/dev with the AWS secrets manager permissions secretsmanager:DescribeSecret and secretsmanager:GetSecretValue. Further, the IAM role needs to trust a service account. Follow a naming convention for the AWS service accounts as well. In our example, we will use prod-service-account and dev-service-account for the production and non-production environments respectively.
{
  "Version": "2012-10-17",
  "Statement": [
    {
      "Effect": "Allow",
      "Action": [
        "secretsmanager:GetSecretValue",
        "secretsmanager:DescribeSecret"
      ],
      "Resource": "project-name/prod"
    }
  ]
}
{
  "Version": "2012-10-17",
  "Statement": [
    {
      "Effect": "Allow",
      "Principal": {
        "Federated": "arn:aws:iam::123456789012:oidc.provider/oidc.eks.zone.amazonaws.com/id/123"
      },
      "Action": "sts:AssumeRoleWithWebIdentity",
      "Condition": {
        "StringEquals": {
          "oidc.eks.zone.amazonaws.com/id/123:aud": "sts.amazonaws.com",
          "oidc.eks.zone.amazonaws.com/id/123:sub": "system:serviceaccount:default:prod-service-account"
        }
      }
    }
  ]
}
Binding the service account to the Kubernetes pod
As a final configuration step, you must bind the service account to the Kubernetes pod executing the DataOps runner. You bind the service account to the pod in the dataops-values.yml of both runners. Showing this for production:
...
runners:
  serviceAccountName: prod-service-account
...
Once your dataops-values.yml is ready, you can launch the runner as per Kubernetes runner installation instructions
Marking the runner as protected
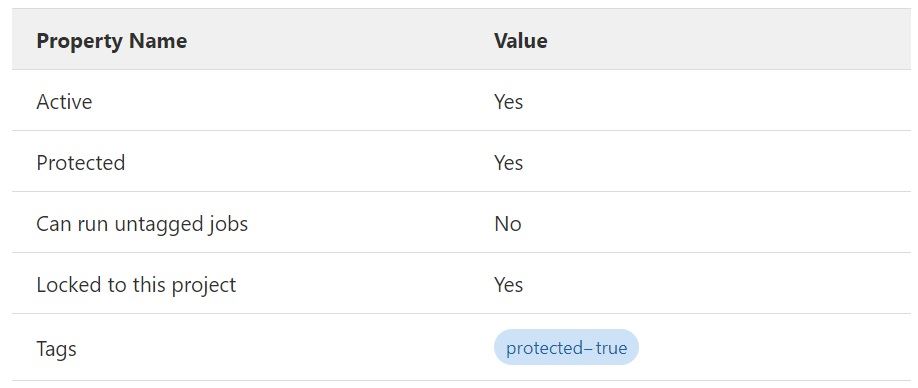
Once the runner is registered, mark the runner tagged with protected-true as a protected runner.
To achieve that navigate to your group's or project's Settings > CI/CD > Runners (expanded), edit the runner, and select the Protected checkbox.
Confirm your configuration: