Core Concepts
The basics
What you will learn
In this section, you will:
- Create your first Pipeline and decompose it into multiple Jobs
- Deploy these jobs to a Runner and customize the available functionality
- Control the sequential versus concurrent execution of jobs with Stages
- Parametrize job execution with Variables
Set aside 30 minutes to complete the section.
Preparation
- Under your top-level Groups menu, create a new
Demogroup - From the created group, click New project and use the Create a blank project tile
- Name this project
DataOps 101 Enablement Project
Hello world job
-
Create your first pipeline by adding a new file,
demo-ci.yml -
Create your first job Hello World in the pipeline by populating the content with the following code:
demo-ci.ymlSay Hello:
script:
- echo "Hello, World!" -
Don't forget to Commit
First pipeline run
- Navigate to CI / CD > Pipelines
- Choose ** Run Pipeline** in the default branch using our newly created
demo-ci.ymlpipeline type
This pipeline gets stuck because we have not told DataOps where to run the job.
Enabling the shared runner
Runners act as a proxy into your environment. If all your resources are accessible via the internet, we provide the DataOps Shared Runner. To enable this runner:
- Within your project, navigate to Settings > CI / CD > Runners
- Expand Shared Runners and toggle on Enable shared runners for this project
Deploying to a runner
Jobs are deployed to runners using a runner tag. Since we are using the shared runner, the tag to use is dataops-101-shared-runner. We can rerun the pipeline once we connect the job to the runner.
- Navigate to Repository > Files; open the file and edit it in the Web IDE
- Add the tag
dataops-101-shared-runnerand click Commit - From Pipeline Behaviour, select 'Run demo-ci.yml'
- Choose the default branch
- Commit with the comment
getting the pipeline unstuck
Say Hello:
  tags: [dataops-101-shared-runner]
  script:
    - echo "Hello, World!"
The pipeline reruns at this point. To verify the results navigate to "DataOps 101 Enablement Project > CI / CD > Pipelines". From this screen, you can execute "Run Pipeline" again.
Did you see what we did in the video? We chose the pipeline we wanted to run from the dropdown menu. The resultant pipeline ID then appeared below in the status bar, and we were able to open it in a new tab to see this pipeline without losing out on the current editing context.
As a bonus, you can choose to install your runner when you need to be more flexible in your deployment, e.g., accessing resources behind a firewall in a hybrid deployment.
Customizing the orchestrator
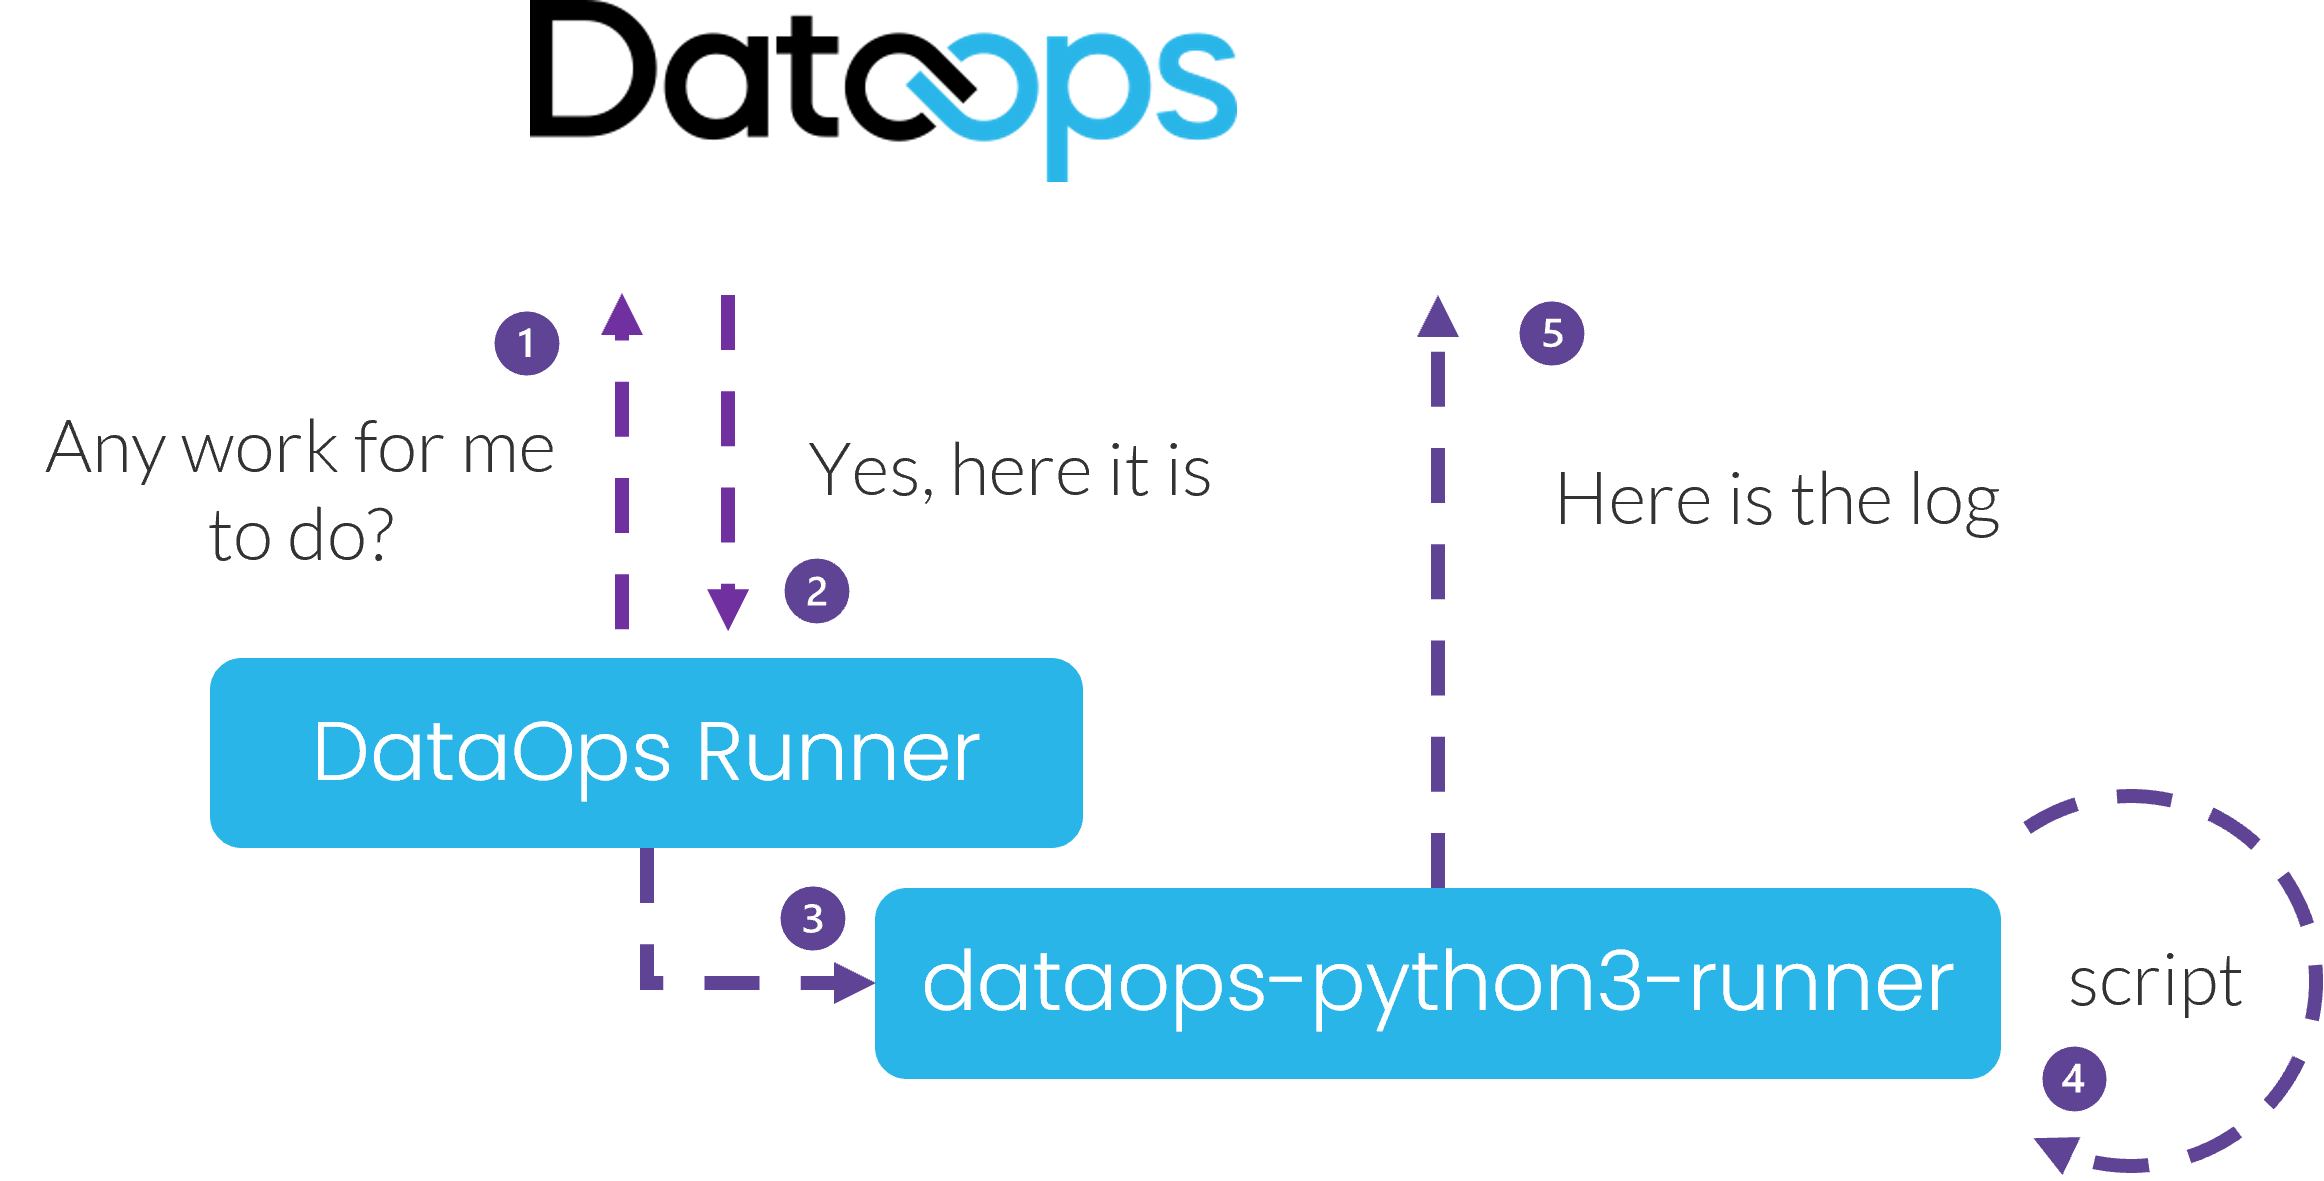
Jobs are not executed inside the runner. Instead, the job runs inside a container backed by a container image. These are the DataOps Orchestrators.
You typically choose the type of orchestrator based on the workload. In our case, we keep running a Python script. To control which Python version is available for your job, let's customize the orchestrator. The result is a deployment as follows:
In real-world examples, you will use the Snowflake Object Lifecycle Engine Orchestrator and your choice of ETL/ELT vendor integration.
To change the orchestrator to our desired Python3 Orchestrator, we need to add the image reference as follows:
- Edit
demo-ci.ymlagain and add the image property - Rerun the pipeline
Say Hello:
  tags: [dataops-101-shared-runner]
  image: dataopslive/dataops-python3-runner:5-stable
  script:
    - echo "Hello, World!"
Did you see what we did in the video? We clicked on the job to see the log output. For jobs that take longer, we will see the output coming back in near realtime.
Stages
Stages are the fundamental method for sequencing jobs in a pipeline. Let's see how:
- First, add a second job, commit, and run:
Say Hello:
  tags: [dataops-101-shared-runner]
  image: dataopslive/dataops-python3-runner:5-stable
  script:
    - echo "Hello, World!"

Say Hello Again:
  tags: [dataops-101-shared-runner]
  image: dataopslive/dataops-python3-runner:5-stable
  script:
    - echo "Hello, World!"
Both jobs run concurrently in a default stage called Test. Visually you can see the two jobs grouped in the same stage. However, we want more control over how this works.
- Define two stages at the top of demo-ci.yml:
stages:
  - Stage One
  - Stage Two

Say Hello:
  tags: [dataops-101-shared-runner]
  image: dataopslive/dataops-python3-runner:5-stable
  script:
    - echo "Hello, World!"

Say Hello Again:
  tags: [dataops-101-shared-runner]
  image: dataopslive/dataops-python3-runner:5-stable
  script:
    - echo "Hello, World!"
- Assign each job to a stage
stages:
  - Stage One
  - Stage Two

Say Hello:
  tags: [dataops-101-shared-runner]
  stage: Stage One
  image: dataopslive/dataops-python3-runner:5-stable
  script:
    - echo "Hello, World!"

Say Hello Again:
  tags: [dataops-101-shared-runner]
  stage: Stage Two
  image: dataopslive/dataops-python3-runner:5-stable
  script:
    - echo "Hello, World!"
- Commit and run
Now we are getting more control over how and when jobs run.
If there is a problem with jobs in the first stages, jobs in subsequent stages do not run.
- Play with the first job
stages:
  - Stage One
  - Stage Two

Say Hello:
  tags: [dataops-101-shared-runner]
  stage: Stage One
  image: dataopslive/dataops-python3-runner:5-stable
  script:
    - echo "Hello, World!"
    - I am not a valid command

Say Hello Again:
  tags: [dataops-101-shared-runner]
  stage: Stage Two
  image: dataopslive/dataops-python3-runner:5-stable
  script:
    - echo "Hello, World!"
Variables
- Create a
variablesblock in yourdemo-ci.yml:
variables:
  MY_NAME: Sam

stages:
  - Stage One
  - Stage Two

Say Hello:
  tags: [dataops-101-shared-runner]
  stage: Stage One
  image: dataopslive/dataops-python3-runner:5-stable
  script:
    - echo "Hello, World!"

Say Hello Again:
  tags: [dataops-101-shared-runner]
  stage: Stage Two
  image: dataopslive/dataops-python3-runner:5-stable
  script:
    - echo "Hello, World!"
- Change both jobs to use the new variable.
variables:
  MY_NAME: Sam

stages:
  - Stage One
  - Stage Two

Say Hello:
  tags: [dataops-101-shared-runner]
  stage: Stage One
  image: dataopslive/dataops-python3-runner:5-stable
  script:
    - echo "Hello, $MY_NAME!"

Say Hello Again:
  tags: [dataops-101-shared-runner]
  stage: Stage Two
  image: dataopslive/dataops-python3-runner:5-stable
  script:
    - echo "Hello, $MY_NAME!"
- Commit and run
Checkpoint 1
We have now built a DataOps project that:
- Used all the core concepts of pipeline, stages, and jobs
- Executed the pipeline by choosing the shared runner and binding it to a concrete Python Orchestrator
- Introduced customization with variables
Now take a break before you head to the next chapter.