Managing Snowflake Accounts
Spendview for Snowflake is a free module from DataOps.live observability, a data product platform core component.
Managing accounts
Spendview for Snowflake supports managing Snowflake accounts as data sources to be monitored. If you have the privilege in Snowflake, you can create user accounts in Spendview, allowing users to view metrics on these accounts and providing access to valuable operational metadata.
However, it also supports managing Spendview accounts to share Snowflake account metrics with people in your enterprise. See Managing Spendview Accounts for more information.
Prerequisites
- You can access Snowflake as a new user with the role
DATAOPS_OBS_VIEWER, which has the necessary permissions. See Create user and warehouse for more information. - If a firewall protects your Snowflake account, you must add our IPs to the allowlist to enable access to your account:
35.176.116.33,3.11.127.149, and18.170.83.22.
Creating user and warehouse
Find below two scripts that can help you create a new user with the necessary permissions and the warehouse necessary to use Spendview for Snowflake.
- Use the following script to create the user
DATAOPS_OBSwith the user roleDATAOPS_OBS_VIEWERwith the necessary permissions. You can change the user name and role or use an existing user after adding the relevant database roles. Only a user with theACCOUNTADMINrole can run this script.
-- with the ACCOUNTADMIN role, execute the following script:

USE ROLE ACCOUNTADMIN;

-- DATAOPS_OBS_VIEWER is the name of the role you may replace with any other name.

CREATE ROLE DATAOPS_OBS_VIEWER;

USE DATABASE SNOWFLAKE;

-- https://docs.snowflake.com/en/sql-reference/snowflake-db-roles.html

GRANT DATABASE ROLE USAGE_VIEWER TO ROLE DATAOPS_OBS_VIEWER;

GRANT DATABASE ROLE GOVERNANCE_VIEWER TO ROLE DATAOPS_OBS_VIEWER;

-- Create a user for Spendview for Snowflake (optional). You can use an existing one.

CREATE USER IF NOT EXISTS DATAOPS_OBS
TYPE = LEGACY_SERVICE
PASSWORD = 'enter your password';

--DATAOPS_OBS, the user that will be used for Spendview for Snowflake.

GRANT ROLE  DATAOPS_OBS_VIEWER TO USER DATAOPS_OBS;

ALTER USER DATAOPS_OBS
TYPE = LEGACY_SERVICE
SET default_role = DATAOPS_OBS_VIEWER;
- Use the following script to create a new warehouse called
DATAOPS_OBS_WH:
-- create a warehouse for Spendview for Snowflake (optional). You can use an existing one.

CREATE WAREHOUSE IF NOT EXISTS DATAOPS_OBS_WH
warehouse_size = 'Small'
AUTO_SUSPEND = 30 ;

-- For a better user experience, we recommend the size to be at least Small.
-- If you already have a warehouse in use with a larger size, like Medium,
-- we recommend using it as the platform will be faster.
-- If the warehouse is only for Spendview for Snowflake, we strongly recommend
-- setting a low AUTO_SUSPEND value, like 20-30 sec. The queries generated by
-- the platform are fast, 5 sec per run, so we would like to suspend the
-- warehouse when there is no traffic. There is no point in having an
-- AUTO_SUSPEND less than 30 sec as billing is per second (with a 60-second
-- minimum each time the warehouse starts).

GRANT ALL PRIVILEGES
ON WAREHOUSE DATAOPS_OBS_WH
TO ROLE DATAOPS_OBS_VIEWER;

ALTER USER DATAOPS_OBS
SET default_warehouse = 'DATAOPS_OBS_WH';
Adding an account
-
Open Spendview for Snowflake in your browser and sign in.
-
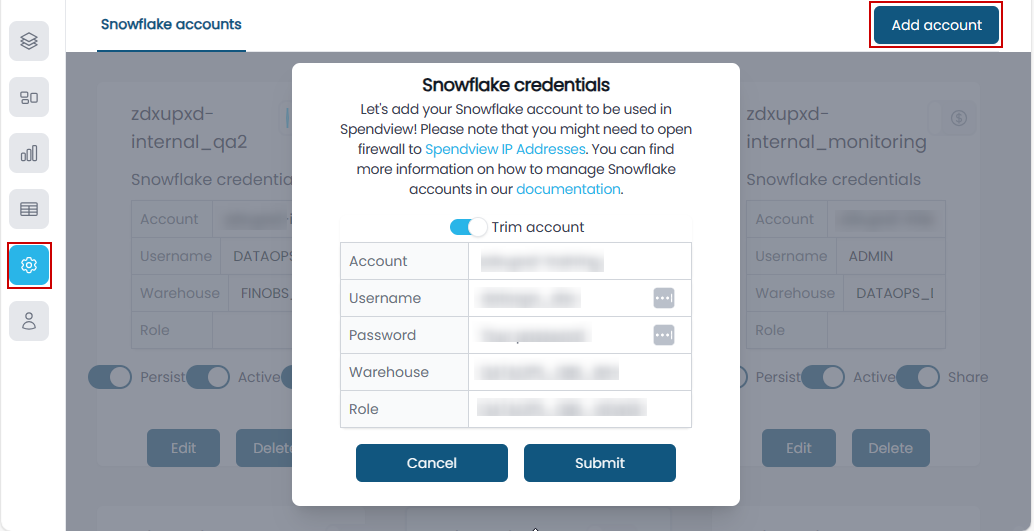
On the left sidebar, click the Snowflake accounts icon and then click Add account on the top right to open a form.
 note
noteYour access to the icons on the left sidebar depends on your role in Spendview. See Access levels and roles for more information.
-
Enter your Snowflake account name. To get the account name:
-
Log in to Snowflake.
-
Click the dropdown arrow next to the Snowflake icon on the bottom left and, in the open list, select the account you want to monitor.
-
Click the copy icon next to the account.
If you want to use the account URL, click the link icon next to the account.
-
Enter the copied account in the form and replace
.with-.For example,
oalsots.ot18677becomesoalsots-ot18677.You can get the current Snowflake account name from the address in your browser — the text immediately following the two forward slashes:

-
Keep the Trim account toggle on if you want to have the account you entered in the field automatically formatted to the expected format.
-
-
Enter a username, a password, and a warehouse name. You can use an existing user and warehouse or create new ones.
-
As an account user, you must have a default role with at least the permissions
USAGE_VIEWERandGOVERNANCE_VIEWERon the Snowflake database. Learn more about creating a new user with the proper permissions using a script. -
What you enter in the warehouse field will be the observability login user's default warehouse and should match the Snowflake user's default warehouse. Learn more about creating a new warehouse using a script.
We recommend you use an existing warehouse frequently used by you as the queries triggered by the platform are relatively small. They will not increase your expenses significantly if they run on a warehouse used by other users.
-
-
(Optional) Enter a specific Snowflake role that you want to use to monitor the Snowflake account. If this field is not set, the default Snowflake role for the user will be used.
Necessary PermissionsThe Snowflake role must have permissions equivalent to
USAGE_VIEWERandGOVERNANCE_VIEWERon the Snowflake database. -
Click Submit to add the Snowflake account.
-
Repeat the above steps to add all the Snowflake accounts you want to monitor.
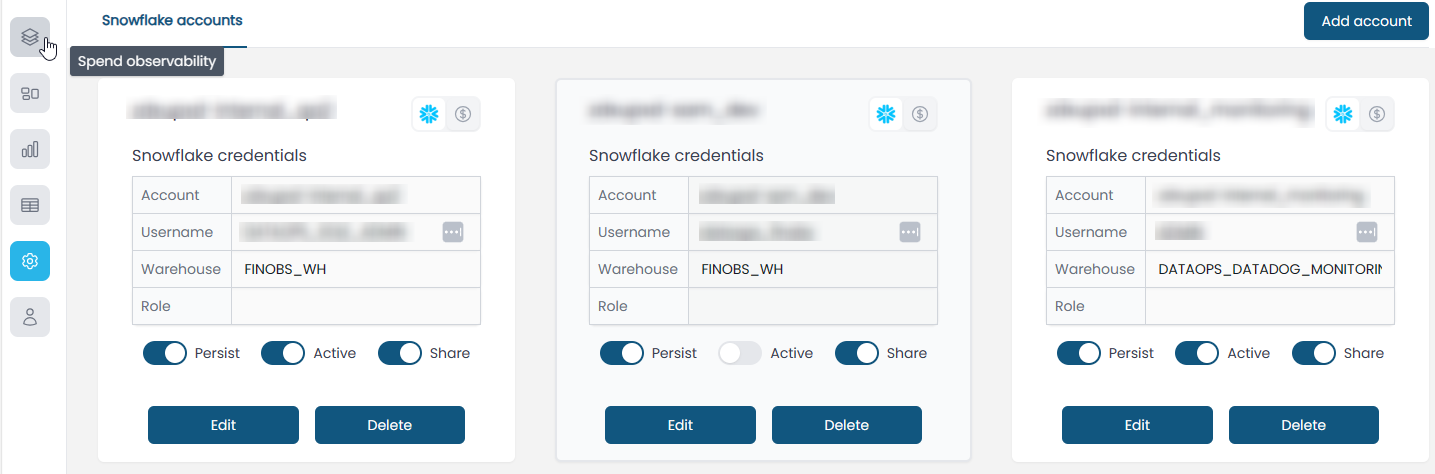
All added accounts have Persist, Active, and Share toggles, where the first two are enabled by default.
- Toggle Active off if you want to stop monitoring the account but keep it listed on the Snowflake accounts page.
- Toggle Persist off if you want to delete the account from the Snowflake accounts page once logged out.
- Toggle Share on if you want to if you want to give access to this account to specific Spendview users. See Inviting users for more information.
Editing an account
-
Open Spendview for Snowflake in your browser and sign in.
-
Click the Snowflake accounts icon on the left sidebar.
-
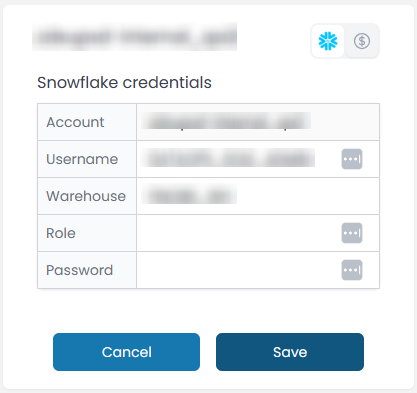
On the tile of the account you want to modify, click Edit.
-
Modify the values in the account fields as necessary, including entering a new password, and click Save.
-
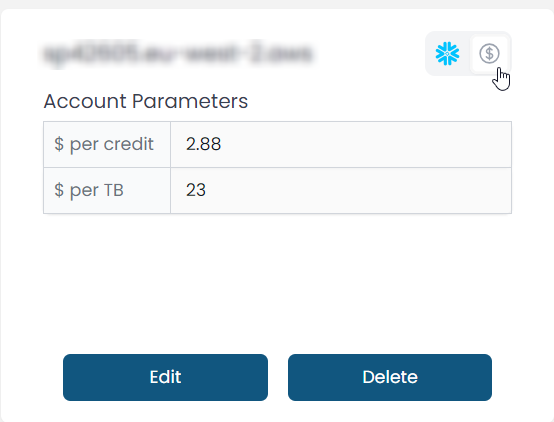
To switch to the account cost view, click the dollar sign on the top right of the tile.
The cost per credit and Terabyte are added by default. Check these values and change them if your Snowflake billing is different.
-
Click Edit, modify the cost per credit and TB if needed, and click Save.