Template Rendering
Template rendering is a software technology that takes a template built using a template language like Jinja and injects (or passes) data into it. The result is content such as a static web application, text document, or configuration file. It is an excellent way to substitute values in the template or configuration files, forming an integral part of the DataOps.live data product platform architecture, as follows:
-
YAML configuration files
-
The DataOps reporting functionality, including the following components:
Therefore, it is worth looking at the principles of Template Rendering to understand how DataOps.live leverages its power.
Jinja template rendering
DataOps.live uses Jinja Template Rendering to inject data into YAML configuration files and for reporting purposes.
How?
Templates are developed using the Jinja Templating Language. A Jinja template is a text file containing variables, expressions, and tags. When the template is rendered, these variables and expressions get replaced with values, while the tags control the template's logic.
For instance, the Jinja Template Designer Documentation uses the following example to show what a simple template looks like:
<!DOCTYPE html>
<html lang="en">
  <head>
    <title>My Webpage</title>
  </head>
  <body>
    <ul id="navigation">
      {% for item in navigation %}
      <li><a href="{{ item.href }}">{{ item.caption }}</a></li>
      {% endfor %}
    </ul>

    <h1>My Webpage</h1>
    {{ a_variable }} {# a comment #}
  </body>
</html>
Jinja basics
Now that we understand what Jinja looks like, let's dive deeply into some basics.
As highlighted in the Jinja documentation, Jinja is a templating language similar to Python. MATE primarily uses it to write functional SQL. Jinji is used in other functions, including documentation, macros, and packages.
While the best place to learn Jinja is its Jinja Template Designer documentation, it is important to review the basics that are most often used in MATE.
Delimiters
There are three delimiters to be aware of:
1. {% %} statement delimiters
Statement delimiters are used to denote statements. And they are used for any functional programming, such as starting and ending loops, if-else statements, and setting variables.
For instance:
- Set a variable as follows:
{% set animals = ['horse', 'cat', 'dog'] %}
- The
forloop construct is as follows:
{% set animals = ['horse', 'cat', 'dog'] %}

{% for animal in animals %}
  loop through animal list
{% endfor %}
- The
if-elseconstruct is as follows:
{% if i = 1 %}
  do something
{% else %}
  do something else
{% endif %}
For a use case of the if-else statement, see How to Use Python's Datetime and Time Modules in Jinja Templates.
2. {{ }} expression delimiters
This delimiter contains expressions that are printed to the rendered file. For instance:
{% set my_companion = 'Dutch Shepherd'] %}

I have a companion dog. It is my {{ my_companion }}.
When this script is rendered, it reads as follows:
I have a companion dog. It is my Dutch Shepherd.
3. \{# #} comment delimiters
This delimiter is used to denote comments. For example:
{# this script describes my companion #}

{% set my_companion = 'Dutch Shepherd'] %}

I have a companion dog. It is my {{ my_companion }}.
Jinja features
The most common features used in Jinja are dictionaries, lists, for-loops, if-else statements, and macros. Let's look at each feature individually:
1. Dictionaries
Dictionaries in Jinja are data structures comprising key-value pairs. The best way to describe a dictionary is to look at the following code snippet:
{% set customer = {
  'customer_id': 'A001',
  'name': 'My Name',
  'address': 'This is my address'
} %}
The data in this data structure is then accessed as follows:
{{ customer.customer_id }}

A001

{{ customer.name }}

My Name

{{ customer.address }}

This my address
2. Lists
Lists are similar to dictionaries in that they are also data structures. However, they also differ because they are ordered and indexed by integers starting from 0.
For instance:
{% set my_pronouns = ['me', 'myself'] %}

{{ my_pronouns[0] }}

me

{{ my_pronouns[1] }}

myself
3. if-else statements
Even though the if-else construct has been highlighted in the delimiters section, it is worth taking another look.
if-else statements essentially are control statements that allow the system to make decisions based on clear criteria. For instance:
{% set color = 'blue' %}

{% if color = 'blue' %}
  {{  The sky is blue }}
{% else %}
  {{ The grass is green }}
{% endif %}
Because the variable color is set to 'blue' at the top of this script, it will always render as
The sky is blue
However, the script renders differently if we modify this if-else statement to use elif (else if).
{% set color = 'blue' %}

{% if color = 'blue' %}
  {{  The sky is blue }}
{% elif color = 'green' %}
  {{ The grass is green }}
{% else %}
  {{ There is no color at all! }}
{% endif %}
The expected outcomes are as follows:
- If
coloris set to 'blue', the template will render asThe sky is blue - If
coloris set to 'green', the template will render asThe grass is green - If
coloris null or has no value, the template will render asThere is no color at all!
4. for loops
For-loops provide the functionality where the template renderer will repeat a code block while passing in different values each time it iterates through the loop.
For example:
{% set products = ['chocolate', 'ice cream', 'candy'] %}

{% for product in products %}
  My favorite food is {{ product }}
{% endfor %}
This template will render as follows:
My favorite food is chocolate

My favorite food is ice cream

My favorite food is candy
5. Macros
In Jinja (and MATE), a macro is a way to write functions similar to functions in any other programming language. We can use macros to group a set of statements and then reference these statements throughout our codebase.
For instance:
{% macro my_color_products(color, product = 'toys') %}

I stock {{ color }} {{ product }} in my eCommerce store.

{% endmacro %}
Once the macro has been written, the next step is to use it. In this sample scenario, I am using this macro to describe the color products in my online store. The template and rendered text are as follows:
{{ my_color_products(red) }}

I stock red toys in my eCommerce store.

{{ my_color_products(blue, trains) }}

I stock blue trains in my eCommerce store.
6. Packages
Packages form a vital component for importing models, macros, and test suites into your DataOps project, especially in MATE. See the MATE docs for more information on using packages in DataOps.
Whitespace control
Whitespace control is a vital part of the Jinja templating language. By default, Jinja renders its output with large blocks of whitespace between each line of code. For example, looking at the following code snippet, we will see that the compiled output includes big blocks of whitespace between each line of code.
{% set animals = ['tiger', 'snake', 'lion', 'leopard'] %}

{% for animal in animals %}
  {% if animal = 'snake' %}
    {% set animal_type = 'reptile' %}
  {%  else %}
    {% set animal_type = 'mammal' %}
  {%  endif %}

  The {{ animal}} is a {{ animal_type }}.
{% endfor %}
This template will render as follows:
The tiger is a mammal.


The snake is a reptile.


The lion is a mammal.


The leopard is a mammal.
This is because when Jinja compiles and evaluates each of the blocks it needs to evaluate, it will include a whitespace line for every line inside the Jinja code, even if it doesn't print anything. Therefore, because there are eight lines of Jinja code, there will be eight lines of whitespace between each line of rendered code.
How do we fix this?
We add minus signs (-) next to the % signs in the control blocks, eliminating the whitespace immediately before and after each control block.
For example:
{%- set animals = ['tiger', 'snake', 'lion', 'leopard'] -%}

{% for animal in animals -%}
  {%- if animal = 'snake' -%}
    {%- set animal_type = 'reptile' -%}
  {%- else -%}
    {%- set animal_type = 'mammal' -%}
  {%-  endif -%}

  The {{ animal}} is a {{ animal_type }}.
{% endfor %}
The Jinja template will now render as follows:
The tiger is a mammal.

The snake is a reptile.

The lion is a mammal.

The leopard is a mammal.
Removing whitespace is quite tricky. Therefore, it's a case of trial and error.
Template rendering the DataOps way
Template files are identified by inserting the word .template into the filename, typically before the extension (e.g. config.template.yml). However, some older templates may still use a suffix format (e.g., config.yml.template).
The suffix format is now deprecated and should not be used in new projects.
Let's now look at two examples of how Template Rendering is used in DataOps.live:
YAML config files
As described in the DataOps Reference Project, storing YAML templates in the repository and rendering them at runtime using variables from the DataOps vault or calculated in an earlier job is a critical function of the overall data product platform.
For instance, let's assume that your login credentials are needed in a YAML config file to run a DataOps pipeline job. However, it is not a good idea (or DataOps best practice) to add these credentials to the YAML file at development time, posing a challenge of how to access these credentials at runtime.
The best solution is to develop a YAML template file with placeholder variables, extract these credentials from the DataOps Vault at runtime, and inject them into the template file at the beginning of the job, allowing the job to run successfully, while preserving the integrity and the security of this data.
The code snippet for this template file is as follows:
LOGIN_CREDENTIALS:
  USERNAME: { { PERSON.NAME } }
  PASSWORD: { { PERSON.PASSWORD } }
The resulting YAML config file, after it has been rendered using our Template Rendering process, will look like this:
LOGIN_CREDENTIALS:
  USERNAME: John
  PASSWORD: John's Password
In some cases, having both the template file and the resulting processed file may cause issues, mainly if an application scans a directory and processes all files found. In this case, you can set the variable DATAOPS_REMOVE_RENDERED_TEMPLATES in the variables.yml file in the project settings, and this, in turn, causes the template renderer to remove the template once it has been processed.
Set this variable in the variables.yml file in the project settings and not within your job. Otherwise, you may get issues when running your pipeline.
As part of the rendering process, we also perform validation of the YAML configuration. Any invalid YAML syntax will cause the pipeline to fail, and the error message will be displayed in the pipeline logs. This includes invalid usage of tab characters (\t), missing colons, and other syntax errors.
Static web application
DataOps also uses template rendering for static web page generation. In summary, report output files are generated by different DataOps pipeline jobs and rendered as static web applications at runtime by the DataOps.live data product platform.
Jobs leverage standard DataOps variables like CI_JOB_ID and CI_JOB_NAME to generate output as an artifact or static web application. See the Job Artifacts doc page for more information.
The output must not be generated by the same process that renders the report. The template rendering process also can render output generated by other jobs/processes.
To expand on this topic, let's look at how DataOps renders the HTML page index.html at runtime by combining the template titled index.template.html and a CSV output file.
This example does not include the output file generation process. It picks up where the values are injected into the placeholder variables in the index.template.html template file as follows:
<!DOCTYPE html>
<html lang="en">
  <head>
    <title>{{ env.CI_JOB_NAME }}</title>
    <meta name="author" content="DataOps" />
    <meta
      content="Display any CSV file as a searchable, filterable, pretty HTML table"
    />
  </head>
  <body>
    <h1>All about {{ env.CI_JOB_NAME }}</h1>

    <p>
      The main content of the static web page gets generated from the input file
      <b>data/{{ env.CI_JOB_ID }}_output.out</b>
    </p>
  </body>
</html>
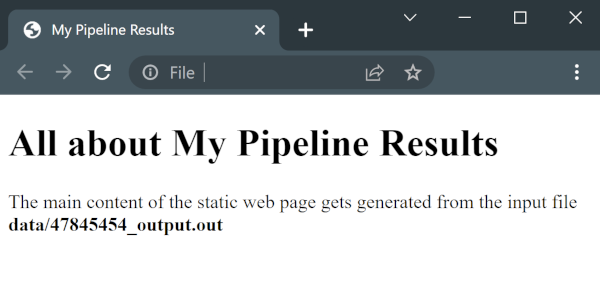
Assuming we used this template in a DataOps job named My Pipeline Results and the pipeline execution assigned the JOB_ID as 47845454 to this DataOps job, the rendered output is as the following HTML:
<!DOCTYPE html>
<html lang="en">
  <head>
    <title>My Pipeline Results</title>
    <meta name="author" content="DataOps" />
    <meta
      content="Display any CSV file as a searchable, filterable, pretty HTML table"
    />
  </head>
  <body>
    <h1>All about My Pipeline Results</h1>

    <p>
      The main content of the static web page gets generated from the input file
      <b>data/47845454_output.out</b>
    </p>
  </body>
</html>
Or as a web page in the browser as: