Using Snowpark Container Services with DataOps.live
What are Snowpark Container Services?
Snowpark Container Services (SPCS) is a component of Snowflake Data Cloud, which has been in public preview since the end of Dec 2023. It's a fully managed service that helps the operations of container-based applications directly inside Snowflake. Containerized applications package all their dependencies, libraries, and configuration files into a container image, ensuring smooth execution and compatibility.
These services are designed specifically for Snowflake, fully integrated and optimized to run containerized workloads. They offer a secure and governed system with flexible hardware options, including GPUs, for a seamless and effective user experience.
The new Snowpark runtime simplifies the complexities of managing and maintaining container computing resources and clusters. For more information, see the Snowflake documentation Snowpark Container Services.
Combined capabilities: container services and DataOps.live
The introduction of Snowpark Container Services is a significant enhancement to DataOps processes within the Snowflake ecosystem. You can now use various DataOps application images in Snowpark Container Services. This will enhance your DataOps's project pipelines and jobs and make them more efficient.
By coupling DataOps.live application images with Snowpark Container Services, the deployment and management of containerized applications becomes more accessible than ever. This integration offers greater flexibility and efficiency in managing different workloads.
You can now focus on creating your containerized applications on the data product platform. Quickly launch them on the Snowflake platform without worrying about managing the infrastructure in both environments.
How does it work?
For most DataOps's project pipeline jobs, the standard built-in orchestrator images are usually sufficient. Yet, Dataops.live allows the creation of images from scratch to answer specific customer needs. This is where Snowpark Container Services becomes particularly valuable, introducing a key feature to the process.
This guide walks you through linking your DataOps's project CI/CD pipelines, your app's pipeline, and Snowflake Snowpark containerization. It focuses on flexibility and supporting various workloads. You'll learn how to create application images in the data product platform and then use them inside Container Services.
In the data product platform, you will work with the DataOps pipelines, jobs, orchestrators, SOLE, and MATE.
Here's an outline of the steps:
- Start DevReady, our browser-based development environment.
- In your Dataops's project CI/CD pipeline, define a job to build your custom application image.
- Register and deploy the image into the Snowpark image registry present in your Snowflake account.
You use the image registry and compute pool within your Snowflake account to run containerized apps. Once deployed and running, containers expose services, service functions, or jobs.
Here's what you'll do:
- Upload your application images to the registry in your Snowflake account.
- Once uploaded, run your application containers as a service, service function, or job. Create a YAML file to provide Snowflake with the necessary information for configuration and run.
- When creating a service or job, create and specify a compute pool where they will operate.
- Use service functions to communicate with a service from an SQL query.
Prerequisites
Before proceeding, ensure the following:
- You have a Snowflake account with Snowpark Container Services enabled.
- You are assigned the ACCOUNTADMIN role in Snowflake.
Development of a Dataops application image
Let's say that you want to build an inference application that uses trained machine-learning models to make predictions or draw conclusions from new data inputs. You want this app to take input data, process it through the trained model, and generate output predictions or insights based on the learned patterns from the training data.
This example assumes a DataOps project in our data product platform at snowflake/solutions/<project-name>.
Develop your DataOps app as a Jinja2 template, and then use the DataOps renderer to render this.
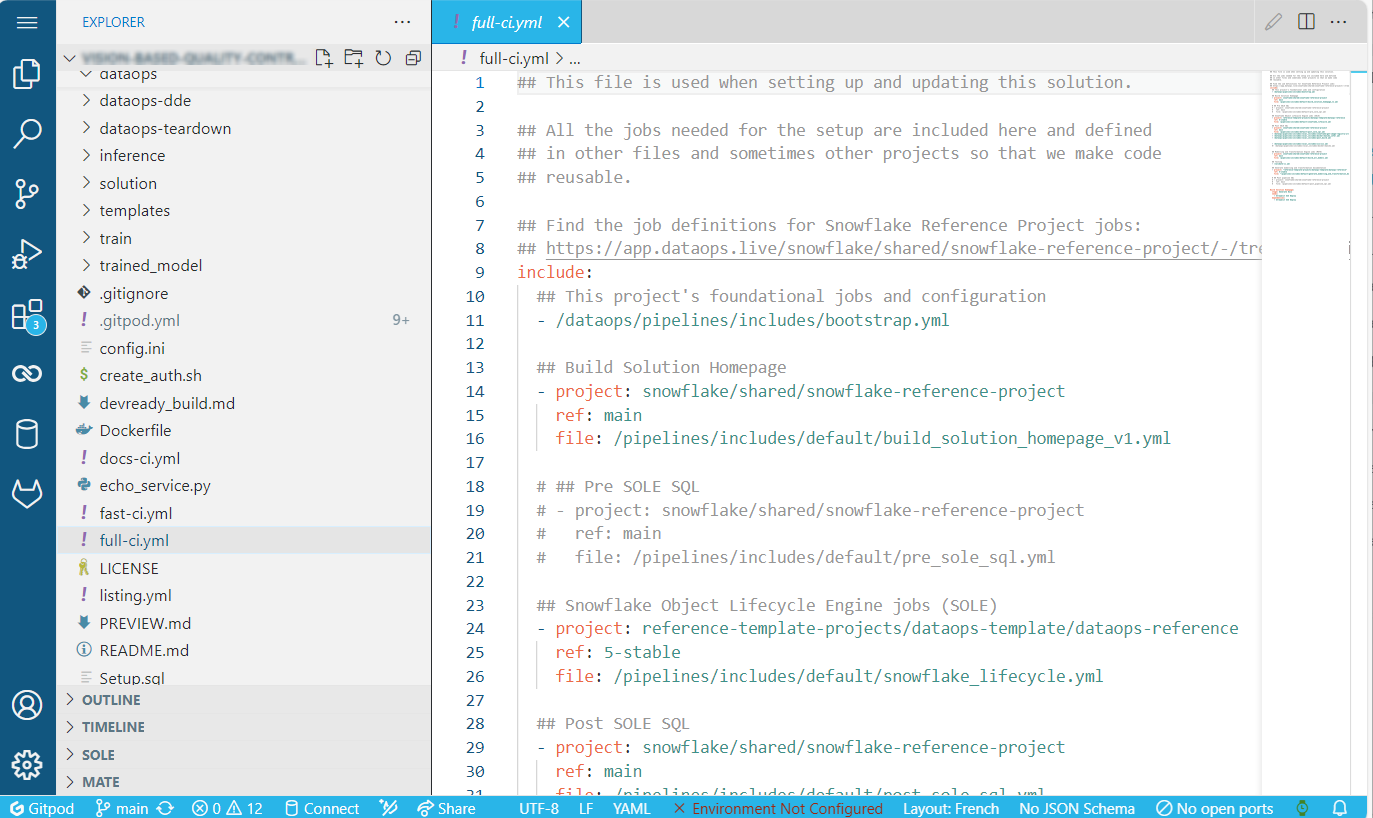
Use the includes directory in your project to store the pipeline job definitions in the full-ci.yml file. For example:
include:
  ## This project's foundational jobs and configuration
  - /dataops/pipelines/includes/bootstrap.yml

  ## Build Solution Homepage
  - project: snowflake/shared/snowflake-reference-project
    ref: main
    file: /pipelines/includes/default/build_solution_homepage_v1.yml

  # ## Pre SOLE SQL
  # - project: snowflake/shared/snowflake-reference-project
  #   ref: main
  #   file: /pipelines/includes/default/pre_sole_sql.yml

  ## Snowflake Object Lifecycle Engine jobs (SOLE)
  - project: reference-template-projects/dataops-template/dataops-reference
    ref: 5-stable
    file: /pipelines/includes/default/snowflake_lifecycle.yml

  ## Post SOLE SQL
  - project: snowflake/shared/snowflake-reference-project
    ref: main
    file: /pipelines/includes/default/post_sole_sql.yml
  - /dataops/pipelines/includes/local_includes/snowflake/get-image-registry-url.yml
  - /dataops/pipelines/includes/local_includes/docker/kaniko_infer.yml
  - /dataops/pipelines/includes/local_includes/post_build.yml

  - /dataops/pipelines/includes/local_includes/sis/sis.yml
  #- /dataops/pipelines/includes/local_includes/docker/kaniko.yml

  ## Modelling and Transformation Engine jobs (MATE)
  - project: snowflake/shared/snowflake-reference-project
    ref: main
    file: /pipelines/includes/default/build_all_models.yml

  ## Testing
  - /validate-ci.yml

  ## Generate modelling and transformation documentation
  - project: "reference-template-projects/dataops-template/dataops-reference"
    ref: 5-stable
    file: "/pipelines/includes/default/generate_modelling_and_transformation_documentation.yml"

Build Solution Homepage:
  stage: Generate Docs
  needs:
    - Streamlit SIS Deploy
  dependencies:
    - Streamlit SIS Deploy
Build images during app development
During your development cycle, you can build images directly in DevReady, our browser-based development environment that optimizes development and testing with Snowpark. The DataOps development environment is fully pre-configured with all the main libraries and tools required for Snowpark development and testing.
Build your images for the linux/amd64 platform using a command similar to:
docker build --rm --platform linux/amd64 -t <name> .
Build images with CI/CD
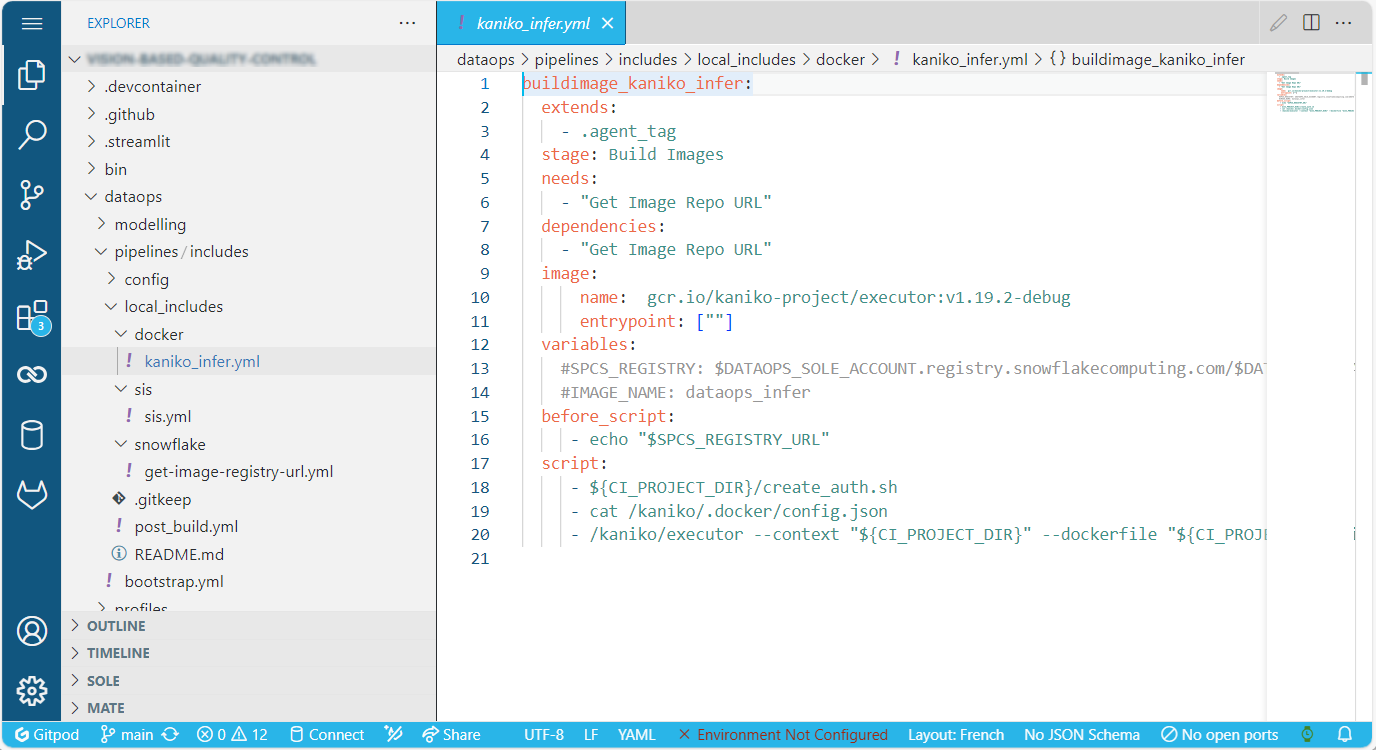
We recommend using Kaniko as the image builder. You define a job like this at the dataops root directory of your project:
build_image_kaniko_infer:
  extends:
    - .agent_tag
  stage: Build Images
  needs:
    - "Get Image Repo URL"
  dependencies:
    - "Get Image Repo URL"
  image:
    name: gcr.io/kaniko-project/executor:v1.19.2-debug
    entrypoint: [""]
  variables:
    #SPCS_REGISTRY: $DATAOPS_SOLE_ACCOUNT.registry.snowflakecomputing.com/$DATAOPS_DATABASE/$IMAGE_SCHEMA/$IMAGE_REPO
    #IMAGE_NAME: dataops_infer
  before_script:
    - echo "$SPCS_REGISTRY_URL"
  script:
    - ${CI_PROJECT_DIR}/create_auth.sh
    - /kaniko/executor --context "${CI_PROJECT_DIR}" --dockerfile "${CI_PROJECT_DIR}/Dockerfile" --destination $(echo ${SPCS_REGISTRY_URL} | tr '[:upper:]' '[:lower:]')/${IMAGE_NAME}
You need a script named create_auth.sh to create a config.json. Below, you can see a sample create_auth.sh.
#!/bin/sh

CONFIGFILE=/kaniko/.docker/config.json
CRED=`echo ${DATAOPS_SOLE_USERNAME}:${DATAOPS_SOLE_PASSWORD} | base64 -w 0`
echo '{"auths":{"'$(echo ${SPCS_REGISTRY_URL} | tr '[:upper:]' '[:lower:]')'": { "auth": "'${CRED}'" }}}' > ${CONFIGFILE}
Sample Dockerfile
The following Dockerfile defines an example image that upgrades Python to version 3.10 from the standard DataOps Python3 orchestrator image.
FROM dataopslive/dataops-python3-runner:5-stable

RUN add-apt-repository -y ppa:deadsnakes/ppa \
 && apt-get update \
 && apt-get install -y python3.10 \
 && ln -sf /usr/bin/python3.10 $(which python3)
Sample build job
To build the custom image, you define a job like this at the dataops root directory of your project:
buildimage_kaniko_infer:
  extends:
    - .agent_tag
  stage: Build Images
  needs:
    - "Get Image Repo URL"
  dependencies:
    - "Get Image Repo URL"
  image:
    name: gcr.io/kaniko-project/executor:v1.19.2-debug
    entrypoint: [""]
  variables:
    #SPCS_REGISTRY: $DATAOPS_SOLE_ACCOUNT.registry.snowflakecomputing.com/$DATAOPS_DATABASE/$IMAGE_SCHEMA/$IMAGE_REPO
    #IMAGE_NAME: dataops_infer
  before_script:
    - echo "$SPCS_REGISTRY_URL"
  script:
    - ${CI_PROJECT_DIR}/create_auth.sh
    - /kaniko/executor --context "${CI_PROJECT_DIR}" --dockerfile "${CI_PROJECT_DIR}/Dockerfile" --destination $(echo ${SPCS_REGISTRY_URL} | tr '[:upper:]' '[:lower:]')/${IMAGE_NAME}
Image registries
Image registries are Snowflake schema objects. You can have multiple registries per schema. The naming format is
account-identifier.registry.snowflakecomputing.com/<database>/<schema>/<registry_name>
Note that having Docker log in to the registry fails if you enable two-factor authentication (2FA).
Image registries appear as Snowflake stage. However, the Snowsight UI does not allow listing the contents and throws errors when accessing the stage. It does not appear to be possible to show the registry's contents.
Compute pools
Compute pools are the hosts that Snowflake uses to run containers. To clean up and stop being billed, follow these steps.
-
Stop all services and jobs on the compute pool.
ALTER COMPUTE POOL tutorial_compute_pool STOP ALL; -
Proceed to delete the compute pool.
DROP COMPUTE POOL tutorial_compute_pool;
Running images as containers
Services
A service contains multiple containers and is the unit of management within SPCS. Create a service using SQL or from a definition file in a stage. The definition contains:
- List of containers with name, image, command, args, environment variables, volume mounts, resources
- List of endpoints with name, type, and if public
- List of volumes with name, source, configuration
- Log level configuration, e.g. INFO, WARN
Service endpoints
Service endpoints are externally available at https://<host>-account-identifier.snowflakecomputing.app/ui. The host part is randomly generated and identifies the container. The /ui part is defined in the code uploaded.
The service implementation listens to port 8000, which is proxied to port 443. Snowflake also adds an OAuth login in front of this connection. Snowflake SSO users can log in using the normal SSO login flow.
A DESCRIBE SERVICE <name> command will describe the service, and the endpoint will be in JSON format in the public_endpoints column.
Networking
Containers cannot connect to the Internet by default. You can configure the access to specific hosts on the Internet. The ports supported are ports 22 (ssh+git), 80 (HTTP), 443 (HTTPS), and 1024+. For simpler cases, you would just configure ports 80 and 443.
Configuring network egress is a multi-step process. Start by creating a network rule:
CREATE OR REPLACE NETWORK RULE google_network_rule
  MODE = EGRESS
  TYPE = HOST_PORT
  VALUE_LIST = ('google.com:80', 'google.com:443');
Next, reference the rule as part of an external access integration:
CREATE EXTERNAL ACCESS INTEGRATION google_apis_access_integration
  ALLOWED_NETWORK_RULES = (translate_network_rule, google_network_rule)
  ENABLED = true;
For other Snowflake services, an external access integration can reference Snowflake Secrets. For Container Services, you can pass secrets as either environment variables or files.
Finally, create the service with a reference to the external access integration:
CREATE SERVICE eai_service
  IN COMPUTE POOL MYPOOL
  FROM SPECIFICATION
  $$
  spec:
    containers:
      - name: main
        image: /db/data_schema/tutorial_repository/my_echo_service_image:tutorial
        env:
          TEST_FILE_STAGE: source_stage/test_file
        args:
          - read_secret.py
    endpoints:
      - name: read
        port: 8080
  $$
  EXTERNAL_ACCESS_INTEGRATIONS = (google_apis_access_integration);
Logs
Snowflake provides an account-wide event log facility. All logs from your container arrive in a single event table. This includes the STDOUT from containers. A lag exists between the container and the table in the order of minutes.
You can use the RESOURCE_ATTRIBUTES column to identify the source of the log message. This column is a JSON object that includes the container name, database, and schema.
Persistent storage volumes
Volumes are now available for persistent storage in three different types:
- Memory - in memory for that container
- Local - for all containers in a single service instance. Not shared across service instances
- Stage - An internal Snowflake stage (not external) with an SSE encryption set.